Ford-Rangers.com Ranger Forum HomeFord-Rangers.com Ranger Forum Home
Home Recent Topics New posts Search search Menu menu Not logged in - Login | Register

Ford-rangers.com is a discussion forum, a Ranger forum for people who have questions about fixing or modifying
their Ford Rangers or people who just admire their Ranger. Please join and enjoy sharing experiences!

How To: Blinker Mod       #: 253
 Moderated by: NoPower, Mike69, MaDMaXX,
New Topic Reply
 Rate Topic 
 Posted: Sun Nov 26th, 2017 07:49 pm
PM Quote Reply
1st Post
TheArcticWolf1911
Gunslinger


Joined: Sat Nov 4th, 2017
Location: Evansville, Indiana USA
Posts: 426
Name: Cameron ...
Occupation: Process Technician ...
Interests: Firearms & Ammunition, Ford Rangers, electronics ...
Status: 
Offline
Reputation: 
Reputation Points: 426
There's a popular mod that belongs here. The blinker mod.

PSA:giveup:  There appears to be a bit of confusion whether or not this mod will work with LEDs. The short answer is: Yes, it will. I know this because my truck only has halogen fog lights and head lights, all the other bulbs being LEDs. The long answer, however, is: Maybe, it depends. The problem is that this mod depends on polarity. 194s have a peculiar habit that I can't quite describe or understand, but suffice it to say it's this behavior that makes the mod work. LEDs, or Light Emitting Diodes will only conduct and illuminate going one way. The LEDs you need to make this mod work will have extra circuitry inside them to circumvent this problem, allowing it to work no matter which way it's plugged in. Buy non-polarity sensitive LEDs and you will be in good shape.

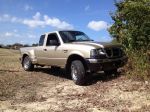
This was one of the first mods to my '99 and it sure adds a bit of cool factor to every truck it's done to. This will work with any Ranger that has a 194/921 corner light and at least one forward turn signal.
Doing some research, it seems that there are several color combinations of wires, so I can't tell you exactly which color wire to cut or solder to, which complicates things just a little. However, I have devised a way to create a method that makes it easy to know which wires are the ones you want.
First, take your headlights and corner lights off. Each generation of Ranger is different, but how to remove these lenses can be found all over the web, so I won't bore you with that.
After these are apart, gather some tools.
-Wire Cutters
-Wire Strippers (auto or manual, I prefer auto)
-Soldering Iron w/ solder (TIP: if the solder isn't flowing easily, use flux to assist the process. Flux cleans corrosion and oxide layers off the copper and allows the solder to quickly flow on easily)
-Heat shrink & quality UL Listed electrical tape. The cheap stuff doesn't last.
-A lighter OR hairdryer/heat gun
-Multi-meter OR test light
 
Now, since each truck will be different for the most part, I unfortunately can't feasibly provide a look at the process on the vehicle. Thankfully, the actual mod itself is dirt simple to do and anyone with these tools and knows how to use them can easily accomplish this.
 
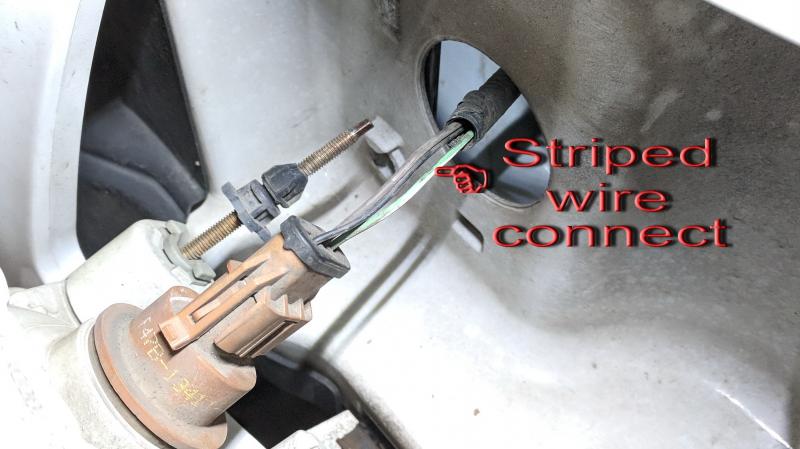
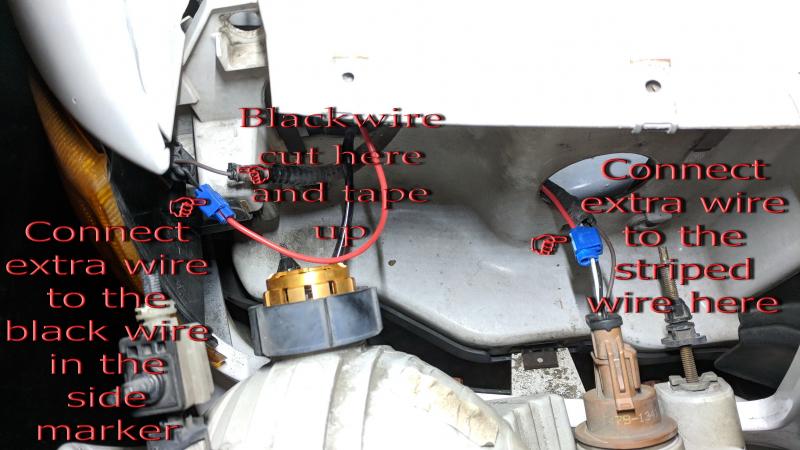
Before we begin, however, we need to understand the goal of this mod, beyond the added function. The ground wire of the 194/921 side marker needs to be cut. The wire on the socket then needs to be brought over to the turn signal wire on its respective side and bridged on. Simple, yes? If you have a wiring diagram for your year model ranger, you can skip the rest of this and do as I just described. For the rest of us, however, here's a way to see what you have.
 
Start by pulling out the bulb in the side marker's socket. You will see two sets of contacts. One side is positive, the other is negative. We need to figure out which is which. Generally speaking, black is ground, but I've seen on a couple occasions where this isn't true. If you have a multi-meter, set it to measure either ohms or continuity. Touch one probe to a grounding terminal (such as the negative battery terminal) or somewhere with bare metal. A wire brush may be useful here.
NOTE: Have all the light switches OFF during this test. Also, try not to short out both sets of contacts. Even though everything should be off, better safe than sorry.
You should find that one of the contacts reads very close to zero ohms resistance. This is the ground wire that needs to be cut.
Don't have a multi-meter? Grab a test light. Clip one end to the positive battery terminal, then probe both sides of the socket until it lights up. When it does, you've found its path to ground.
 
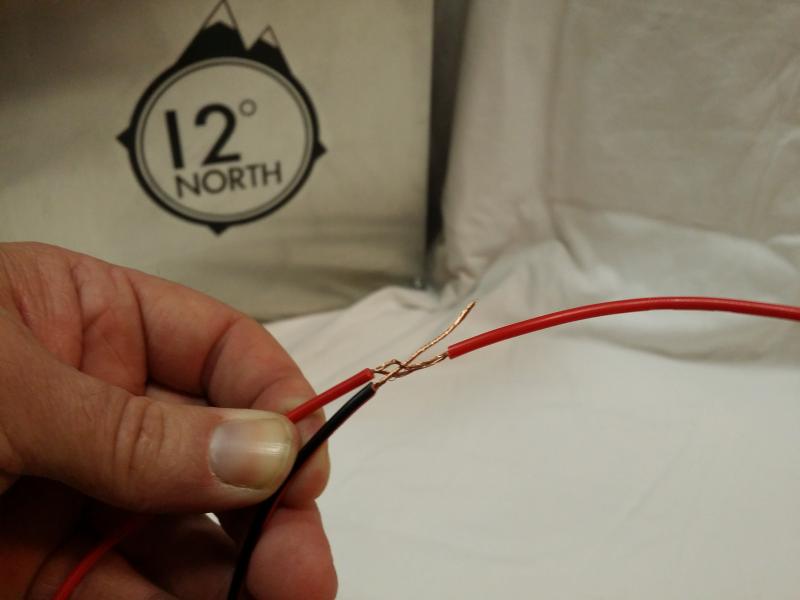
Cut the ground wire and tape up or preferably heat-shrink the end that goes to the truck. Next, strip the end of the wire on the socket and extend it to comfortably reach the turn signal's socket. If yours has multiple turn signals, pick either. It doesn't matter which one.
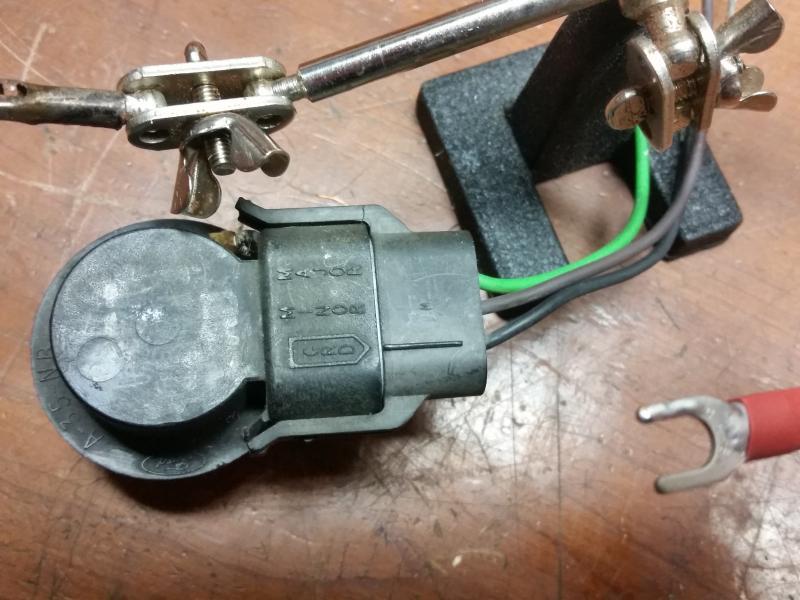
Now, here's where I can actually post a picture to illustrate a point. Turn the socket over and on its bottom you should see three markings. GND, Minor, and Major.
GND means ground, minor is the dim filament (used for running lights) and major is the bright filament, used for turn signals. We want the wire indicated as 'Major'.


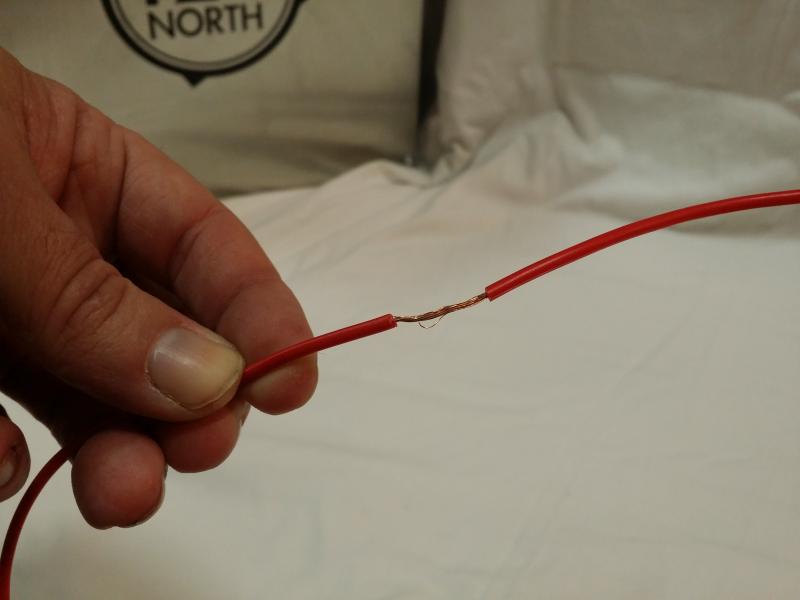
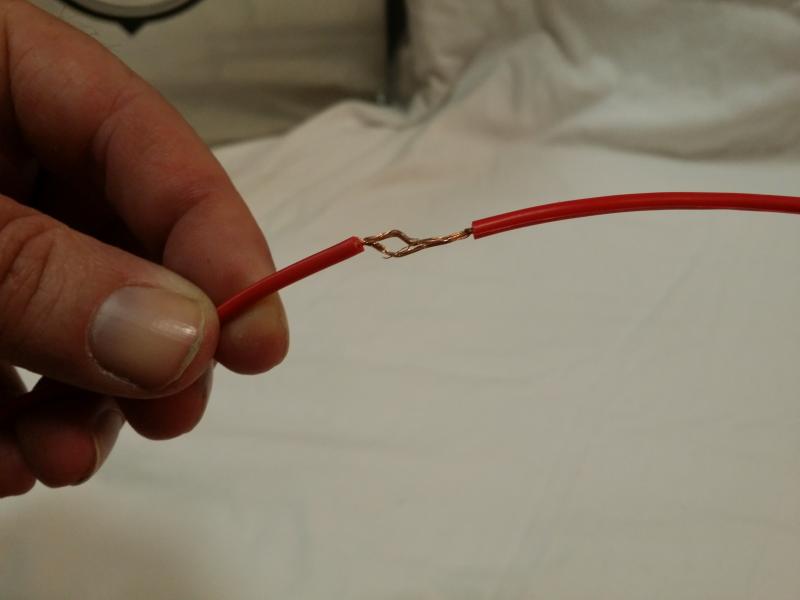
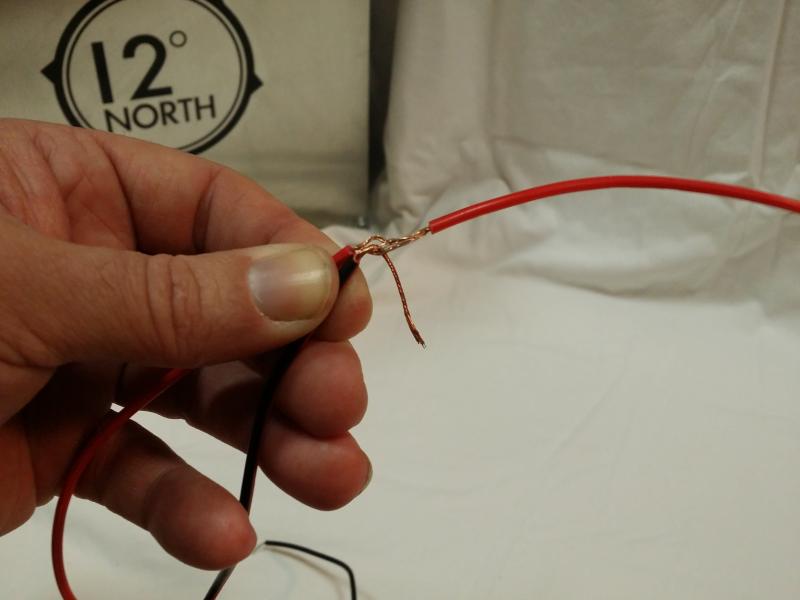
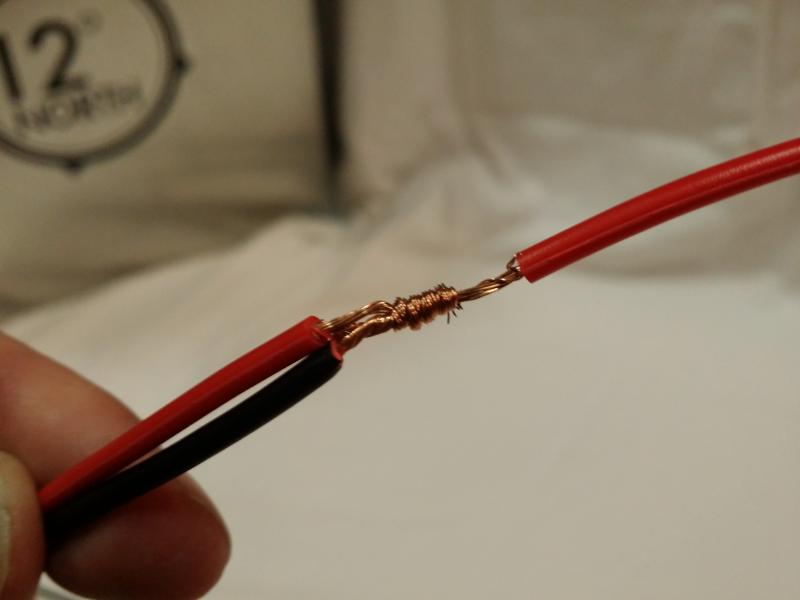
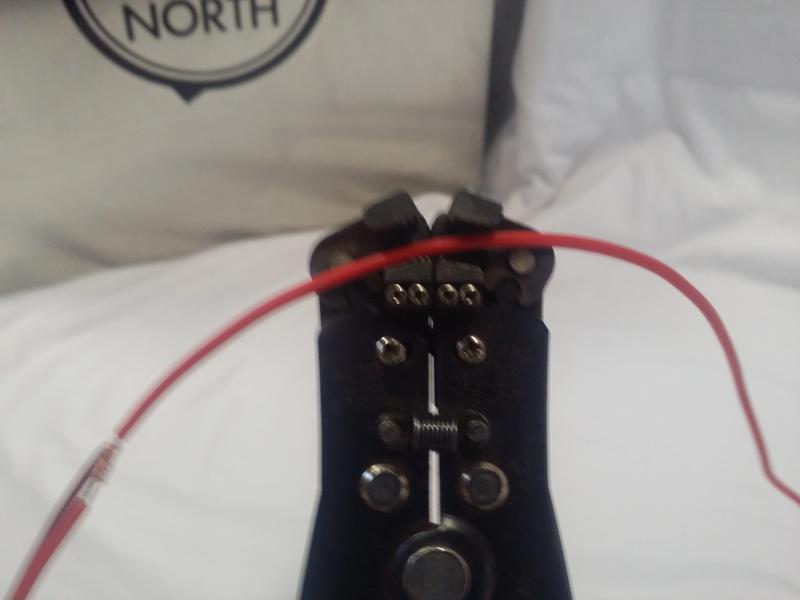
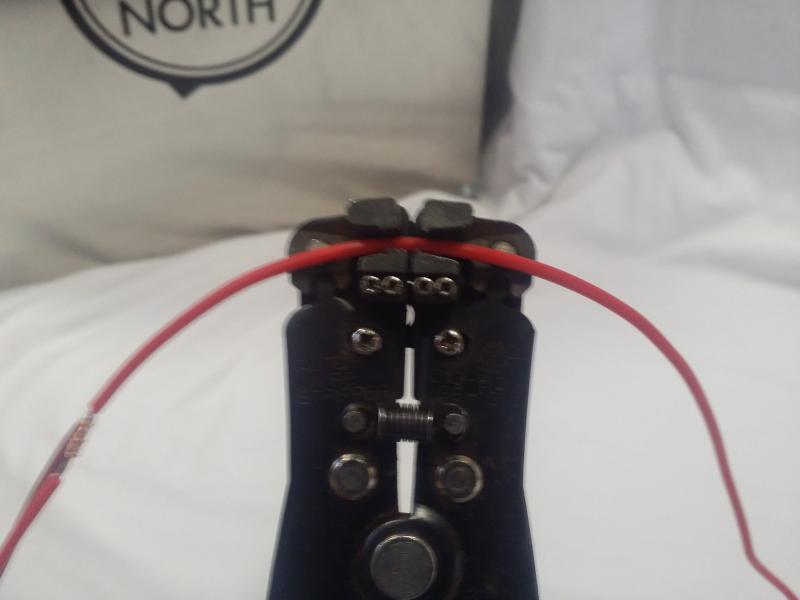
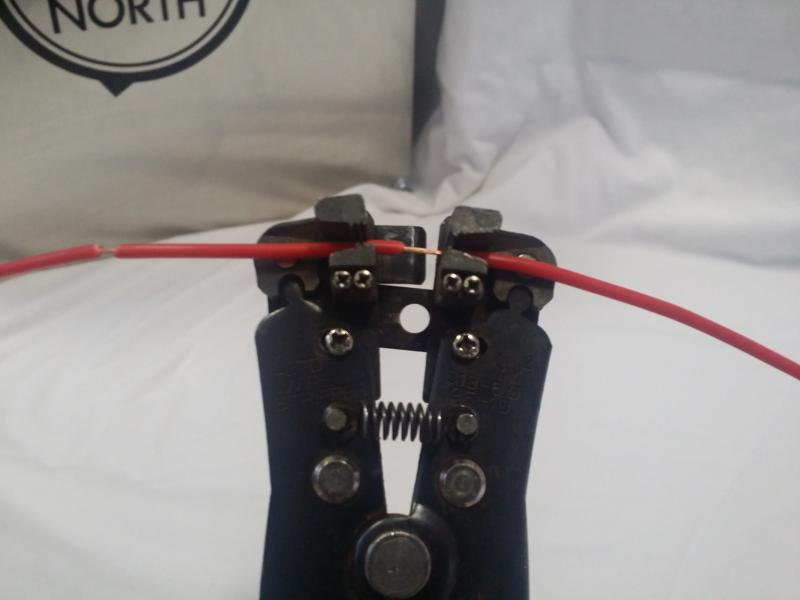
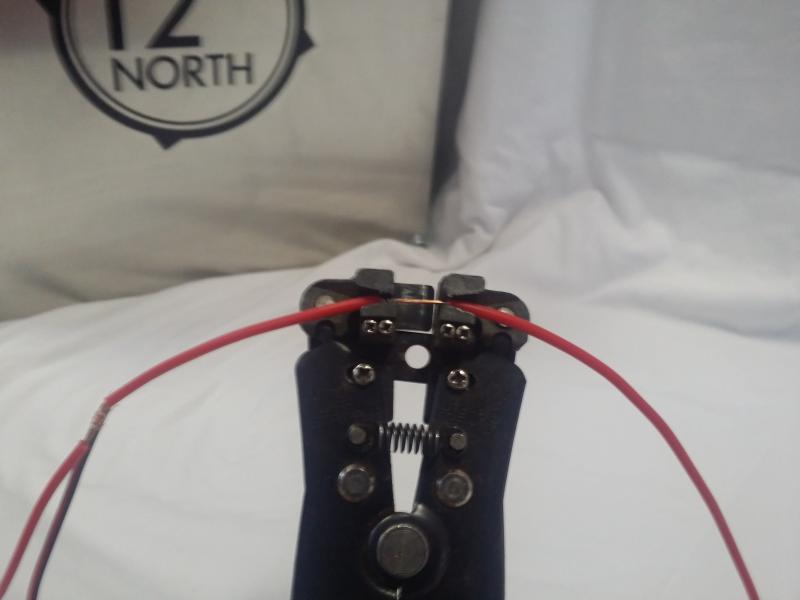
Now, there's two different ways to go about attaching the wire we extended to this turn signal wire. We can cut and strip both ends, twist and solder the two together as shown in the top photo, or alternatively, we can use a set of automatic wire strippers to make a gap in the wire, leaving it intact, and wrap the new wire around it, then solder. I have not soldered the wires in these photos so you can clearly see what's been done. The wires you see being used are scrap pieces being used for demonstration purposes.


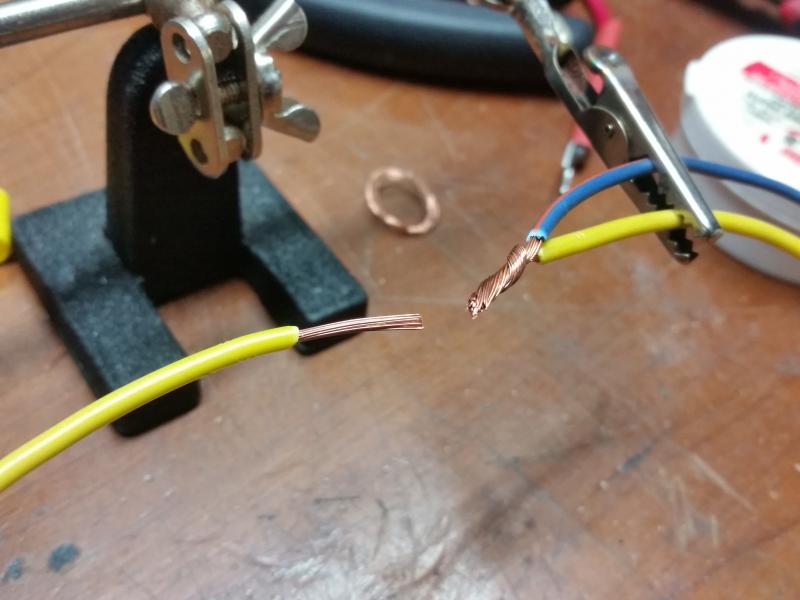
There's a few pros and cons to each.


With the first solution, we can use heat shrink to secure the connections. Heat shrink lasts forever and a day, but we have cut the wire and reconnected it. This isn't necessarily a bad thing, but if the solder joint is bad, then it will break. Ensure the solder joint is nice and strong.
Tip: You know you have enough solder when it's tough to see the individual strands in the wires. If you can clearly make them out, you don't have enough.
With the second method, this leaves the wire intact, but we miss out on being able to utilize our heat shrink. In my experience, tape doesn't cope well with heat and water. I recommend the first method for longevity.
Whichever way you decide on, ensure the connection is secure and it will last.
 
Tip: It's a good idea to disconnect the negative battery terminal and tuck it away when cutting wires and putting them back together again. Doing this eliminates the possibility of shorting something out.


-A quick 'thank you' to user mhoward for catching my grammar mistakes. The difference between what you think you're typing and what you're really typing is amazing sometimes.

Last edited on Sun Nov 26th, 2017 08:10 pm by TheArcticWolf1911


____________________
1999 Ford Ranger XLT - 3.0 V6 4x4 - Loaded (Totaled) 143k. Rest in Peace, Gold Dust.
Back To Top PM Quote Reply

 Posted: Sun Nov 26th, 2017 08:10 pm
PM Quote Reply
2nd Post
mhoward
Hey look ~ they ~ bounce!


Joined: Sun Oct 22nd, 2017
Location: Evansville, USA
Posts: 2736
Name: Michael ...
Occupation: Technology Manager ...
Interests: Trucks / Guitars & Music / Things that go BANG ...
Status: 
Offline
Reputation: 
Reputation Points: 2736
Nice write up, Cameron! :)


____________________
-- Michael

2003 Ranger Edge / Extended Cab / Flareside / 3.0L FLEX / 5r44e Auto / 2WD / 8.8 LS 4:10 / Sonic Blue Pearl

So many mods... so little time...


Back To Top PM Quote Reply

 Posted: Sun Nov 26th, 2017 08:51 pm
PM Quote Reply
3rd Post
12° North Industries
SITE SPONSOR


Joined: Thu Nov 23rd, 2017
Location: Las Vegas, Nevada USA
Posts: 389
Name: 
Occupation: Vehicle Upfitter ...
Interests: The great outdoors, nature, back to basics ...
Status: 
Offline
Reputation: 
Reputation Points: 389
Just as a slight twist [no pun intended] your method of intact wire stripped back and wrapped around can be slightly modified into a full military splice for 12ga-24ga wires.. I would imagine you could to this to a 10 or even an 8ga wire but there are better methods for those gauges.

While the wire is stripped back, a pin tool or even a tip of a test light is used to pierce between the wires and create a "hole" per say [Post pics tomorrow of a job demo] offset of the direction the wire is indented to run to its circuit.

Strip the new wire 0.75"-1.00", threading it through the hole and begin to wrap the wire around the bare wire until you encompass the stripped back portion. In case you stripped back to far, you can trim this excess off if necessary. Then follow up with your solder work.

At this point you can either cover with appropriate sized heat shrink or if you're down to basics; we ALWAYS have a roll of 3m's 33+ electrical tape and proper tape job with a small 4" cable tie around the center of the soldered connection point works very effectively even in cold or hot weather.

Hope that helps further.


[demo pics tomorrow]


____________________
North Industries
Las Vegas, Nevada 89118
Web http://www.12degnorth.com


Back To Top PM Quote Reply

 Posted: Sun Nov 26th, 2017 09:35 pm
PM Quote Reply
4th Post
TheArcticWolf1911
Gunslinger


Joined: Sat Nov 4th, 2017
Location: Evansville, Indiana USA
Posts: 426
Name: Cameron ...
Occupation: Process Technician ...
Interests: Firearms & Ammunition, Ford Rangers, electronics ...
Status: 
Offline
Reputation: 
Reputation Points: 426
I have not heard of that method before, but I like the sound of it. I may give it a try next time I do some wiring.


____________________
1999 Ford Ranger XLT - 3.0 V6 4x4 - Loaded (Totaled) 143k. Rest in Peace, Gold Dust.
Back To Top PM Quote Reply

 Posted: Sun Nov 26th, 2017 09:48 pm
PM Quote Reply
5th Post
mhoward
Hey look ~ they ~ bounce!


Joined: Sun Oct 22nd, 2017
Location: Evansville, USA
Posts: 2736
Name: Michael ...
Occupation: Technology Manager ...
Interests: Trucks / Guitars & Music / Things that go BANG ...
Status: 
Offline
Reputation: 
Reputation Points: 2736
Hmmm... interesting method. Yep, gonna have to try that!


____________________
-- Michael

2003 Ranger Edge / Extended Cab / Flareside / 3.0L FLEX / 5r44e Auto / 2WD / 8.8 LS 4:10 / Sonic Blue Pearl

So many mods... so little time...


Back To Top PM Quote Reply

 Posted: Tue Nov 28th, 2017 11:11 pm
PM Quote Reply
6th Post
12° North Industries
SITE SPONSOR


Joined: Thu Nov 23rd, 2017
Location: Las Vegas, Nevada USA
Posts: 389
Name: 
Occupation: Vehicle Upfitter ...
Interests: The great outdoors, nature, back to basics ...
Status: 
Offline
Reputation: 
Reputation Points: 389
Apologies, I meant to post this up earlier as I promised.

I took the time to break down the simpler aspects of the whats been as long as I've known and taught as the "military splice". The idea behind it is to create a secure splice into an existing circuit without damaging the integrity of the original circuit and that is designed to not work its way lose even when assisted. I personally have used both methods I will show and describe but I prefer the latter one which comprises of using heat shrink. Mostly because when creating harnesses the wires lay down better and are slightly smaller when complete.

The red wire is our original circuit. It can be in a harness or a stand alone situation. The circuit is over emphasized for clarity more than to scale. Generally we don't strip the wire(s) back that far but for the demonstration of the circuit splice, we have.


Using the tip of a test light or some times when de-pinning circuits from connectors I will use the de-pinning tools pointed tip to protrude the wires as to make a loop in the center of the wires.


Next you will take the wire of the circuit you are going to introduce into the splice and thread it through the hole as seen below.


From there you are going to pull the wire up or in this case down and begin to wrap it around the wire. this not only creates a small binding lock mechanism against itself closing the loop but provides strength to the integrity of the tapped in circuit from being pulled out.


The end result should look like this.


Now to finish this as a military splice you should wrap the tape around in a way that adds to the circuits protection and security of the insulation of the circuit. Tape is meant to insulate wires and NOT USED to hold the circuit together initially. Then the use of a 4" cable tie to securely keep the tape from coming undone long term by wrapping it around the taped areas center, don't forget to trim the excess off the cable tie and discard it.

Depending on the take out, amount of wires in the circuit(s), or design of the harness itself will depend on how you finish the circuit. Ideally this is meant to maintain harness integrity because for a period of time if you had an issue, took your car to the dealer and they found "T-taps" or "Scotch Locks", they would deem the harness integrity compromised and not cover electrical issues under warranty regardless of the offending devices removal or not.

With the military splices we were able to meet the criteria for the dealerships and manufacture warranty reps because as the most times "Proper" T-Taps and Scotch locks used wouldn't necessarily pierce and cut through the wires. However, many shops being cheap or shop managers more concerned with saving $50 in their parts orders would only order red (sm), Blue (Med), sized connectors and maybe just the Blue T-tap male connectors rather than the 3 sizes needed to make proper circuits. making it easier for smaller gauge wires to pull out or or larger wires cut down so only a few of the wires fit into the too small male connector vibrated lose and pulled out.

Personally, I will take my splices as such and make them more permanent when possible by soldering them before taping them and if and whenever possible the use of heat shrink is used.


Hope this explains the process better and helps you on your next project.


____________________
North Industries
Las Vegas, Nevada 89118
Web http://www.12degnorth.com


Back To Top PM Quote Reply

 Posted: Wed Nov 29th, 2017 08:11 am
PM Quote Reply
7th Post
mhoward
Hey look ~ they ~ bounce!


Joined: Sun Oct 22nd, 2017
Location: Evansville, USA
Posts: 2736
Name: Michael ...
Occupation: Technology Manager ...
Interests: Trucks / Guitars & Music / Things that go BANG ...
Status: 
Offline
Reputation: 
Reputation Points: 2736
That is a sweet connection! I'm adding this to my "toolbox", so to speak. I can see where this would also keep the wires tight together while soldering. Nice... thanks for the lesson! :)


____________________
-- Michael

2003 Ranger Edge / Extended Cab / Flareside / 3.0L FLEX / 5r44e Auto / 2WD / 8.8 LS 4:10 / Sonic Blue Pearl

So many mods... so little time...


Back To Top PM Quote Reply

 Posted: Wed Nov 29th, 2017 10:35 am
PM Quote Reply
8th Post
Ordinary Biker
Member


Joined: Sat Oct 21st, 2017
Location: Denver, Colorado USA
Posts: 469
Name: 
Occupation: 
Interests: 
Status: 
Offline
Reputation: 
Reputation Points: 469
My only question is how did you remove the insulation from that wire in the middle of it's run? I have done this with a utility knife, but this looks far neater.

Back To Top PM Quote Reply

 Posted: Wed Nov 29th, 2017 10:37 am
PM Quote Reply
9th Post
mhoward
Hey look ~ they ~ bounce!


Joined: Sun Oct 22nd, 2017
Location: Evansville, USA
Posts: 2736
Name: Michael ...
Occupation: Technology Manager ...
Interests: Trucks / Guitars & Music / Things that go BANG ...
Status: 
Offline
Reputation: 
Reputation Points: 2736
Automatic wire strippers is how I do it. Nice and neat, no cut wire strands! :)


____________________
-- Michael

2003 Ranger Edge / Extended Cab / Flareside / 3.0L FLEX / 5r44e Auto / 2WD / 8.8 LS 4:10 / Sonic Blue Pearl

So many mods... so little time...


Back To Top PM Quote Reply

 Posted: Wed Nov 29th, 2017 04:59 pm
PM Quote Reply
10th Post
12° North Industries
SITE SPONSOR


Joined: Thu Nov 23rd, 2017
Location: Las Vegas, Nevada USA
Posts: 389
Name: 
Occupation: Vehicle Upfitter ...
Interests: The great outdoors, nature, back to basics ...
Status: 
Offline
Reputation: 
Reputation Points: 389
Ordinary Biker wrote: My only question is how did you remove the insulation from that wire in the middle of it's run? I have done this with a utility knife, but this looks far neater.

Very correct, sometimes when doing multiple wires in a harness or getting into an existing harness the aid of a tool always prevails when its the right tool.

The use of the automatic wire-stripper comes in handy.. A tool easily picked up in several variations although we don't recommend some of the others we've seen and tried. They either are easily damaged, mis-allignment issues which shred wires, the bulkiness of them etc..

We prefer this type for the easy use from 24ga to generally 12ga wires, some times a 10 gauge if its not too soft of an insulation.

Klein Tools 11061 Self-Adjusting Wire Stripper and Cutter

AND/OR -

Klein Tools 11055 Wire Stripper and Cutter

will be all the stripping tools you will need for 98% of everything you are likely to touch as a DIY'er. Usually I also recommend for the general purpose of crimpers these as well;

Klein Tools 1005 Crimping and Cutting Tool for Insulated and Non-Insulated Terminals, 9-3/4-Inch


I like these the best for just about everything especially while under a dash because the jaws are so thin and setup in a way that allow you to get a small section of wire pulled from the main harness and these slide right in side ways and strip wires without damage.


Squeeze the handles slightly to tighten them on a wire.


A single pull of the strippers


A double pull if you needed to have a bit more length to play with.


Glad to contribute fellas oh.. and and to the lady or two on here.


____________________
North Industries
Las Vegas, Nevada 89118
Web http://www.12degnorth.com


Back To Top PM Quote Reply

 Posted: Wed Nov 29th, 2017 05:13 pm
PM Quote Reply
11th Post
MaDMaXX

Hails from the land of rust!


Joined: Sat Oct 21st, 2017
Location: Oregon USA
Posts: 1368
Name: 
Occupation: 
Interests: Motorsport/Firearms/IT ...
Status: 
Offline
Reputation: 
Reputation Points: 1368
How are you choosing a single/double pull with those?


____________________
2002 - 3.0 - 4x2 - Edge

Upgrades/Maintenance log
Back To Top PM Quote Reply

 Posted: Wed Nov 29th, 2017 06:45 pm
PM Quote Reply
12th Post
Tsquare
Member


Joined: Fri Nov 10th, 2017
Location: Suwanee, Georgia USA
Posts: 1540
Name: 
Occupation: Controlled Insanity ...
Interests: 
Status: 
Offline
Reputation: 
Reputation Points: 1540
12° North Industries wrote: I took the time to break down the simpler aspects of the whats been as long as I've known and taught as the "military splice". The idea behind it is to create a secure splice into an existing circuit without damaging the integrity of the original circuit and that is designed to not work its way lose even when assisted. 
  In the Air Force we called that an "EOD splice". They would wire up their explosive charges with those types of splices but they would not solder anything.


____________________
Tony
NE ATL
'04 XLT regular cab 3.slo stepside
Semi retirement
Back To Top PM Quote Reply

 Posted: Wed Nov 29th, 2017 07:08 pm
PM Quote Reply
13th Post
mhoward
Hey look ~ they ~ bounce!


Joined: Sun Oct 22nd, 2017
Location: Evansville, USA
Posts: 2736
Name: Michael ...
Occupation: Technology Manager ...
Interests: Trucks / Guitars & Music / Things that go BANG ...
Status: 
Offline
Reputation: 
Reputation Points: 2736
Those are nice tools. My son has a pair of the automatics very similar to those. Not sure which brand they are though.


____________________
-- Michael

2003 Ranger Edge / Extended Cab / Flareside / 3.0L FLEX / 5r44e Auto / 2WD / 8.8 LS 4:10 / Sonic Blue Pearl

So many mods... so little time...


Back To Top PM Quote Reply

 Posted: Wed Nov 29th, 2017 08:49 pm
PM Quote Reply
14th Post
buggman

Do Not Touch The Trim!


Joined: Thu Oct 19th, 2017
Location: USA
Posts: 230
Name: 
Occupation: 
Interests: 
Status: 
Offline
Reputation: 
Reputation Points: 230
i need to dig into this mod myself, i've had a lot of guys asking about using led's with the blinker mod. sometimes it works, sometimes not, i think it has to do with the way the led's are made.
some have a built in bridge rectifier (4 diodes that normally turn AC into DC short explination) that will generelly allow the mod to work correctly.

i need to do some actual testing myself to see what's going on & such :-)


____________________
1996 XLT Supercab 4.0L 4x4
Lots of Explorer parts & tons of my custom mods.
Back To Top PM Quote Reply

 Posted: Wed Nov 29th, 2017 09:07 pm
PM Quote Reply
15th Post
MaDMaXX

Hails from the land of rust!


Joined: Sat Oct 21st, 2017
Location: Oregon USA
Posts: 1368
Name: 
Occupation: 
Interests: Motorsport/Firearms/IT ...
Status: 
Offline
Reputation: 
Reputation Points: 1368
If i can find the time, i *will* be doing this mod, i have LED's in the sidelights and just regular bulbs (Currently) for the indicators, but, yeah, time....


____________________
2002 - 3.0 - 4x2 - Edge

Upgrades/Maintenance log
Back To Top PM Quote Reply

 Posted: Wed Nov 29th, 2017 11:04 pm
PM Quote Reply
16th Post
12° North Industries
SITE SPONSOR


Joined: Thu Nov 23rd, 2017
Location: Las Vegas, Nevada USA
Posts: 389
Name: 
Occupation: Vehicle Upfitter ...
Interests: The great outdoors, nature, back to basics ...
Status: 
Offline
Reputation: 
Reputation Points: 389
MaDMaXX wrote: How are you choosing a single/double pull with those?

Simple manner of allowing the strippers to reset themselves back to the open position, setting the left side which technically does not move if you watch the action of the stripper. Pulling them closed to set lock on the left side and pull a second time. Generally this may be needed once you get to 14ga wires down or overly difficult types of wire insulation's.


____________________
North Industries
Las Vegas, Nevada 89118
Web http://www.12degnorth.com


Back To Top PM Quote Reply

 Posted: Wed Nov 29th, 2017 11:07 pm
PM Quote Reply
17th Post
12° North Industries
SITE SPONSOR


Joined: Thu Nov 23rd, 2017
Location: Las Vegas, Nevada USA
Posts: 389
Name: 
Occupation: Vehicle Upfitter ...
Interests: The great outdoors, nature, back to basics ...
Status: 
Offline
Reputation: 
Reputation Points: 389
Tsquare wrote: 12° North Industries wrote: I took the time to break down the simpler aspects of the whats been as long as I've known and taught as the "military splice". The idea behind it is to create a secure splice into an existing circuit without damaging the integrity of the original circuit and that is designed to not work its way lose even when assisted. 
  In the Air Force we called that an "EOD splice". They would wire up their explosive charges with those types of splices but they would not solder anything.


I would take the position that would be in case a wire was yanked or pulled on accidentally the probability of connection was still high to complete the mission at hand. And the USAF works with Explosives outside of armament or aircraft weapons? Interesting.


____________________
North Industries
Las Vegas, Nevada 89118
Web http://www.12degnorth.com


Back To Top PM Quote Reply

 Posted: Wed Nov 29th, 2017 11:12 pm
PM Quote Reply
18th Post
12° North Industries
SITE SPONSOR


Joined: Thu Nov 23rd, 2017
Location: Las Vegas, Nevada USA
Posts: 389
Name: 
Occupation: Vehicle Upfitter ...
Interests: The great outdoors, nature, back to basics ...
Status: 
Offline
Reputation: 
Reputation Points: 389
mhoward wrote: Those are nice tools. My son has a pair of the automatics very similar to those. Not sure which brand they are though.

Klein has become a pretty reputable company over the years and deals with a host of products in multiple on top of multiple industries. I have come to wonder why they haven't joined the ranks of mobile distribution like; Matco tools, MAC, Snap-On, Cornwell, SK tools and the like. They must have a reason of why they havent entered that arena.

As for us, the candy shops on wheels like MAC and Snap-on wrestle some cash from these hands and other techs here.


____________________
North Industries
Las Vegas, Nevada 89118
Web http://www.12degnorth.com


Back To Top PM Quote Reply

 Posted: Thu Nov 30th, 2017 12:40 pm
PM Quote Reply
19th Post
Ordinary Biker
Member


Joined: Sat Oct 21st, 2017
Location: Denver, Colorado USA
Posts: 469
Name: 
Occupation: 
Interests: 
Status: 
Offline
Reputation: 
Reputation Points: 469
Klein makes some great tools. The seem to aim to the electrical world. When my son was working as an apprentice electrician, he was a total slut for Klein. Now he is doing other stuff, it is Milwaukee...

I may pick up the top one you recommended. I may be mostly done with mods, but I like having the tools should I choose to do something.

Back To Top PM Quote Reply

 Posted: Thu Nov 30th, 2017 01:01 pm
PM Quote Reply
20th Post
mhoward
Hey look ~ they ~ bounce!


Joined: Sun Oct 22nd, 2017
Location: Evansville, USA
Posts: 2736
Name: Michael ...
Occupation: Technology Manager ...
Interests: Trucks / Guitars & Music / Things that go BANG ...
Status: 
Offline
Reputation: 
Reputation Points: 2736
Ordinary Biker wrote: I may be mostly done with mods, but I like having the tools should I choose to do something.

No Doug!!!  Say it ain't so!!!  AAAgggghhhhh!


____________________
-- Michael

2003 Ranger Edge / Extended Cab / Flareside / 3.0L FLEX / 5r44e Auto / 2WD / 8.8 LS 4:10 / Sonic Blue Pearl

So many mods... so little time...


Back To Top PM Quote Reply

 Posted: Wed Jan 3rd, 2018 10:20 pm
PM Quote Reply
21st Post
MaDMaXX

Hails from the land of rust!


Joined: Sat Oct 21st, 2017
Location: Oregon USA
Posts: 1368
Name: 
Occupation: 
Interests: Motorsport/Firearms/IT ...
Status: 
Offline
Reputation: 
Reputation Points: 1368
I wanted to add some 'practical' pictures to this guide as well as using the alternate (easier/faster) connection method.


____________________
2002 - 3.0 - 4x2 - Edge

Upgrades/Maintenance log
Back To Top PM Quote Reply

Current time is 07:57 pm Top  

Ford-Rangers.com Ranger Forum > Tech Section > How-To Section > How To: Blinker Mod

Users viewing this topic


PHP Version: 8.2.28
Server version: 10.6.22-MariaDB
UltraBB 2.01.01 Copyright © 2008-2025 Jim & Chris
Page processed in 0.0799 seconds (40% database + 60% PHP). 103 queries executed.