Ford-Rangers.com Ranger Forum HomeFord-Rangers.com Ranger Forum Home
Home Recent Topics New posts Search search Menu menu Not logged in - Login | Register
Ford-Rangers.com Ranger Forum > Tech Section > How-To Section > How To: Gauge Cluster Color Swap (By San

Ford-rangers.com is a discussion forum, a Ranger forum for people who have questions about fixing or modifying
their Ford Rangers or people who just admire their Ranger. Please join and enjoy sharing experiences!

How To: Gauge Cluster Color Swap (By San       #: 258
 Moderated by: NoPower, Mike69, MaDMaXX, Page:    1  2  Next Page Last Page  
New Topic Reply
 Rate Topic 
 Posted: Sun Nov 26th, 2017 11:27 pm
PM Quote Reply
1st Post
TheArcticWolf1911
Gunslinger


Joined: Sat Nov 4th, 2017
Location: Evansville, Indiana USA
Posts: 426
Name: Cameron ...
Occupation: Process Technician ...
Interests: Firearms & Ammunition, Ford Rangers, electronics ...
Status: 
Offline
Reputation: 
Reputation Points: 426
Are you tired of that ugly, dingy green dash? Do you want a different color, but aren't sure how to do it?


PSA:giveup :Buy quality LEDs. The 194s you get from china are just garbage. I don't like trashing products, but there's nothing good to say about them for automotive purposes. Color quality isn't all that great, viewing angle is just OK, but nothing stellar, and they don't last six months. Literally. Buy quality LEDs. I highly recommend those from SuperBrightLEDs.com. Not a sponsor, wasn't paid to type that. Just a happy customer.
Tip: Average 194 brightness is 25-30 lumens. You can learn more about LEDs in the how to linked here. (Click here.)

 
Well, get your tools because I'm going to show you how to do this. Here's what you need.
-1/4 socket set and ratchet
-1000 grit wet or dry sand paper
-Six new LEDs in the color you want.
-a bucket with water or spray bottle
-a gps
-a day.
-a friend.
-a plastic fork (metal will damage components)
-masking tape
Before we begin, have a dedicated GPS on hand. We will be pulling needles off the gauges and they are not keyed. Also, take a picture of the gauge cluster with everything warmed up and a full tank of gas. This will help you position the needles back where they need to go.
First off, we need to disassemble the dash to gain access to the gauge cluster itself. A youtuber by the name of ChrisFix has an excellent video showing this process, so give his video a watch.
(Linky)
Now that we've disassembled the dash, we need to go deeper. Grab the appropriate socket and remove the gold screws holding the lens onto the cluster and set aside.
Tip: Clean the lens while you have it out. There is no better time to do this.
Take your plastic fork and pull the needles off. This may require some force.
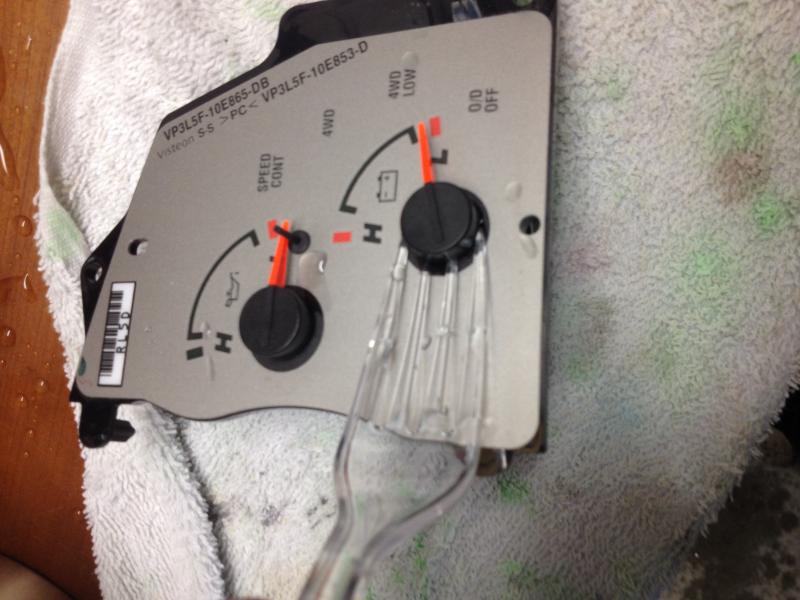
Now, the faces are sonic welded on in a couple places. Be patient and peel slowly, or risk ripping the face.
On the back of the face, you'll notice a white layer covers the parts where lines shine through. Mask off what you don't wish to sand, using an overhead light or flashlight to help you.
Next, grab your 1000 grit sandpaper and get it and the face nice and wet. You will go nowhere in a hurry without the water. Start sanding away at the colored layer until it disappears completely. You should see absolutely no color when looking at the front of the face with a light behind it. This does not take long at all.
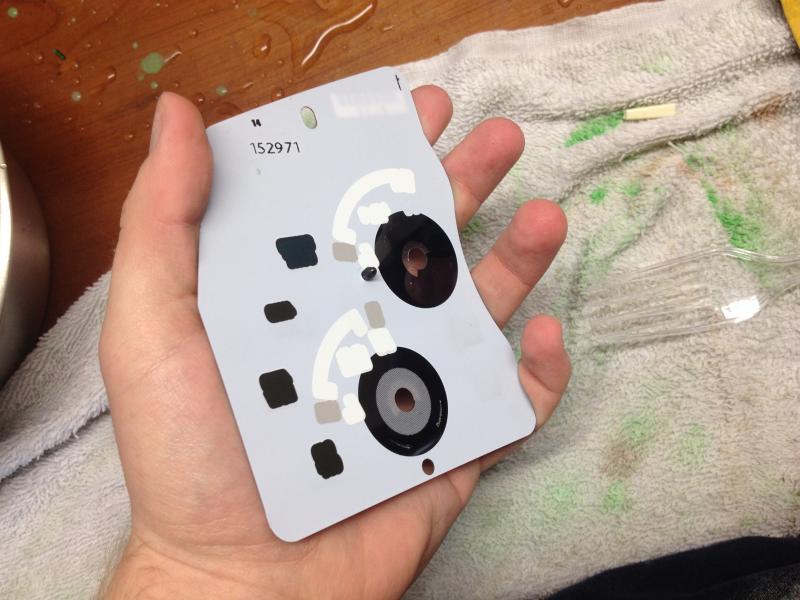
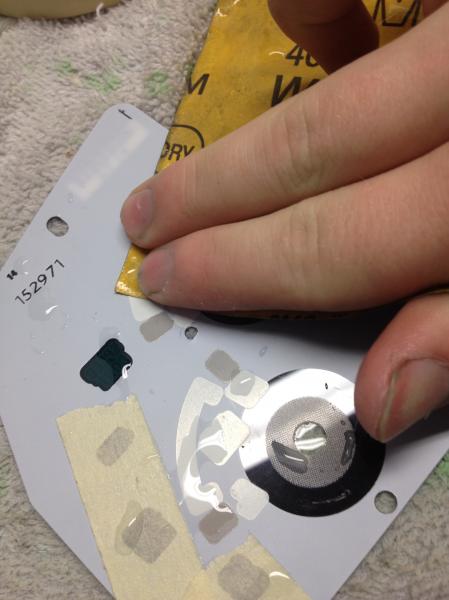
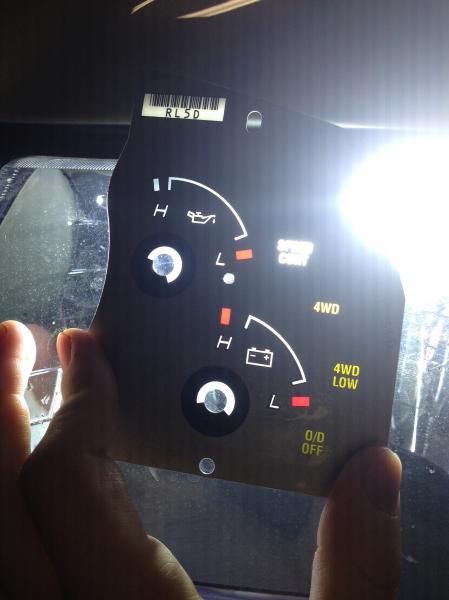
When you're done, peel the tape away and dry them off.
Replace the six 194 bulbs with the LEDs of your choice. I have chosen blue. Before reassembling the cluster, plug it back into the truck temporarily and turn the parking lights on as you would normally to confirm all six bulbs light up. If one does not, flip it around 180 degrees and try again. LEDs are polarized, and not all of them contain extra circuitry to circumvent this behavior. The ones I bought do contain this feature, which makes the job easier.
Take the cluster back out and lay the faces on top where they should go. Use masking tape to hold them on, but do not reinstall the lens just yet. Take the cluster back out to the truck with the needles and begin the 'fun' part.
Start with the fuel, battery, and temperature needles. Turn the key on and put them where you think they should go. Turn the key off and turn it back on. Don't start the truck just yet. Don't be discouraged if they move away from where you put them, this is normal. Remove and readjust as necessary until they stay where you put them.
Now, start the truck and place the RPM needle on. Having a scan tool to tell you how fast the engine is spinning is a big help, here. Otherwise, use your 'spiritual connection' that we all have to our pride and joy to guess about where it usually is. This is where that picture we took earlier will help, being mindful of the difference between cold idle and warm idle speeds. Rev the engine a little to get the needle to move. It should return to where you put it. If not, remove and try again.
A similar process can be used for the oil pressure gauge needle, except starting and stopping the engine to test it rather than revving the engine.
For this next part, you need a fairly long straight road with little traffic. Please, be smart and don't put others at risk while doing this, please.
If desired, remove the instrument cluster bezel entirely. Instead of disconnecting the plugs from the switches, remove the switches from the bezel. The cruise control lamp runs through one or two of these switches and will not operate without them.
Get on your stretch of road with your friend holding the GPS. Get the truck up to around 25-35 and set the cruise control if you have it. At this time, let your friend take the wheel to keep the truck straight while you focus on getting the needle on correctly. Increase or reduce speed then return to the speed you were at while installing the needle. The GPS speed should match the speedometer's needle. If it does, go home and ensure the rest of the needles still say what they should. If they do, proceed.
Remove the gauge cluster again while being careful not to touch the needles. Lay it flat on the bench, gauge side up, and install the gauge cluster's lens. If you've placed the tape optimally, you don't have to remove it to keep it out of view.
With the cluster put back together, check one last time that everything still works as it should. If it does, reassemble the dash and  bask in the glory that is your freshly upgraded cluster!
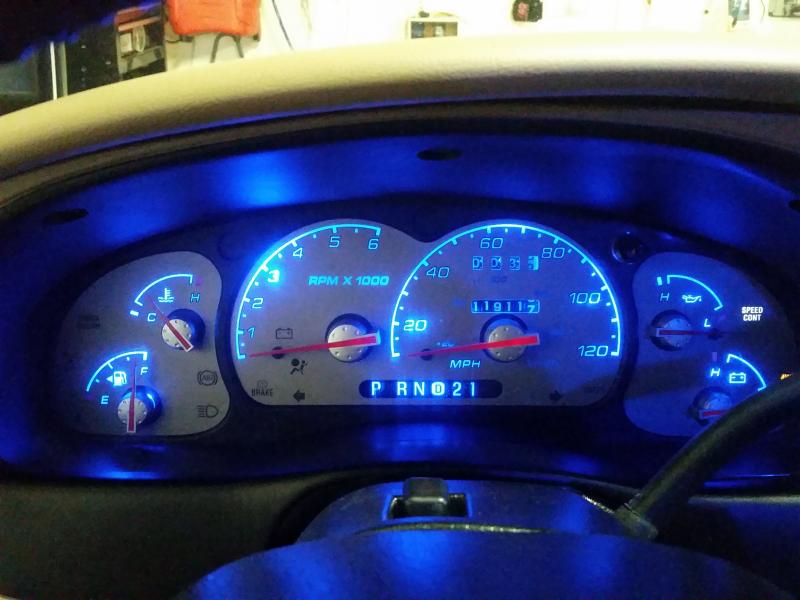
Last edited on Sun Nov 26th, 2017 11:44 pm by TheArcticWolf1911


____________________
1999 Ford Ranger XLT - 3.0 V6 4x4 - Loaded (Totaled) 143k. Rest in Peace, Gold Dust.
Back To Top PM Quote Reply

 Posted: Mon Nov 27th, 2017 01:35 am
PM Quote Reply
2nd Post
buggman

Do Not Touch The Trim!


Joined: Thu Oct 19th, 2017
Location: USA
Posts: 230
Name: 
Occupation: 
Interests: 
Status: 
Offline
Reputation: 
Reputation Points: 230
One thing to note, in my experience when using colored led's with orange/red needles, they have a tendency to be a bit dim.

I always recommend doing all the steps mentioned here but adding an additional bit... after all the color filtering has been removed, I mask around the areas off that I want to change colors & spray DupliColor MetalCast spray paint.
It comes in several colors & it translucent which will allow the light from white led's to really brighten things up. As a bonus, you can control the color depth by the number of coats of paint you spray on.
Using the white led's will also illuminate any color needles without any issues.

(don't forget your buggman led's lol)


____________________
1996 XLT Supercab 4.0L 4x4
Lots of Explorer parts & tons of my custom mods.
Back To Top PM Quote Reply

 Posted: Mon Nov 27th, 2017 02:27 am
PM Quote Reply
3rd Post
TheArcticWolf1911
Gunslinger


Joined: Sat Nov 4th, 2017
Location: Evansville, Indiana USA
Posts: 426
Name: Cameron ...
Occupation: Process Technician ...
Interests: Firearms & Ammunition, Ford Rangers, electronics ...
Status: 
Offline
Reputation: 
Reputation Points: 426
I personally haven't tried any method like that, so I can't comment on it, but I will admit (as you can probably tell) that the needles don't glow very well. If I had blue needles, on the other hand (or even white), that would be a different story. So, you've got me there. Maybe some day I'll try that on a junk cluster and see what I get then do a write up on it, that is if you don't beat me to it.


____________________
1999 Ford Ranger XLT - 3.0 V6 4x4 - Loaded (Totaled) 143k. Rest in Peace, Gold Dust.
Back To Top PM Quote Reply

 Posted: Mon Nov 27th, 2017 05:56 am
PM Quote Reply
4th Post
JAMMAN

Owns A Torsen


Joined: Mon Sep 18th, 2017
Location: Grove City, Ohio USA
Posts: 6436
Name: Jim ...
Occupation: 5 axis cnc programmer ...
Interests: RBV's ...
Status: 
Offline
Reputation: 
Reputation Points: 6436
If I ever finish my cluster light tester I'll be able to post the back of a cluster with all the positive sides marked.

TAW, thanks for posting this I always wondered if you could indeed take the color away! Nice to have choices. I have a native blue cluster (from a 97 mountaineer) I will be offing eventually, after I get my tester 100% built and stuff LED's in it. I'm a green guy myself.

And 2 good things about Buggman LED's... they are already marked positive and negative AND you get a cool sticker :)


____________________
00 XLT 4WD RCSB 3.GO! Jalapeño
01 XLT 2WD RC Steppie 3.0 auto Silver
The future belongs to those who show up.
Back To Top PM Quote Reply

 Posted: Mon Nov 27th, 2017 08:55 am
PM Quote Reply
5th Post
Kealel
Certified Ranger Nutjob


Joined: Sat Oct 21st, 2017
Posts: 174
Name: Keegan ...
Occupation: Engineer ...
Interests: Rangers. Duh. Also Robots. ...
Status: 
Offline
Reputation: 
Reputation Points: 174
You mean like this? (Picture stolen from the Explorer forums)

JAMMAN
wrote:
If I ever finish my cluster light tester I'll be able to post the back of a cluster with all the positive sides marked.

TAW, thanks for posting this I always wondered if you could indeed take the color away! Nice to have choices. I have a native blue cluster (from a 97 mountaineer) I will be offing eventually, after I get my tester 100% built and stuff LED's in it. I'm a green guy myself.

And 2 good things about Buggman LED's... they are already marked positive and negative AND you get a cool sticker :)


____________________
Past:
Baby Girl: 2006 XL 3.0 ~RIP~ 1/26/2015

Current:
Penguin: 2002 XLT 3.SLOW 4x2

River/Kaitlyn: 2003 EDGE 3.GO! 4x2... For now?
~Aspiring Mini Level 2~

The Duck: 2003 Ford Ranger FX4 Level 2 - TWIN STICKS!

Back To Top PM Quote Reply

 Posted: Mon Nov 27th, 2017 09:09 am
PM Quote Reply
6th Post
JAMMAN

Owns A Torsen


Joined: Mon Sep 18th, 2017
Location: Grove City, Ohio USA
Posts: 6436
Name: Jim ...
Occupation: 5 axis cnc programmer ...
Interests: RBV's ...
Status: 
Offline
Reputation: 
Reputation Points: 6436
Yup only I'm going to mark them all, and I have everything ready for a switch box with plugs to check everything that is a light.

During research I found that some of the lights are ground to activate and some are positive to activate.

Once the circuit board is on the mill I'll start an official thread I have posted some pictures.


____________________
00 XLT 4WD RCSB 3.GO! Jalapeño
01 XLT 2WD RC Steppie 3.0 auto Silver
The future belongs to those who show up.
Back To Top PM Quote Reply

 Posted: Mon Nov 27th, 2017 02:15 pm
PM Quote Reply
7th Post
MaDMaXX

Hails from the land of rust!


Joined: Sat Oct 21st, 2017
Location: Oregon USA
Posts: 1368
Name: 
Occupation: 
Interests: Motorsport/Firearms/IT ...
Status: 
Offline
Reputation: 
Reputation Points: 1368
Still not seeing where i can browse Bugmans led's as single items ;)


____________________
2002 - 3.0 - 4x2 - Edge

Upgrades/Maintenance log
Back To Top PM Quote Reply

 Posted: Mon Nov 27th, 2017 02:18 pm
PM Quote Reply
8th Post
JAMMAN

Owns A Torsen


Joined: Mon Sep 18th, 2017
Location: Grove City, Ohio USA
Posts: 6436
Name: Jim ...
Occupation: 5 axis cnc programmer ...
Interests: RBV's ...
Status: 
Offline
Reputation: 
Reputation Points: 6436
Yeah I've been meaning to talk to him about that. Again :)


____________________
00 XLT 4WD RCSB 3.GO! Jalapeño
01 XLT 2WD RC Steppie 3.0 auto Silver
The future belongs to those who show up.
Back To Top PM Quote Reply

 Posted: Mon Nov 27th, 2017 03:00 pm
PM Quote Reply
9th Post
buggman

Do Not Touch The Trim!


Joined: Thu Oct 19th, 2017
Location: USA
Posts: 230
Name: 
Occupation: 
Interests: 
Status: 
Offline
Reputation: 
Reputation Points: 230
lol, check out my buggman mods youtube channel, i need to get footage of more of my projects.
i've got some pics in my gallery here, but i need to get more goodies added there too.


____________________
1996 XLT Supercab 4.0L 4x4
Lots of Explorer parts & tons of my custom mods.
Back To Top PM Quote Reply

 Posted: Mon Nov 27th, 2017 03:10 pm
PM Quote Reply
10th Post
MaDMaXX

Hails from the land of rust!


Joined: Sat Oct 21st, 2017
Location: Oregon USA
Posts: 1368
Name: 
Occupation: 
Interests: Motorsport/Firearms/IT ...
Status: 
Offline
Reputation: 
Reputation Points: 1368
Need bulb options, details and prices. I've seen some of your solutions, which are cool, but i just need bulbs now.

Like the 3157 bulbs talked about in the other thread.


____________________
2002 - 3.0 - 4x2 - Edge

Upgrades/Maintenance log
Back To Top PM Quote Reply

 Posted: Mon Nov 27th, 2017 03:14 pm
PM Quote Reply
11th Post
mhoward
Hey look ~ they ~ bounce!


Joined: Sun Oct 22nd, 2017
Location: Evansville, USA
Posts: 2736
Name: Michael ...
Occupation: Technology Manager ...
Interests: Trucks / Guitars & Music / Things that go BANG ...
Status: 
Offline
Reputation: 
Reputation Points: 2736
On the subject of colorizing; John Griggs (CarDomain) used stained glass paint on a cluster. Looked pretty rough on the backside, but the end result you actually see looked really good (if you like red gauges). Also, colored gel sheets like they used for stage lighting back in the day. You can cut out pieces to color the various parts of the cluster and stick them on with brush-on gel superglue. Obviously, lots of ways to skin this cat! :)

I would be interested to hear other members' ideas for getting the color results they desire.


____________________
-- Michael

2003 Ranger Edge / Extended Cab / Flareside / 3.0L FLEX / 5r44e Auto / 2WD / 8.8 LS 4:10 / Sonic Blue Pearl

So many mods... so little time...


Back To Top PM Quote Reply

 Posted: Mon Nov 27th, 2017 05:50 pm
PM Quote Reply
12th Post
black06xlt
Coal miner


Joined: Sat Nov 25th, 2017
Location: Flushing, Ohio USA
Posts: 1738
Name: 
Occupation: 
Interests: my wife my kids ford rangers ...
Status: 
Offline
Reputation: 
Reputation Points: 1738
i see pictures of people using blue and red leds what do white leds look like in the cluster


____________________
1995 ranger splash (pieces)
Back To Top PM Quote Reply

 Posted: Mon Nov 27th, 2017 06:56 pm
PM Quote Reply
13th Post
mhoward
Hey look ~ they ~ bounce!


Joined: Sun Oct 22nd, 2017
Location: Evansville, USA
Posts: 2736
Name: Michael ...
Occupation: Technology Manager ...
Interests: Trucks / Guitars & Music / Things that go BANG ...
Status: 
Offline
Reputation: 
Reputation Points: 2736
Well, if you just install white LEDs in the stock, unmodified cluster, you will simply get a somewhat brighter display in the OEM color. If you sand the cluster as per the how-to, then white LEDs will yield white sweep lines (or whatever parts you sanded the color off of.


____________________
-- Michael

2003 Ranger Edge / Extended Cab / Flareside / 3.0L FLEX / 5r44e Auto / 2WD / 8.8 LS 4:10 / Sonic Blue Pearl

So many mods... so little time...


Back To Top PM Quote Reply

 Posted: Mon Nov 27th, 2017 08:01 pm
PM Quote Reply
14th Post
MaDMaXX

Hails from the land of rust!


Joined: Sat Oct 21st, 2017
Location: Oregon USA
Posts: 1368
Name: 
Occupation: 
Interests: Motorsport/Firearms/IT ...
Status: 
Offline
Reputation: 
Reputation Points: 1368
Just shoving 5 SMD LED's in the cluster (cool white) will really improve the look, much crisper looking and actually more of a likeable colour.


____________________
2002 - 3.0 - 4x2 - Edge

Upgrades/Maintenance log
Back To Top PM Quote Reply

 Posted: Mon Nov 27th, 2017 08:13 pm
PM Quote Reply
15th Post
buggman

Do Not Touch The Trim!


Joined: Thu Oct 19th, 2017
Location: USA
Posts: 230
Name: 
Occupation: 
Interests: 
Status: 
Offline
Reputation: 
Reputation Points: 230
i've got a couple pics in my photobucket albums of the polarity on the older style clusters... if anybody gets bored & wants to click through all the stupid ads before i find them, feel free to post 'em up lol.

i've even seen a few people use a sharpie to color the overlays... results weren't that great but gotta give 'em an A for redneck engineering.


____________________
1996 XLT Supercab 4.0L 4x4
Lots of Explorer parts & tons of my custom mods.
Back To Top PM Quote Reply

 Posted: Mon Nov 27th, 2017 08:23 pm
PM Quote Reply
16th Post
black06xlt
Coal miner


Joined: Sat Nov 25th, 2017
Location: Flushing, Ohio USA
Posts: 1738
Name: 
Occupation: 
Interests: my wife my kids ford rangers ...
Status: 
Offline
Reputation: 
Reputation Points: 1738
do you sell the led replacement bulbs for the cluster in a 2006? i cant remember the number they are really small


____________________
1995 ranger splash (pieces)
Back To Top PM Quote Reply

 Posted: Mon Nov 27th, 2017 08:43 pm
PM Quote Reply
17th Post
buggman

Do Not Touch The Trim!


Joined: Thu Oct 19th, 2017
Location: USA
Posts: 230
Name: 
Occupation: 
Interests: 
Status: 
Offline
Reputation: 
Reputation Points: 230

yeah, my 1smd led's. i think there will be 5x of them in the newer clusters.


black06xlt wrote: do you sell the led replacement bulbs for the cluster in a 2006? i cant remember the number they are really small


____________________
1996 XLT Supercab 4.0L 4x4
Lots of Explorer parts & tons of my custom mods.
Back To Top PM Quote Reply

 Posted: Mon Nov 27th, 2017 09:09 pm
PM Quote Reply
18th Post
black06xlt
Coal miner


Joined: Sat Nov 25th, 2017
Location: Flushing, Ohio USA
Posts: 1738
Name: 
Occupation: 
Interests: my wife my kids ford rangers ...
Status: 
Offline
Reputation: 
Reputation Points: 1738
i know i asked you the headlight and 4x4 switches facebook but what about the expo ohc and cruise control switches? what do you offer there?


____________________
1995 ranger splash (pieces)
Back To Top PM Quote Reply

 Posted: Wed Jan 17th, 2018 08:58 pm
PM Quote Reply
19th Post
motorhead1991
Farm Mechanic and TurboFord nu
 

Joined: Thu Nov 23rd, 2017
Location: Caldwell, Idaho USA
Posts: 9
Name: 
Occupation: 
Interests: 
Status: 
Offline
Reputation: 
Reputation Points: 9
So, I learned a few things while playing with this method...
1. 400 grit sandpaper works fine on the gen2 clusters
2. Gen2 clusters are glued and not sonic welded
And 3. Don't use nail polish remover on gen2 faces

Back To Top PM Quote Reply

 Posted: Wed Jan 17th, 2018 10:10 pm
PM Quote Reply
20th Post
JAMMAN

Owns A Torsen


Joined: Mon Sep 18th, 2017
Location: Grove City, Ohio USA
Posts: 6436
Name: Jim ...
Occupation: 5 axis cnc programmer ...
Interests: RBV's ...
Status: 
Offline
Reputation: 
Reputation Points: 6436
Awwwww what you gonna do?


____________________
00 XLT 4WD RCSB 3.GO! Jalapeño
01 XLT 2WD RC Steppie 3.0 auto Silver
The future belongs to those who show up.
Back To Top PM Quote Reply

 Posted: Wed Jan 17th, 2018 10:11 pm
PM Quote Reply
21st Post
MaDMaXX

Hails from the land of rust!


Joined: Sat Oct 21st, 2017
Location: Oregon USA
Posts: 1368
Name: 
Occupation: 
Interests: Motorsport/Firearms/IT ...
Status: 
Offline
Reputation: 
Reputation Points: 1368
I feel like the nail polish remover was proceeded by "i've got a great idea!"


____________________
2002 - 3.0 - 4x2 - Edge

Upgrades/Maintenance log
Back To Top PM Quote Reply

 Posted: Wed Jan 17th, 2018 10:47 pm
PM Quote Reply
22nd Post
motorhead1991
Farm Mechanic and TurboFord nu
 

Joined: Thu Nov 23rd, 2017
Location: Caldwell, Idaho USA
Posts: 9
Name: 
Occupation: 
Interests: 
Status: 
Offline
Reputation: 
Reputation Points: 9
You know what they say "curiosity killed the cat". Thankfully, I had no intention of using this cluster again since I prefer the tach clusters 😁.

Back To Top PM Quote Reply

 Posted: Thu Jan 18th, 2018 09:22 am
PM Quote Reply
23rd Post
mhoward
Hey look ~ they ~ bounce!


Joined: Sun Oct 22nd, 2017
Location: Evansville, USA
Posts: 2736
Name: Michael ...
Occupation: Technology Manager ...
Interests: Trucks / Guitars & Music / Things that go BANG ...
Status: 
Offline
Reputation: 
Reputation Points: 2736
Nail polish remover is pretty much acetone. I wouldn't recommend that on ANYTHING plastic. Guess you found that out though...


____________________
-- Michael

2003 Ranger Edge / Extended Cab / Flareside / 3.0L FLEX / 5r44e Auto / 2WD / 8.8 LS 4:10 / Sonic Blue Pearl

So many mods... so little time...


Back To Top PM Quote Reply

 Posted: Thu Jan 18th, 2018 01:50 pm
PM Quote Reply
24th Post
motorhead1991
Farm Mechanic and TurboFord nu
 

Joined: Thu Nov 23rd, 2017
Location: Caldwell, Idaho USA
Posts: 9
Name: 
Occupation: 
Interests: 
Status: 
Offline
Reputation: 
Reputation Points: 9
mhoward wrote: Nail polish remover is pretty much acetone. I wouldn't recommend that on ANYTHING plastic. Guess you found that out though...
The plastic was unphased, but not the ink.

Back To Top PM Quote Reply

 Posted: Thu Jan 18th, 2018 04:34 pm
PM Quote Reply
25th Post
mhoward
Hey look ~ they ~ bounce!


Joined: Sun Oct 22nd, 2017
Location: Evansville, USA
Posts: 2736
Name: Michael ...
Occupation: Technology Manager ...
Interests: Trucks / Guitars & Music / Things that go BANG ...
Status: 
Offline
Reputation: 
Reputation Points: 2736
I'm surprised the plastic was okay. I shouldn't be though, I work at a plastics injection molding company. There are a LOT of different types of plastic.


____________________
-- Michael

2003 Ranger Edge / Extended Cab / Flareside / 3.0L FLEX / 5r44e Auto / 2WD / 8.8 LS 4:10 / Sonic Blue Pearl

So many mods... so little time...


Back To Top PM Quote Reply

Current time is 02:36 pm Top Page:    1  2  Next Page Last Page    

Ford-Rangers.com Ranger Forum > Tech Section > How-To Section > How To: Gauge Cluster Color Swap (By San

Users viewing this topic


PHP Version: 8.2.28
Server version: 10.6.22-MariaDB
UltraBB 2.01.01 Copyright © 2008-2025 Jim & Chris
Page processed in 0.0893 seconds (35% database + 65% PHP). 110 queries executed.