Ford-Rangers.com Ranger Forum HomeFord-Rangers.com Ranger Forum Home
Home Recent Topics New posts Search search Menu menu Not logged in - Login | Register

Ford-rangers.com is a discussion forum, a Ranger forum for people who have questions about fixing or modifying
their Ford Rangers or people who just admire their Ranger. Please join and enjoy sharing experiences!

1999 Ranger "Gold Dust" - Part       #: 1828
 Moderated by: NoPower, Mike69, MaDMaXX, Page:  First Page Previous Page  ...  5  6  7  8  9  10  11  Next Page Last Page  
New Topic Reply
 Rating:  Rating
 Posted: Sun Jun 21st, 2020 02:54 pm
PM Quote Reply
226th Post
TheArcticWolf1911
Gunslinger


Joined: Sat Nov 4th, 2017
Location: Evansville, Indiana USA
Posts: 426
Name: Cameron ...
Occupation: Process Technician ...
Interests: Firearms & Ammunition, Ford Rangers, electronics ...
Status: 
Offline
Reputation: 
Reputation Points: 426
Ordered some stuff from SuperBrightLEDs.com. Some connectors that'll handle the HELLAs going atop my rollbar, 50 feet of 5 core wire, a nice 3rd brake light replacement, six grommet lights for the bed and the mirrors as puddle lights, etc. 

3RD brake / ID Bar 

This is more than just a lightup bar, though. It has provisons for turn signals, park circuit, and brake all in one clean unit. It would have been nice if they had made the last two or three LEDs amber (or rather the polymer amber) as provisions for the turn signals instead of it all being red, but whatever. It's nice and clean, so I'm OK with it. I'm struggling to decide what color I want my muthco glass to be though. Amber or red. From the back, all the other lighting is red, so red would match well, but I have a preference for amber turn signals. I also have a preference for things to match! 

(Incoming ramble)

I also had to make a decision how I was going to deal with my cargo lights. If there's one thing I love, it's functionality. I was not about to give up cargo lights. 

Initially, I was going to use a pair of these, the Truck-Lite model 60204C/60004C. They've been used on countless commercial vehicles across the US, and they're easy to get a hold of. These would have been mounted to the inner sides of my rollbar, similar to how some service trucks are set up.


Of course, LED versions also exist, but I don't like how they look. The oldschool incandecent models have a vibe to them that I really like, but I'm also weird that way, too. 


However, they're incandecent. No big deal, right? My idea was to buy the incandecent models and replace the inner lamp with an LED version. Oldschool appearance, newschool performance. Best of both worlds, right?

Not that simple. These units are sealed. Yep, sealed. When the lamp goes out, you throw the whole thing away and replace it. No retrofitting here. You can't even take them apart like you would our headlights. The lens isn't glued on, it's sonic welded  together. There's no getting these apart without destroying them. 

Now, I could have easily just dealt with the whole incandecent thing, as my Hella's, headlights, and fog lights, plus reverse lights, are not LED. They'd hardly be the only thing that wasn't LED, but I think we all know that LED just performs better than incandecent. So, instead of settling, I went with grommet lights that will be all nice and stealthly mounted instead, one above each tie-down. 

One could argue that the original option would have added some help in that  they could, theoretically, function as additional reverse lights. True, but I already have 200 watts in aux reverse lighting, and my LED 3157s. I think I'm pretty well covered in that department. Plus, I tried that with my existing cargo lamps. The light winds up going all over the bed and anything in it, which winds up giving you the opposite effect, as the bed winds up shooting the light right back into your eyes, making the darkness seem even darker than it already is. So, a net negative. 

That said, once the interior is finalized, the rollbar comes next. I want the mounting all figured out and all wired up before it goes to paint. At that point, all I'd need to do is remove it, send the truck off, get it back, and re attach. Same thing will happen with both bumpers and the brush guard. 

We're getting closer to finishing a sub-goal, here.


____________________
1999 Ford Ranger XLT - 3.0 V6 4x4 - Loaded (Totaled) 143k. Rest in Peace, Gold Dust.
Back To Top PM Quote Reply

 Posted: Sun Jun 21st, 2020 03:47 pm
PM Quote Reply
227th Post
Eddie Money
Member


Joined: Mon Nov 13th, 2017
Posts: 1587
Name: 
Occupation: 
Interests: Burt gummer life ...
Status: 
Offline
Reputation: 
Reputation Points: 1587
I chose the orange signal for my muthco mirrors.


____________________


I know my crazy! Do you?
2007 Sport 4door 4x4 4.0L SOHC V6 Ranger
Back To Top PM Quote Reply

 Posted: Mon Jun 22nd, 2020 01:43 pm
PM Quote Reply
228th Post
TheArcticWolf1911
Gunslinger


Joined: Sat Nov 4th, 2017
Location: Evansville, Indiana USA
Posts: 426
Name: Cameron ...
Occupation: Process Technician ...
Interests: Firearms & Ammunition, Ford Rangers, electronics ...
Status: 
Offline
Reputation: 
Reputation Points: 426
bouncing back to the interior for a moment, I think I'm going to try recovering the visors and headliner myself. Headliner should be a piece of cake. The visors, at least the expo ones, have the fabric stretched over some foam, glued, then the two halves are sandwiched together. They open like a book. 

Now, arts and crafts aren't exactly my speed, but even I should be able to handle that. Visors aren't exactly as complicated as seats.

The trick, however, I believe will be finding the absolute thinnest fabric/whatever possible. 

The headliner, I'd like to simply put a really thin layer of something overtop what I already have. Sort of like wood veneer, but in fabrics instead. If I go too thick, then things won't pop back together right, particularly my overhead console. I'm going to try to stick to a similar fabric to what's already there. 

The visors, I can be a little less picky on thickness. I'm thinking some kind of vinyl, like a bar stool or a "leather" wallet kind of stuff, on the visors.


Still hunting for a center console section from a manual 02 expo. The lead I had in CA happened to crush that vehicle last weekend. So goes my luck. But, I did get some advice from another user (fellow Ranger enthusiast) from a neighboring forum. So, with that, I have another lead or two. I only need one, thankfully. Had I stuck with the 2nd gen console, this wouldn't be an issue. That said, no regrets. That 2nd gen console creaked like an antique bed in.... Well, I'll let your imagination finish that one. 

Still trying to decide on what color that muthco glass is gonna be. The simplest decisions.....


____________________
1999 Ford Ranger XLT - 3.0 V6 4x4 - Loaded (Totaled) 143k. Rest in Peace, Gold Dust.
Back To Top PM Quote Reply

 Posted: Mon Jun 22nd, 2020 06:44 pm
PM Quote Reply
229th Post
Scrambler82
Old Bastard !


Joined: Fri Dec 22nd, 2017
Location: California USA
Posts: 2108
Name: Grev B ...
Occupation: Quality Assurance Engineer ...
Interests: Rangers, Photography, Metal Bending ...
Status: 
Offline
Reputation: 
Reputation Points: 2108
My thought on T-Red is NOT !

The only Ford Reds are either... E4 Red and the new Ford Red... Race Red !
But of course you need to like to look like a Fire Truck ! 

Good to see you have things under control, now it will be just a few tweaks and you will be done !

The 5.0L Swap, once you have it you will say why didn't I do this sooner, the truck will feel like it should have when new from Ford !

You will also be able to surprise a few people at the lights.


Ltr


____________________
Ltr,
2003 EDGE, Std Cab, Steppie, E4 Red, 5sp, 4x
5" SuperLift, 33" x 12.50 x 15"
Hurst Shifter
Mod'd Backrack to fit Steppie
Front and Rear Bumpers by Custom 4x4 Fabrication, OK; now Mike's Welding and Fabrication.
Working on more Mods, just need more time, longer days would work !
Back To Top PM Quote Reply

 Posted: Tue Jun 23rd, 2020 10:05 am
PM Quote Reply
230th Post
TheArcticWolf1911
Gunslinger


Joined: Sat Nov 4th, 2017
Location: Evansville, Indiana USA
Posts: 426
Name: Cameron ...
Occupation: Process Technician ...
Interests: Firearms & Ammunition, Ford Rangers, electronics ...
Status: 
Offline
Reputation: 
Reputation Points: 426
There's a few reds out there. Ruby red, rapid red, race red, E4 (bleh), Magma Red (looks maroon to me, but whatever), Hot Pepper Red Metallic, Kapoor Red, Vermillion Red, Sangria Red, Toreador, so on and so forth. 

Granted, color is heavily subjective, but imo, the right shade of red with a good amount of metallic can look good on any vehicle. You gotta have metallic in it, at least, though. If you don't, that's when you look like either a firetruck, or a Dr. Pepper label.

Oh, I wanted to toss some good news out there. A few months ago, I said I wasn't sure if I would continue to have a job, as a result of the slowdown. Well, things have picked way back up over the last month. Doesn't mean it'll stay that way, but it's a comforting change of pace. I believe we're moving towards getting back to some degree of normal.

Last edited on Tue Jun 23rd, 2020 12:46 pm by TheArcticWolf1911


____________________
1999 Ford Ranger XLT - 3.0 V6 4x4 - Loaded (Totaled) 143k. Rest in Peace, Gold Dust.
Back To Top PM Quote Reply

 Posted: Tue Jun 23rd, 2020 04:25 pm
PM Quote Reply
231st Post
Scrambler82
Old Bastard !


Joined: Fri Dec 22nd, 2017
Location: California USA
Posts: 2108
Name: Grev B ...
Occupation: Quality Assurance Engineer ...
Interests: Rangers, Photography, Metal Bending ...
Status: 
Offline
Reputation: 
Reputation Points: 2108
TheArcticWolf1911 wrote:
There's a few reds out there. Ruby red, rapid red, race red, E4 (bleh), Magma Red (looks maroon to me, but whatever), Hot Pepper Red Metallic, Kapoor Red, Vermillion Red, Sangria Red, Toreador, so on and so forth. 

Granted, color is heavily subjective, but imo, the right shade of red with a good amount of metallic can look good on any vehicle. You gotta have metallic in it, at least, though. If you don't, that's when you look like either a firetruck, or a Dr. Pepper label.

Oh, I wanted to toss some good news out there. A few months ago, I said I wasn't sure if I would continue to have a job, as a result of the slowdown. Well, things have picked way back up over the last month. Doesn't mean it'll stay that way, but it's a comforting change of pace. I believe we're moving towards getting back to some degree of normal.

Good News is always good !  LoL !

Ok on the Red is right when it has metal in it !
To me solid color no metal is the way to go... everyone is different !  I am sticking to Race Red this time around IF I stick to a red this time.

Good-Go on the job thing, tuff to work and not knowing what going to happen !

Good Luck on the job and the paint choice.

Ltr


____________________
Ltr,
2003 EDGE, Std Cab, Steppie, E4 Red, 5sp, 4x
5" SuperLift, 33" x 12.50 x 15"
Hurst Shifter
Mod'd Backrack to fit Steppie
Front and Rear Bumpers by Custom 4x4 Fabrication, OK; now Mike's Welding and Fabrication.
Working on more Mods, just need more time, longer days would work !
Back To Top PM Quote Reply

 Posted: Tue Jun 23rd, 2020 05:23 pm
PM Quote Reply
232nd Post
Tsquare
Member


Joined: Fri Nov 10th, 2017
Location: Suwanee, Georgia USA
Posts: 1540
Name: 
Occupation: Controlled Insanity ...
Interests: 
Status: 
Offline
Reputation: 
Reputation Points: 1540
Everybody is different.  I am not a big fan of red unless it is on a sports car. For trucks I like earth tones and shades of blue.

My current truck is silver - not a big fan of that color on trucks or sedans as well.


____________________
Tony
NE ATL
'04 XLT regular cab 3.slo stepside
Semi retirement
Back To Top PM Quote Reply

 Posted: Thu Jun 25th, 2020 11:47 am
PM Quote Reply
233rd Post
TheArcticWolf1911
Gunslinger


Joined: Sat Nov 4th, 2017
Location: Evansville, Indiana USA
Posts: 426
Name: Cameron ...
Occupation: Process Technician ...
Interests: Firearms & Ammunition, Ford Rangers, electronics ...
Status: 
Offline
Reputation: 
Reputation Points: 426
Well, parts came in today, including those mini grommet lights, that 3rd brake light, , sequential turn signal kit, and a couple other things due today plus some that really isn't noteworthy.

A couple of new challenges have come to light that I had not previously considered. One of which isn't particularly difficult, and makes me glad I ordered some stuff I figured wasn't completely necessary, but was cheap enough.

First up, I didn't realize it at the time, but that 3rd brake light w/ turn signals is expecting a combination signal input, like what's found on 2000+ rangers. My 99 still has the signals separate from the brakes, and that's how it's gonna stay. That means I need to put together a little module box that I can feed my brake, left, and right, into and it will spit out a combination signal. A schematic for that shouldn't take me more than 10 minutes to come up with, or I could see what someone else has already come up with if I don't feel like reinventing the wheel. Or make my own and then look it up to see if I made the same design others have. 

Second, I couldn't resist trying out that sequential turn signal kit. So, I grabbed some spare lights and jumper wires. It did as you'd expect, but it made me consider something else I hadn't thought of. This kit has 3 wires in, and 3 wires out. There's an optional 4th wire in, but that's for a setup that involves brake lights, which this is going on the front. So, null.

3 wires in = tail, turn/brake, ground.
3 wires out (in 3 sets) - tail, turn/brake, ground. 

Nothing fancy, or complicated, really. Except for whatever weird reason they made white ground and not black. That's a pet peeve of mine when there's black there as well. Guys, black is standard for ground! Leave it that way! (ahem)

For the two 3157 lamps in the signal, that's no issue. Cut the harness, solder in the box, go on with one's day. But.... off in the corner, there's a 194. That's only two wires. On, or off. No high or low.

So, what's a guy to do? I've come up with 4 options.

1. Ignore the tail on the corner, and simply have it illuminate ONLY when turn signal is activated. This option feels sort of..... as if one were to only use a portion of his/her hindquarters to complete the task, if you will.
2. Make an adjustable current circuit w/ diode, which effectively dims the 194 at half it's brightness on Tail, and Turn bypasses it for the signal's duration, giving the impression of two intensities.
3. Find a minibulb which has 2 intensities and can be made to fit in the same footprint as a 194. I'm not sure if one of these even exists for an automotive application, but I'll look anyway.
4. Add a lamp to the housing. SBL makes "bolt lights" which take a small footprint, and gives an option for illumination in tight spaces. Picture a 1/4 or smaller bolt with a 5mm LED sticking out the threads and you have the idea. This is my least favorite option, as there's high potential for damaging the housing and allowing moisture to get inside. 

Out of all of these, #2 is my personal favorite, probably because it make something so simple so over-complicated in 15 easy steps.

Off to the internet.


____________________
1999 Ford Ranger XLT - 3.0 V6 4x4 - Loaded (Totaled) 143k. Rest in Peace, Gold Dust.
Back To Top PM Quote Reply

 Posted: Thu Jun 25th, 2020 11:51 am
PM Quote Reply
234th Post
410customs

Idahome


Joined: Wed May 2nd, 2018
Location: Panhandle, Idaho USA
Posts: 2165
Name: Jamie ...
Occupation: Elevator Design Worlds Tallest Buildings ...
Interests: Ranger Based Vehicles and OFFROAD ...
Status: 
Offline
Reputation: 
Reputation Points: 2165
2 bulb to 3 bulb adapters and vise versa:
https://www.google.com/search?rlz=1C1GGRV_enUS751US751&sxsrf=ALeKk015nQz2BTDFSx9c_LelPeDCCSSUNA%3A1593100170762&ei=isf0XviVLof5-wTKvqrIBA&q=2+bulb+to+3+bulb+trailer+adapter&oq=2+bulb+to+3+bulb+trailer+adapter&gs_lcp=CgZwc3ktYWIQAzoECAAQR1CxL1iSN2CoOWgAcAJ4AIABggGIAbUHkgEDMC44mAEAoAEBqgEHZ3dzLXdpeg&sclient=psy-ab&ved=0ahUKEwj4gpTOqJ3qAhWH_J4KHUqfCkkQ4dUDCAw&uact=5

We use these to run trailers behind vehicles with two bulb tail light systems, also to convert earlier rangers to the 06+ 2 bulb tail lights.

Does that fit your needs?


____________________
I build custom RBV, specializing in drivetrain conversions, wiring, suspension and complete custom trucks
Back To Top PM Quote Reply

 Posted: Thu Jun 25th, 2020 02:13 pm
PM Quote Reply
235th Post
TheArcticWolf1911
Gunslinger


Joined: Sat Nov 4th, 2017
Location: Evansville, Indiana USA
Posts: 426
Name: Cameron ...
Occupation: Process Technician ...
Interests: Firearms & Ammunition, Ford Rangers, electronics ...
Status: 
Offline
Reputation: 
Reputation Points: 426
Yeah, something like that ought to do it. 

That said, I did draw up my own schematic. The first one sort of worked, but the problem was, the signal after the homebrew module was opposite of the rest of the vehicle, making a flipper circuit necessary to get everything to flash in time. 

I figure I'll go with this, as I have a gallon back *full* of relays already, so it's not as if I have to buy any of the supplies to make it. 

Working on a polished V2 schematic.


____________________
1999 Ford Ranger XLT - 3.0 V6 4x4 - Loaded (Totaled) 143k. Rest in Peace, Gold Dust.
Back To Top PM Quote Reply

 Posted: Thu Jun 25th, 2020 03:17 pm
PM Quote Reply
236th Post
TheArcticWolf1911
Gunslinger


Joined: Sat Nov 4th, 2017
Location: Evansville, Indiana USA
Posts: 426
Name: Cameron ...
Occupation: Process Technician ...
Interests: Firearms & Ammunition, Ford Rangers, electronics ...
Status: 
Offline
Reputation: 
Reputation Points: 426
OK, followup.

Thought about it, and decided to do it a little differently. Schem implies a standard 5 pin is used, but the mini relay would suffice if your output current is low. 

Originally, I had the brake signal flow through the relay from 30 to 87A uninterrupted. The turn signal, signal, would then energize the relay and kick out the brake light. This did work, but resulted in the "converted" output being the opposite of the rest of the vehicle, which is unnacceptable. I mulled around a way or two and this is what I came up with.

Here's what's going on. L/R are mirror images of one another, essentially. 

Pin 30 on relay 1 connects to the brake signal. Pin 86 is tied to pin 30. Pin 87 goes to the bulb desired, the 'combo out' short for 'combination output'. 
Pin 85, on the other hand, leads to relay 2, pin 87A. Pin 30 and 85 on relay 2 are tied to ground. Pin 86 @ relay 2 connects to either the left or right turn signal circuit, whichever is needed.

When the brakes are applied, relay 1 energizes, allowing the current to flow through 30 and out to 87, illuminating the lamp. The relay's ground flows through relay 2 uninterrupted, out to pin 30. When the turn signal begins, however, the turn signal current energizes relay 2, disconnecting Relay 1's ground, killing the light. 

That's the theory. I haven't cracked out the jumper wires and tested it, yet. 


____________________
1999 Ford Ranger XLT - 3.0 V6 4x4 - Loaded (Totaled) 143k. Rest in Peace, Gold Dust.
Back To Top PM Quote Reply

 Posted: Fri Jun 26th, 2020 03:21 pm
PM Quote Reply
237th Post
TheArcticWolf1911
Gunslinger


Joined: Sat Nov 4th, 2017
Location: Evansville, Indiana USA
Posts: 426
Name: Cameron ...
Occupation: Process Technician ...
Interests: Firearms & Ammunition, Ford Rangers, electronics ...
Status: 
Offline
Reputation: 
Reputation Points: 426
Well, after work, I made some headway today. Decided to tackle the sequentials first, as I thought that would be the simplest thing to get me rolling. Took way longer than I thought, but that was more me than the task.

I anticipated the sequentials not having much smarts to it, but this module was more sophisticated than I thought. Turns out, it has features in it that let you run single brightness LEDs as dual brightness. No extra hardware needed, no wiring tricks.

I took the lights off the truck, cut the harness and stripped it down to the bare three plugs. I'll have more photos tomorrow. 

I hooked it up with jumpers, and when I activated the park lighting circuit, I was surprised to find that the 194 was illuminated, at half brightness. I thought I was backfeeding the circuit, but after playing around, it turns out that it's meant to do that.

I tested it by hooking up the red signal wire to the major wire of the 3157s, activated the tail circuit, leaving the actual tail circuit wire floating, and saw the 3157 also illuminated at half brightness then went to full when sequential was activated. 

Apparently this thing detects whether there's current being drawn on the tail circuit, and if there isn't, it incorporates it's own dimming circuit, which is PWM. 

Even so, I still hooked up the 3157s with all three wires, and for the 194, just two. I was expecting to have to use a resistor in series on the tail circuit and have the signal circuit simply jump the resistor, having the same effect this does. $50 well spent.

You'll notice the modules come with a 1157 bayonet plug stock on there. They invite you to chop it off if not suitable for your application, which is what I did and replaced it with a plug of my choice. Although if I had thought about it, I could have just as easily wired on a bayonet socket onto the truck and done that instead. probably doesn't make a nickel's worth of difference at the end of the day. 

The flickering on low mode is due to the PWM being picked up by my camera. Looking at it in person doesn't yield this effect. 


More to come in a day or two as I make more headway.....


____________________
1999 Ford Ranger XLT - 3.0 V6 4x4 - Loaded (Totaled) 143k. Rest in Peace, Gold Dust.
Back To Top PM Quote Reply

 Posted: Sun Jun 28th, 2020 08:48 am
PM Quote Reply
238th Post
TheArcticWolf1911
Gunslinger


Joined: Sat Nov 4th, 2017
Location: Evansville, Indiana USA
Posts: 426
Name: Cameron ...
Occupation: Process Technician ...
Interests: Firearms & Ammunition, Ford Rangers, electronics ...
Status: 
Offline
Reputation: 
Reputation Points: 426
I wound up spending a lot more time in R&D than actually making progress on the build in the way I hoped.

The circuit schematic I posted earlier only half works. It does work, but only when the brake pedal is pressed. If the brake isn't pressed, the lights on the output are dark. I tell ya, coming up with a circuit that truly converts 3 bulb to 2 bulb after the fact is surprisingly difficult. 

At some point, I had the revelation to run the relay in reverse. When we use relays, we usually only consider using them to send power to one or two different places. For most of us, we probably only use half the relay the majority of the time. Horns, aux lights, the like. 

However, we can also use them to power one thing from two different sources. Let me show you what I mean.
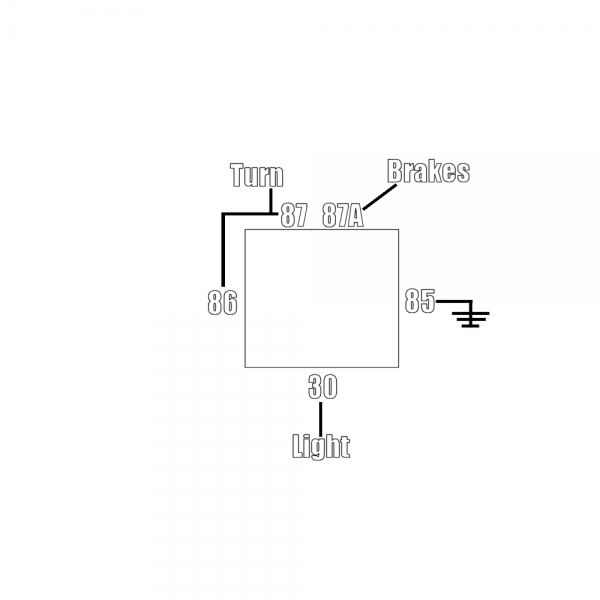


Usually we send power to 30, and send it through 87 or 87A, then to the device. Here, however, I'm connecting the lamp to pin 30, and I'm changing the source power via the actuation of the relay. This circuit right here does and doesn't work. It does succeed in changing which source is powering the lamp, but only for the duration of the signal. It doesn't allow for any 'dark' time when the turn signal is off while the brakes are still depressed. 

That right there was the hardest part of designing this circuit, figuring out how to keep the relay energized long enough to keep power flowing from the turn signal circuit to the lamp without it switching back to the brake circuit before we want it to. I tried to do this without any exterior components, but ultimately failed to do so. See, it's easy for Ford to do it, as they can 'kill' the brake signal to the appropriate lamp with the same switch that activates the turn signals. They don't need complimentary components. Guys like me that do things after the fact, however, not so much. Not without rewiring the entire truck.
Now I may be crazy, but I'm not that crazy.

I dug around in my parts bin, did some more testing, and came up with this.


It's a bit more complex, but it does the job just fine. It's almost the same circuit as before, but the majority of the changes center around the relationship between pin 87 and 86, as well as between 86 and 85.

You'll notice that between 87 and 86, there's a diode. Between 85 and 86, a capacitor. The cap acts as an energy storage space and the diode prevents that energy from leaking out from where we want it to stay. The cap is charged by the turn signal's pulse, and has enough energy to keep the relay closed until the next pulse arrives. 

These two components working together allows the combo light to flash while you're signaling, but return to being a brake light once you've finished you're turn. 

This is what all that looks like put together. The caps I used are rated for a max of 40v, and 2700uf. 2700uf is way more than what is needed, but that was the only size I had that worked. I had a 470uf that *almost* worked, but it didn't quite have enough to keep the relay closed. One around 800uf-1000uf would likely work just fine. The diode is just your standard silicon diode. They don't have to be anything special. Do pick a diode that is large in it's physical dimension. Makes it easier to work with and physically stronger. The actual specs don't matter too much. The relay doesn't draw much current (therefor the diode doesn't heat up much if at all), and the forward voltage drop is really inconsequential. You could probably use a schottky diode, too with equal results. Lucky for us, the voltage requirement on the relay's switching circuit is pretty forgiving. 
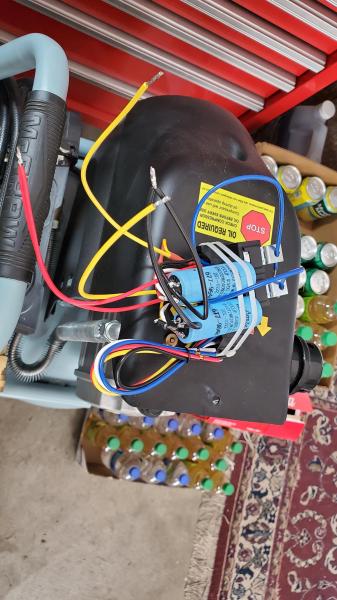


Of course you can buy the components online if you so desire, or you can salvage them from old electronics. I hang onto old circuitboards just for this purpose. The diodes I got from an old PC power supply, and the capacitors I snagged from an old battery backup. That said, if you can't find one single cap big enough, you could wire up two or more in parallel if necessary. Or, you could be less stubborn than me and just buy a converter. You could probably also use a different type of cap all together. 

Buy a good one though, as cheap china units suck out loud. My father can attest to that, as we tried to convert his combo signals to 3 way signals with one, and that didn't work out well for very long.

Anyway, enough of that.

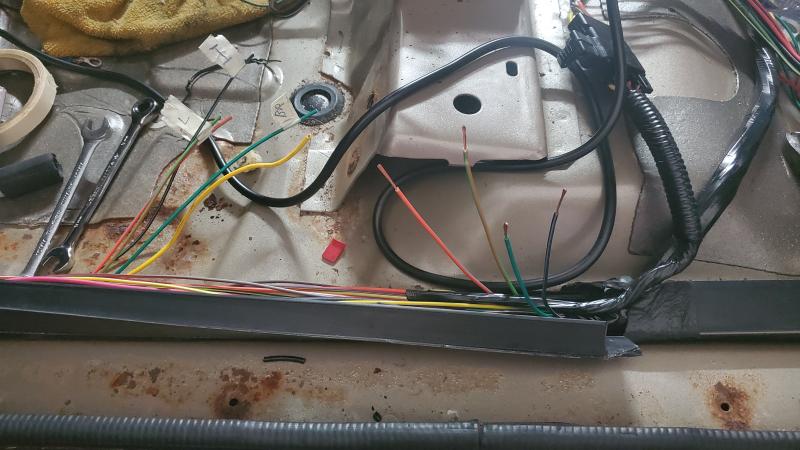
I tapped into the harness running along the driver's side, found all the wires that I need. Interior, park circuit, left and right signals, and brakes. Although it hurt to do, I chopped the wires in half so I could splice in a plug and use heatshrink to cover them up, rather than leaving them intact and only being able to wrap them up in tape. Worthy sacrifice for longevity, if you ask me. I did add one wire to that harness, a ground. The ground wire I ran over to the driver's side footwell and added onto a dedicated grounding point. The only reason I chose yellow, is I had a nice long piece of hookup wire lying around that happened to be the right size. I prefer black for ground, but at the end of the day I believe it's the quality of the connection that's more important than the color of the wire. 
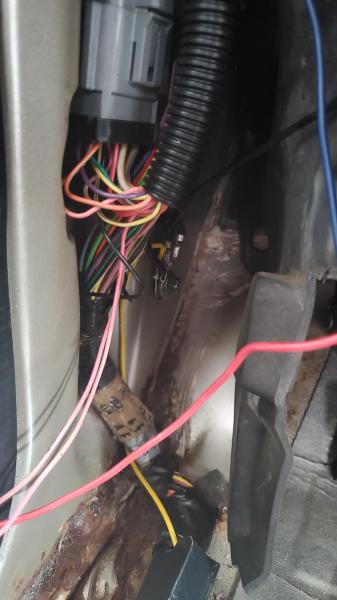


Also. I have the front reassembled. The truck's headerpanel did require some light modification. Some of you 98-00 owners may recall that each lamp's cables is run through it's own seperate hole in the panel. With the sequential modules, I wound up having to run them all through one. I probably could have done it the factory way, but I didn't see the gain for doing it that way over my way. 

This is the modification. I had to take a razor  blade (fresh new one) and carve out the rounded edge of the hole into a square one. This is done for clearance. Without it, the wires wound up almost getting crushed between the socket and the panel itself. After that, I tucked things away and called it a day.
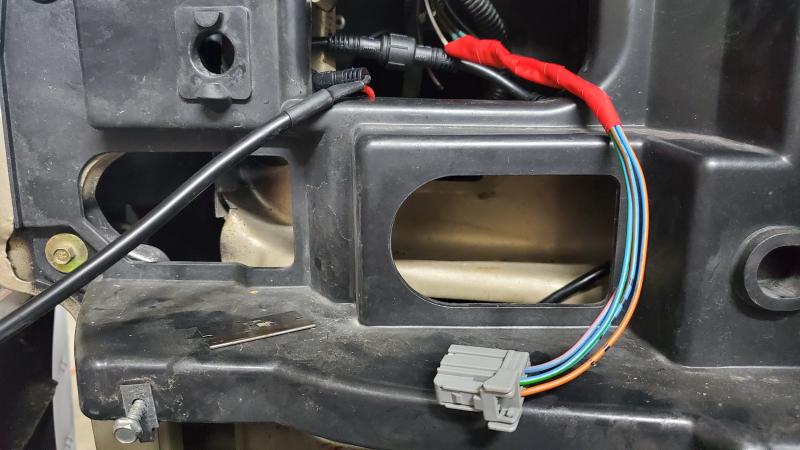
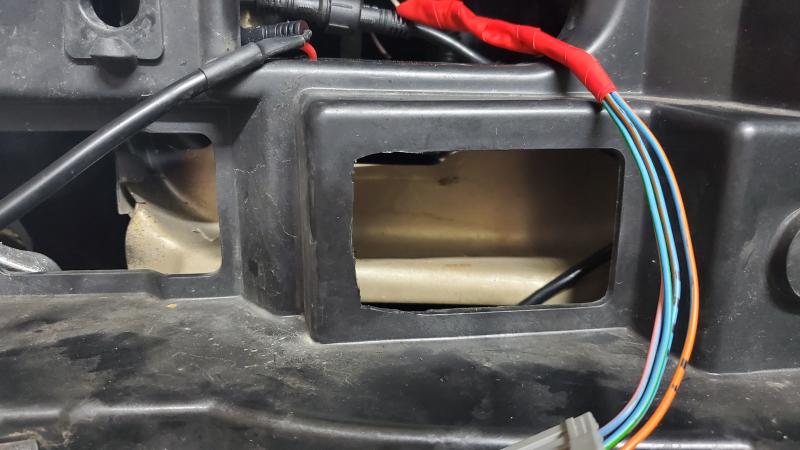


Not quite sure how it wound up being vertical instead of horizontal. You get the idea, though. That said, I'm happy with the end result. You'll notice the brushguard is missing. It's reinstalled now, but I had to remove it in order to get the housings out. I love that guard and how it looks, but man does it make it a pain to get to anything. Good luck changing headlight bulbs, I guess? 

I'm going to make more progress today. 

Oh, some of you may notice the rust on the floorboard. That's getting addressed with some wire brush and paint. Maybe I'll get the floor in, today! 

Next weekend, I'm getting a 4 day weekend, so expect to see even more progress in the coming days.


____________________
1999 Ford Ranger XLT - 3.0 V6 4x4 - Loaded (Totaled) 143k. Rest in Peace, Gold Dust.
Back To Top PM Quote Reply

 Posted: Sun Jun 28th, 2020 10:32 am
PM Quote Reply
239th Post
410customs

Idahome


Joined: Wed May 2nd, 2018
Location: Panhandle, Idaho USA
Posts: 2165
Name: Jamie ...
Occupation: Elevator Design Worlds Tallest Buildings ...
Interests: Ranger Based Vehicles and OFFROAD ...
Status: 
Offline
Reputation: 
Reputation Points: 2165
  cool, glad to have you on our team! WAY OVER MY HEAD but I am here to learn so THANKS
I love it!
Looks like somebody needs to unbox their air compressor hose reel, I love those things for $80 you cant beat the harbor freight hose reels
I plan to build some custom LED tail lights using factory 1988 BII housings SOMEDAY soon when I do I will need your help I want sequential!!!!!!!!!!


____________________
I build custom RBV, specializing in drivetrain conversions, wiring, suspension and complete custom trucks
Back To Top PM Quote Reply

 Posted: Sun Jun 28th, 2020 04:55 pm
PM Quote Reply
240th Post
TheArcticWolf1911
Gunslinger


Joined: Sat Nov 4th, 2017
Location: Evansville, Indiana USA
Posts: 426
Name: Cameron ...
Occupation: Process Technician ...
Interests: Firearms & Ammunition, Ford Rangers, electronics ...
Status: 
Offline
Reputation: 
Reputation Points: 426
If you want sequentials, buy this and call it a day. Well worth the money. This is what I used. 

Sequential Tail Light Kit 

Made more progress today.

Cleaned up / removed some wiring left over from projects and features that came and went, neatened up the rest. At this point, all that remains is adding the heater circuit for the mirrors, modifying the mirrors, and actually installing them. Then the interior can go back together, or some of it anyway. Need to get some upholstery work done....

As for mirrors, I just bit the bullet and bought mirrors made by Ford, brand new, from an authorized dealer. Peeked inside and sure enough, they're what's needed. Now I'm just waiting on that glass to get here....that I ordered a week ago and still hasn't shipped. 

Still on the hunt for that console part, for the stickshift.

Last edited on Sun Jun 28th, 2020 04:59 pm by TheArcticWolf1911


____________________
1999 Ford Ranger XLT - 3.0 V6 4x4 - Loaded (Totaled) 143k. Rest in Peace, Gold Dust.
Back To Top PM Quote Reply

 Posted: Tue Jun 30th, 2020 04:08 pm
PM Quote Reply
241st Post
TheArcticWolf1911
Gunslinger


Joined: Sat Nov 4th, 2017
Location: Evansville, Indiana USA
Posts: 426
Name: Cameron ...
Occupation: Process Technician ...
Interests: Firearms & Ammunition, Ford Rangers, electronics ...
Status: 
Offline
Reputation: 
Reputation Points: 426
My muthco mirrors came in today, and I thought I'd post an initial impression on the mirrors themselves for anyone looking to buy a set. 

First up, I bought these with my money. They weren't sent to me, nor did anyone buy them for me. These were bought and paid for by me, at $200 plus shipping. Also note that I sometimes care about things that other's don't, and sometimes the opposite is true, where I simply don't care about what others make a big deal over. So, bear that in mind potential reader who is only here because this post came up under your search queries for these mirrors. 

Before you continue, note that my tone changes a bit. 12 hour shift with crap-tacular sleep has.... less than ideal effects. This guy is about to get real picky, real quick. Grab a snack, or something. Or don't. I'm a post on the internet, not a cop.

{cranky rant}

First thing that caught my attention was that the box makes zero attempt at hiding what's inside. It's branded all over the outside exactly what it is. Not that this is a Sony or Apple product where the name and logo is instantly recognized by, oh, *everyone*. But, still, I found that odd. Quality of the packaging itself, could be better. A lot better. The cardboard is thin, and the styrofoam usage is minimal. Considering that we're shipping glass panes here, I expected some extra care taken with this. I've had vintage gas masks and other surplus shipped from Russia by an individual with better packaging. That is not a joke, either. 

It does come with instructions, rather detailed ones at that. I gave them a quick read, and the instructions talk about reusing the backing plate, merely peeling the glass off the originals and sticking these on in place. Which, this is massively confusing because it comes with new backing plates. Not to mention, for $200, I expected the new backing plates to be already adhered. Not that I am incapable of doing so myself, but I feel that for the steep price of (again) $200, they could have done that for me. If this kit was $75, I wouldn't have said a thing about that. 

Also, the adhesive used for attaching them.... Quite frankly I'm not hopeful. It appears to be some foam backed sticky tape cut to a specific shape, custom. Which, this appears to glue straight smack dab onto the heating element. The instructions themselves say to use heat to soften the glue on the old backing plates, and we're using some sort of adhesive to adhear these to the car  by the element itself. That strikes me as *highly* counter-intuitive. I may wind up adding some extra epoxy to help keep these on, lest one comes off on the highway and shatters. I'm starting to understand why they also sell L and R separately. 

The glass itself is wrapped in bubblewrap. Seems to be of reasonable quality. One thing immediately caught my eye though, that will get some attention before I even consider mounting these. The LED arrow, which itself seems well made, has the cheapest little connector on it. This type of connector I do not believe has the *slightest* bit of waterproofing or resistance to it at all. I can even see down into the PCB between it and the housing. I can very much see this design flaw filling with water in a heavy rainstorm, or car wash, and corroding then crapping out later. 

Moving onto the heating element. Note the contacts. Some of them aren't covered *at all*, and what is covered feels to be similarly cheap rubbery silicone. Just barely picking at it with my non-existant fingernail feels like I could pull it off with no effort. It reminds me of RTV, but with no substance to it. Maybe dollar store hot glue. And this is directly on the *heating* element. I'm not sure how hot this will get, but we all know heat softens glues. Heat also makes a royal mess out of black electrical tape, as anyone whose taken apart a vehicle wiring harness knows.

The solder connections look OK to me. No whining there. The wires though. I stripped the ends, and.... they aren't copper. I scraped at the wire end with a razor knife and failed to reveal any copper, considering maybe that these were plated, maybe. No, it's aluminum. There's a reason we don't use aluminum for wire as standard. I have also heard many a tale of mobile homes burning to the ground because of crappy aluminum cables being used in place of copper. The wires on these just feel cheap all together. 

I peeled back the layer over the viewing side of the glass, and the mirrors are nice and clear. That's the best I can say about these.

Maybe I'm being harsher because I can't sleep and therefor I'm getting cranky, but I stand by that for the price you pay for these, there's a lot to be desired in my eyes. I had hopes of something with some serious quality to it, through and through, and honestly I'm disappointed. These are going to need a few improvements before I even consider taking the glass out of my OEM mirrors. 


Full Size Instructions  for those who are curious. 

I noticed there at the end that they actually specify RTV as something you'll need. They actually tell you to use it because apparently the "PSA" tape isn't enough? All that tells me is that they couldn't be bothered to actually find a better solution (Perhaps what OEM does?) and they just bandaid it by telling you to add more glue in the instructions. Feels absolutely, completely, lazy to me. 

If it seems like I'm ragging on every little thing, I'll explain why. If this were a $50 or $75 kit from china, I'd be happy it was this good. But it's not. This is a $200 kit that is from a company who supposedly specializes in this. They only sell mirrors for a wide variety of vehicles. If you're a 1 trick pony, your 1 trick better be good. I'm also increasingly picky, because this project truck is my baby. I'm doing this without short-cuts, the right way the first time, with good parts for good money. I strongly believe they could have done better for the price myself (and at least 1 other member here) paid. I hope he got more quality than I feel I got.

{/cranky rant}


____________________
1999 Ford Ranger XLT - 3.0 V6 4x4 - Loaded (Totaled) 143k. Rest in Peace, Gold Dust.
Back To Top PM Quote Reply

 Posted: Fri Jul 3rd, 2020 06:43 pm
PM Quote Reply
242nd Post
mhoward
Hey look ~ they ~ bounce!


Joined: Sun Oct 22nd, 2017
Location: Evansville, USA
Posts: 2732
Name: Michael ...
Occupation: Technology Manager ...
Interests: Trucks / Guitars & Music / Things that go BANG ...
Status: 
Offline
Reputation: 
Reputation Points: 2732
I've seen these new mirrors myself.  He isn't embellishing one bit.  I have actually suggested that he return these mirrors for a refund and approach it in a different manner.


____________________
-- Michael

2003 Ranger Edge / Extended Cab / Flareside / 3.0L FLEX / 5r44e Auto / 2WD / 8.8 LS 4:10 / Sonic Blue Pearl

So many mods... so little time...


Back To Top PM Quote Reply

 Posted: Sat Jul 4th, 2020 08:19 pm
PM Quote Reply
243rd Post
TheArcticWolf1911
Gunslinger


Joined: Sat Nov 4th, 2017
Location: Evansville, Indiana USA
Posts: 426
Name: Cameron ...
Occupation: Process Technician ...
Interests: Firearms & Ammunition, Ford Rangers, electronics ...
Status: 
Offline
Reputation: 
Reputation Points: 426
I decided not to use the muthco mirrors and instead use the explorer 06 glass. Which, btw, the 06 glass pops right in place with no modifications necessary. As for the signal portion, I'm going to do it the same way I did the first time around.

For those who don't remember, I used a wrap of LED tape on the inside perimeter of the glass. It was amber last time, it'll be red this time. I also installed the puddle lights, and that went very well. The 06 explorer mirrors have it in the "stalk?" I guess you'd call it, so I decided to do it the same way. There just so happens to be a crater sized area inside there with *plenty* of clearance inside. One 3/4" hole later, fish the wires out, and you're done. They could be a bit brighter, but they're plenty bright for the task at hand. 

On Monday, I'm going to dump photos into this thread. So for right now, it's just words. You will get pictures, I promise.

Yesterday, I pretty much wasted the day  trying to find fabric wide enough for the headliner. Could not find any locally. That said, it's black now. But not by recovering. This is going to sound redneck, and it probably is, but I tell you what, the results I got were beyond belief. 

Spray paint. No, I'm not kidding. black rustolem spray paint. Satin, gloss, whatever. They look the same on fabric. End result looks damn near factory. It also doesn't feel sticky or gritty at all. So, problem solved.

Also have the new floor laid in, and it looks real good. I have a *little* bit of wiring left to do, but that's nothing. I have to add the heater circuit, and I have the wires already run to the doors and in the harness. I just have to hook them up to power on the truck side. 

Center and overhead consoles are also reassembled and ready for re-installation. Tomorrow, many interior pieces go back together. Door panels (which turned out great) have to wait until the mirrors are finished. 

Progress!


____________________
1999 Ford Ranger XLT - 3.0 V6 4x4 - Loaded (Totaled) 143k. Rest in Peace, Gold Dust.
Back To Top PM Quote Reply

 Posted: Mon Jul 6th, 2020 03:15 pm
PM Quote Reply
244th Post
TheArcticWolf1911
Gunslinger


Joined: Sat Nov 4th, 2017
Location: Evansville, Indiana USA
Posts: 426
Name: Cameron ...
Occupation: Process Technician ...
Interests: Firearms & Ammunition, Ford Rangers, electronics ...
Status: 
Offline
Reputation: 
Reputation Points: 426
The interior is not together. We're close, though. Really, really close. Pictures in next post....

The headliner is in, center console + dome light holding it up. The dash is now black. Glovebox, airbag, driver's kick panel, center console and all that are all painted. I have to get a new cluster bezel, as the screw  holes in mine are just chewed out. That's not a huge deal though and won't hold up anything, really. I also need an explorer's radio bezel to make room for the heater switch. So I'll have to transplant my radio into it. 

Also, that back panel that has the cargo net. There's an easy  way around that net for painting. Suspend the part by the net which holds it out of the way. Done.

The floor is also in, just needs some finishing trimming here and there. The mirrors are modified, and some red LED strips are ordered and on the way. 

Went on ebay and found a passenger side black seatbelt. Will call up a couple local yards. Also ordered the clutch+brake pedal assembly. 

So far, I still need these parts...

Manual column shroud/cover
Driver's side black seat belt
02 Expo manual center console section
Roll bar + hellas
Instrument + Radio bezels


Now, there's some things I had not considered. 

Obviously to do the manual swap, I'm going to need a different starter and a flywheel+clutch+pressure plate assembly. Oh, and the slave cylinder. Perhaps the Ranger unit would work? 

Problem here is, well, what car do you get those from? The 5.0 expo never came with a stick, so that's out. There's the potential that those parts could come from a 5.0 mustang, which also used the windsor for some time. Or, is it possible those parts could also come from the 4.2 F150? I have my doubts on that one.


____________________
1999 Ford Ranger XLT - 3.0 V6 4x4 - Loaded (Totaled) 143k. Rest in Peace, Gold Dust.
Back To Top PM Quote Reply

 Posted: Mon Jul 6th, 2020 03:17 pm
PM Quote Reply
245th Post
TheArcticWolf1911
Gunslinger


Joined: Sat Nov 4th, 2017
Location: Evansville, Indiana USA
Posts: 426
Name: Cameron ...
Occupation: Process Technician ...
Interests: Firearms & Ammunition, Ford Rangers, electronics ...
Status: 
Offline
Reputation: 
Reputation Points: 426


____________________
1999 Ford Ranger XLT - 3.0 V6 4x4 - Loaded (Totaled) 143k. Rest in Peace, Gold Dust.
Back To Top PM Quote Reply

 Posted: Mon Jul 6th, 2020 03:24 pm
PM Quote Reply
246th Post
TheArcticWolf1911
Gunslinger


Joined: Sat Nov 4th, 2017
Location: Evansville, Indiana USA
Posts: 426
Name: Cameron ...
Occupation: Process Technician ...
Interests: Firearms & Ammunition, Ford Rangers, electronics ...
Status: 
Offline
Reputation: 
Reputation Points: 426
Weird. 

Am I wrong that the 5.0 never came with a stick? Doing some parts numbers comparison on rockauto, and they list a manual trans for that vehicle + the various parts. 

I also looked at the starter motor selection for the 4.2 v6 F150 (1999), and noticed that they make no distinction between auto and manual starters. Come to think of it, when I bought a new starter for my 98 F150, I just bought one. Didn't think too much about whether it was for an auto or manual. 

Perhaps the whole swapping starters thing isn't a thing anymore? We'll find out at some point on this project.


____________________
1999 Ford Ranger XLT - 3.0 V6 4x4 - Loaded (Totaled) 143k. Rest in Peace, Gold Dust.
Back To Top PM Quote Reply

 Posted: Mon Aug 3rd, 2020 10:30 am
PM Quote Reply
247th Post
TheArcticWolf1911
Gunslinger


Joined: Sat Nov 4th, 2017
Location: Evansville, Indiana USA
Posts: 426
Name: Cameron ...
Occupation: Process Technician ...
Interests: Firearms & Ammunition, Ford Rangers, electronics ...
Status: 
Offline
Reputation: 
Reputation Points: 426
OK, I gave up on finding a driver's side 01-03 seatbelt. For some reason they're unobtanium. I did, however, get a pair of 04+ belts out of the same truck on ebay. It appears the only real difference between them is the shape of some of the plastic moldings, not actually how they mount up and work. 
I got lucky and scored on a manual shifter shroud, expo radio bezel, and a new instrument bezel.


____________________
1999 Ford Ranger XLT - 3.0 V6 4x4 - Loaded (Totaled) 143k. Rest in Peace, Gold Dust.
Back To Top PM Quote Reply

 Posted: Tue Aug 4th, 2020 09:52 am
PM Quote Reply
248th Post
410customs

Idahome


Joined: Wed May 2nd, 2018
Location: Panhandle, Idaho USA
Posts: 2165
Name: Jamie ...
Occupation: Elevator Design Worlds Tallest Buildings ...
Interests: Ranger Based Vehicles and OFFROAD ...
Status: 
Offline
Reputation: 
Reputation Points: 2165
the 96-01 5.0 sploder never came with a stick no
But the FSB and F150 and Mustang did
The 302 and 351 trucks even had a version of the mazda 5 speed, the M5od R2 or whatever. Yes the 4.2 V6 also has the same bellhousing as the 5.0
The 95-01 Explorer and 02-04 sport and sport trac v6 DID come with a stick however, You can use the v6 pedals and master cylinder

The 302 in the explorer is basically just a fuel injected 302...you should be able to find a flywheel, clutch and starter setup that will work with your pushrod SBF

Sorry to see about the crappy mirrors....... I will be going down that same path here very soon! Yikes


Those 04 seatbelts may or may not clip into your trucks receivers.....did you get the 04 receivers also? If not let me know if they do not latch I have a trick


____________________
I build custom RBV, specializing in drivetrain conversions, wiring, suspension and complete custom trucks
Back To Top PM Quote Reply

 Posted: Wed Aug 5th, 2020 02:00 pm
PM Quote Reply
249th Post
TheArcticWolf1911
Gunslinger


Joined: Sat Nov 4th, 2017
Location: Evansville, Indiana USA
Posts: 426
Name: Cameron ...
Occupation: Process Technician ...
Interests: Firearms & Ammunition, Ford Rangers, electronics ...
Status: 
Offline
Reputation: 
Reputation Points: 426
I have not ordered the receivers. I figured it couldn't hurt to try.


____________________
1999 Ford Ranger XLT - 3.0 V6 4x4 - Loaded (Totaled) 143k. Rest in Peace, Gold Dust.
Back To Top PM Quote Reply

 Posted: Fri Aug 7th, 2020 09:57 am
PM Quote Reply
250th Post
410customs

Idahome


Joined: Wed May 2nd, 2018
Location: Panhandle, Idaho USA
Posts: 2165
Name: Jamie ...
Occupation: Elevator Design Worlds Tallest Buildings ...
Interests: Ranger Based Vehicles and OFFROAD ...
Status: 
Offline
Reputation: 
Reputation Points: 2165
if they do not click in let me know I have a trick with a grinder that might help
The black interior LOOKS   GREAT!!!!!!!!!!!!! I tried to paint my dash black once....I ripped it out two days later, something about super shiney black paint....back then we did not have all these great plastic paints and dyes
I want black interior so bad, every ranger needs this


____________________
I build custom RBV, specializing in drivetrain conversions, wiring, suspension and complete custom trucks
Back To Top PM Quote Reply

Current time is 03:58 am Top Page:  First Page Previous Page  ...  5  6  7  8  9  10  11  Next Page Last Page    

Ford-Rangers.com Ranger Forum > Tech Section > Member's Projects Showcase > 1999 Ranger "Gold Dust" - Part

Users viewing this topic


PHP Version: 8.2.28
Server version: 10.6.21-MariaDB
UltraBB 2.01.01 Copyright © 2008-2025 Jim & Chris
Page processed in 0.0983 seconds (44% database + 56% PHP). 107 queries executed.