Ford-Rangers.com Ranger Forum HomeFord-Rangers.com Ranger Forum Home
Home Recent Topics New posts Search search Menu menu Not logged in - Login | Register

Ford-rangers.com is a discussion forum, a Ranger forum for people who have questions about fixing or modifying
their Ford Rangers or people who just admire their Ranger. Please join and enjoy sharing experiences!

2000 Ranger 300K earned a v8       #: 2221
 Moderated by: Mike69, MaDMaXX, Page:  First Page Previous Page  1  2  3  4  5  6   
New Topic Reply
 Rate Topic 
 Posted: Thu Nov 26th, 2020 08:48 am
PM Quote Reply
126th Post
410customs

Idahome


Joined: Wed May 2nd, 2018
Location: Panhandle, Idaho USA
Posts: 2165
Name: Jamie ...
Occupation: Elevator Design Worlds Tallest Buildings ...
Interests: Ranger Based Vehicles and OFFROAD ...
Status: 
Offline
Reputation: 
Reputation Points: 2165
heck yes that would be three total 5.0 based Rangers coming out of your camp!! BRING IT!
Happy Thanksgiving! I hope everyone makes it the best day possible


____________________
I build custom RBV, specializing in drivetrain conversions, wiring, suspension and complete custom trucks
Back To Top PM Quote Reply

 Posted: Thu Nov 26th, 2020 09:08 am
PM Quote Reply
127th Post
Junglejoe
Member


Joined: Tue Jun 30th, 2020
Location: Missouri USA
Posts: 293
Name: 
Occupation: 
Interests: 
Status: 
Offline
Reputation: 
Reputation Points: 293
Happy Thanksgiving  J


____________________
2000 EFI 302 Zspec T5 swap ranger
Back To Top PM Quote Reply

 Posted: Fri Nov 27th, 2020 07:33 pm
PM Quote Reply
128th Post
410customs

Idahome


Joined: Wed May 2nd, 2018
Location: Panhandle, Idaho USA
Posts: 2165
Name: Jamie ...
Occupation: Elevator Design Worlds Tallest Buildings ...
Interests: Ranger Based Vehicles and OFFROAD ...
Status: 
Offline
Reputation: 
Reputation Points: 2165
I have been driving this truck, short test drives!!

We have a working speedometer and 4wheel drive

Before I could drive her around too much I had to finish up some extended sway bar links. 

Now she is back in the shop for final alignment and fluid checks, before more test driving this time highway speeds out on the road. 
If all goes as smoothly as I expect she will be ready for delivery!


Old links were 1.5" too short
So I fabricated some, I used Energy suspension urethane bushings this time around.


Energy bushings, threaded rod, some heavy pipe and thick washers + welder = new links!

Top nut is welded to the rod, lower nut is nylock so it will not come loose
I do not take credit for this design, I am simply just copying what was on the truck. So simple! works perfectly for drop bracket lifted Ranger!!


New tie rod boot for drivers side, existing was ripped
Found in Dorman help section


Done and done
New inner tie rod ends, new sway bar links and we are off and running


She sounds so good and with the steering now fixed the truck drives really really well!! 

We used the Dakota digital bluetooth app to setup the speedometer calibrations
The settings are
Low input
Low output
Calibration value set to 1.71

Because = current tires are 30" tall
A 30" tire rotates 695 times in a mile
The 8.8 speed sensor tone ring has 108 teeth on it and it attached to the ring gear, so it rotates 1:1 with the tire 
695 rotations x 108 teeth = 75,060 pulses per mile being generated by the rear axle speed sensor
This is the INPUT wire to the Dakota box
Inside the dakota calibrator
this number now gets multiplied by our set calibration value, which is set at 1.71 (I know from trial and error)
75,060 x 1.71 = 128,352
When you use output 3 on the dakota box this number is now multiplied by 0.0625 (1/16 of the value shown on Output 1)
128,352 x 0.0625 = 8,022 pulses per mile generated to the truck
Perfect! 

Ford speedometer, cruise control, PCM is happy with 8000 pulses per mile +/-
Now using GPS and bluetooth we can fine tune the dakota to register the trucks exact speed on the instrument cluster and live data (PCM) for whatever tire size this truck ever sees (33's!!)


____________________
I build custom RBV, specializing in drivetrain conversions, wiring, suspension and complete custom trucks
Back To Top PM Quote Reply

 Posted: Fri Nov 27th, 2020 09:33 pm
PM Quote Reply
129th Post
VelociRanger
I’ll probably do it tomorrow


Joined: Mon Jun 25th, 2018
Location: Dallas, Texas USA
Posts: 721
Name: Justin ...
Occupation: 
Interests: 
Status: 
Offline
Reputation: 
Reputation Points: 721
Awesome work man, that's a genius sway bar link, seriously. I wonder if you could design one that's quickly detachable to get more wheel travel? That'd be cool. Do you perhaps have a single cab short bed 98+ ranger you're working on? If so you could you by chance get measurements on the distances of the body mounts? If not it's fine, I'll jack mine up and see. The Dakota box deal seems easy to use if you know the correct inputs, I'll probably need one....


____________________
knowing when to quit is wisdom, being able to quit is courage.

1983 Ranger, reluctantly taking apart. Donor/project vehicle.

1997 Ranger Ex Cab Manual 4.0 2wd, dead on arrival. Hopefully reviving for a daily driver.

1984 Ranger, currently in ≈861 pieces. She’s donating what’s salvageable.
Back To Top PM Quote Reply

 Posted: Sat Nov 28th, 2020 10:11 am
PM Quote Reply
130th Post
410customs

Idahome


Joined: Wed May 2nd, 2018
Location: Panhandle, Idaho USA
Posts: 2165
Name: Jamie ...
Occupation: Elevator Design Worlds Tallest Buildings ...
Interests: Ranger Based Vehicles and OFFROAD ...
Status: 
Offline
Reputation: 
Reputation Points: 2165
Thank you!

Sure you can easily make quick disconnect sway bars! I had links on my Bronco II for years... I would get to the trail, pull a couple of pins and had small bujie cords to keep the sway bars tucked up and out of the way. This really allows the suspension to flex especially up front since the sway bar is the only link keeping the IFS from acting independently. Years later I just removed the sway bars completely... with soft springs and stiff shocks, very wide tires, a wide suspension and low center of gravity the BII does not need sway bars. 
The Jeep aftermarket has PLENTY of  quick disconnects for sway bars that can be adapted to your Ranger
The new Jeeps (and others) actually come with an auto disconnecting sway bar...those things are genius! Flip of a switch, bam! unlocked!!


____________________
I build custom RBV, specializing in drivetrain conversions, wiring, suspension and complete custom trucks
Back To Top PM Quote Reply

 Posted: Sun Nov 29th, 2020 10:00 am
PM Quote Reply
131st Post
410customs

Idahome


Joined: Wed May 2nd, 2018
Location: Panhandle, Idaho USA
Posts: 2165
Name: Jamie ...
Occupation: Elevator Design Worlds Tallest Buildings ...
Interests: Ranger Based Vehicles and OFFROAD ...
Status: 
Offline
Reputation: 
Reputation Points: 2165
truck is smooth like glass all the way up to 80 mph, I took her for a 20 mile round trip.
The 4x4 works awesome! Transmission shifts smoothly though all gears, engine runs fantastic, the Borla muffler has a nice small block sound to it without the highway droning noise. I love it!
The speedometer was reading a little slow with the Dakota calibration set to 1.71, so while driving I adjusted it to 1.73, and it now appears to be dead accurate (for these tires).

I have a short list of things to fix, she will be going home next week.

BAM!!!!! 
This truck is so mint, for 301K miles she is as close to a new truck as you are gonna get.


____________________
I build custom RBV, specializing in drivetrain conversions, wiring, suspension and complete custom trucks
Back To Top PM Quote Reply

 Posted: Mon Nov 30th, 2020 10:14 am
PM Quote Reply
132nd Post
410customs

Idahome


Joined: Wed May 2nd, 2018
Location: Panhandle, Idaho USA
Posts: 2165
Name: Jamie ...
Occupation: Elevator Design Worlds Tallest Buildings ...
Interests: Ranger Based Vehicles and OFFROAD ...
Status: 
Offline
Reputation: 
Reputation Points: 2165
So working through the short list of things to fix before she can go home.

#1, slight coolant leak from the coolant line mounted on pass side of the lower intake manifold. The fitting was simply not tight enough. This is pretty common.
Lucky for me I have fixed this same issue a time or two and I know that you can slide a 1" wrench in there if you are careful. So just had to remove the 3 nuts holding the coil pack tripod down and wiggle my way with the wrench to tighten it up. Tighten 1/8 of a turn, flip wrench over, tighten....repeat until its fully tight in the intake
hard to see but the wrench is on the fitting in this pic
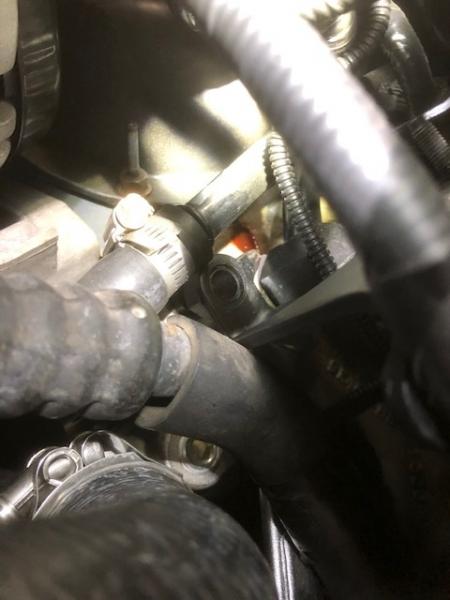
see the puddle of red coolant? NO MORE!
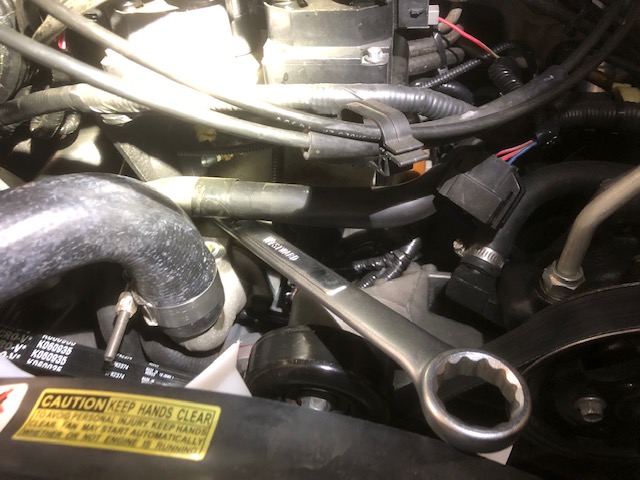

NO LEAKS ALLOWED!! that Amsoil red coolant is nasty when it leaks and gets cooked in place. I had to do a little cleaning to make it easy to spot if it returns.

#2 Next up, the instrument cluster coolant gauge was INOP, earlier in the thread we tried a new sensor and I suspected it was not the correct part...it was not. So I simply removed it with a 19mm deep socket while the coil pack was loose and replaced it with a stock 98 95.0 coolant sensor.
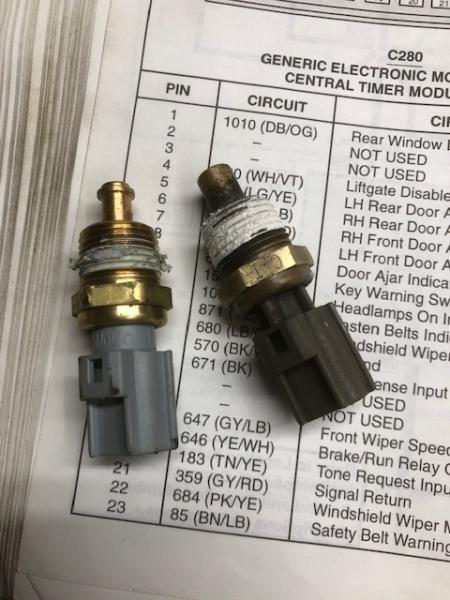
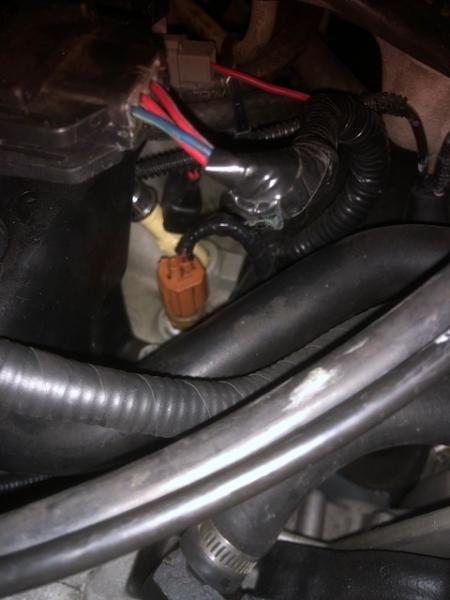


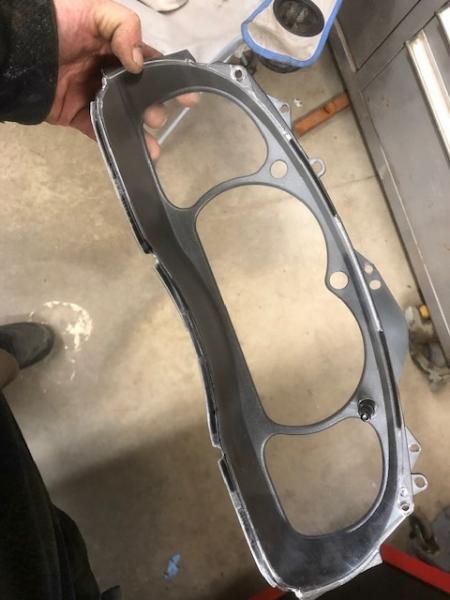
#3 the tachometer was hanging, most times it was reading correctly for the new V8 but it would stick at 3000-2500 rpm. I know this issue I have seen it many times before, with these miles the tachometer head is simply worn out. So I removed the cluster and replaced it with another tachometer head from a 2000 explorer with only 113K on the clock. While the cluster is out it also gets a thorough cleaning (just water and elbow grease)

Cluster is put on the bench and dismantled
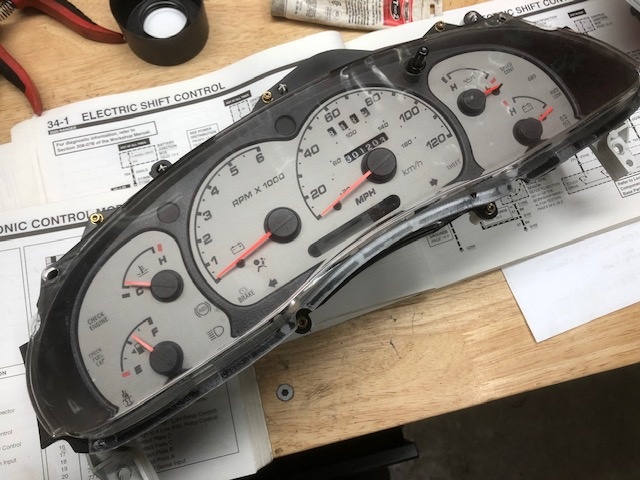
with the clear plastic removed we can see the buildup of dirt/soil/smudges
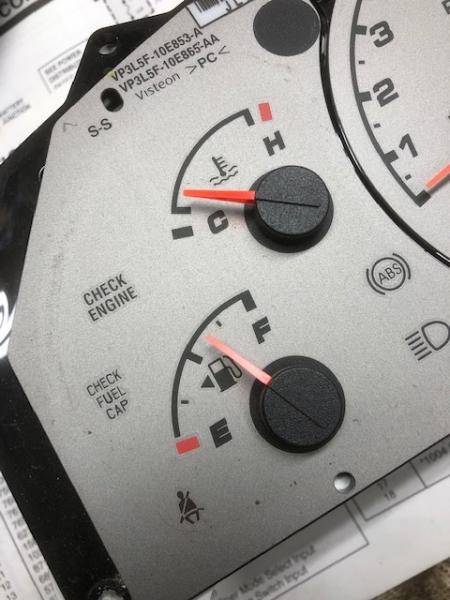

First thing to do is remove the needle from the tachometer so the needle is not attached to the head/drive. A fork is the perfect tool for this, carefully pry and pull upward
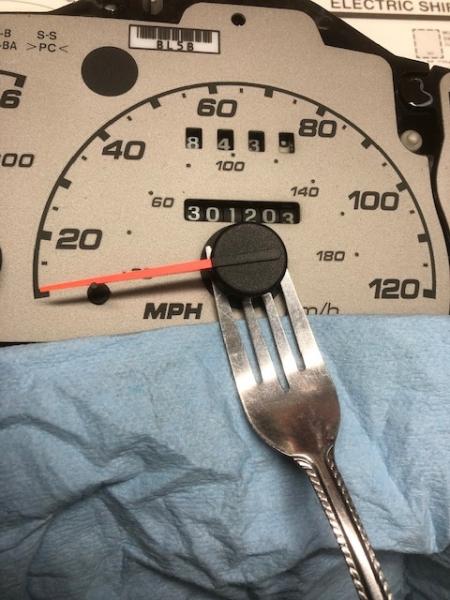

I also removed the speedometer needle, I did not have too...whoops. No harm no foul
113K cluster for parts
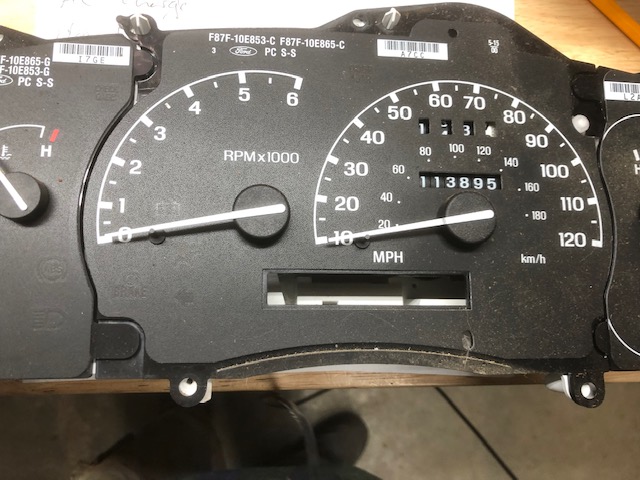

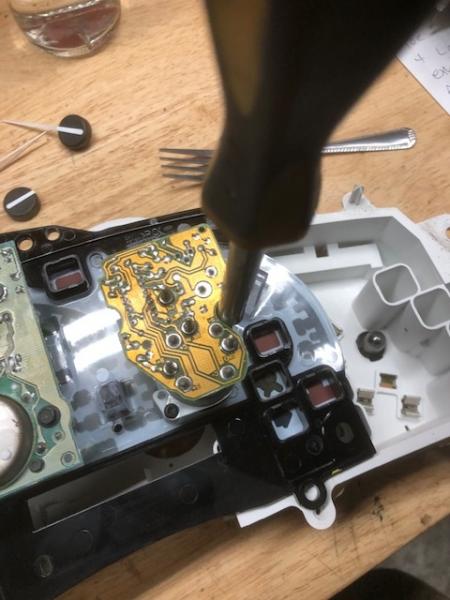
There are 3 "modules" that make up your instrument cluster, they simply pull straight up and out. The first two outer modules must come off first then you can pull up and out the center module containing the speedo and tachometer
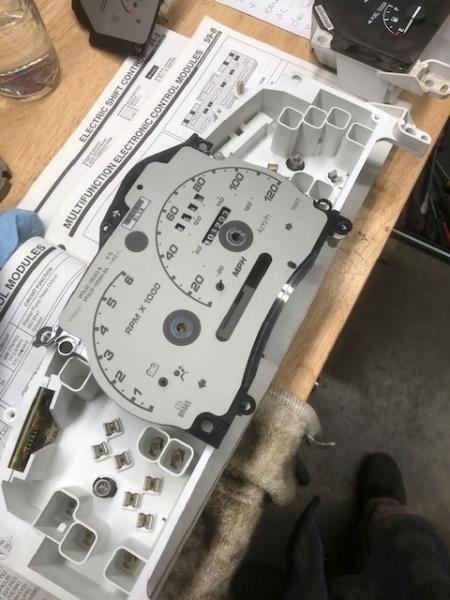


Flip the center module over to reveal the two screws that hold the tachometer drive to the cluster

Compare the parts, make SURE they are the same unit
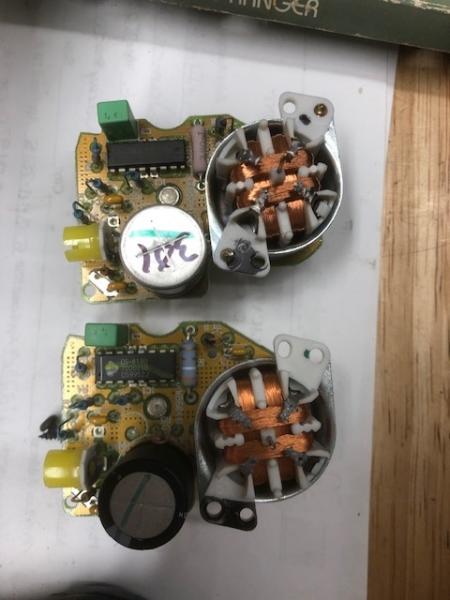

Sure enough the old 301K unit has a nice rattle inside, much "looseness" the part is BAD
Replace with the new one and put the cluster back together
This time I use a clean towel and filtered water to wipe down the gauge faces
Also water, Q tips and towel are used to clean the inside of the cluster "glass"
Cluster is put back together....BUT DO NOT SEAT THE NEEDLES YET or install the glass

the cluster MUST be hooked to the trucks power and the truck turned on, so the cluster is powered NOW you can CAREFULLY put the needles into their home position (resting on the pegs)
See how clean the surfaces are now? no more schmutz
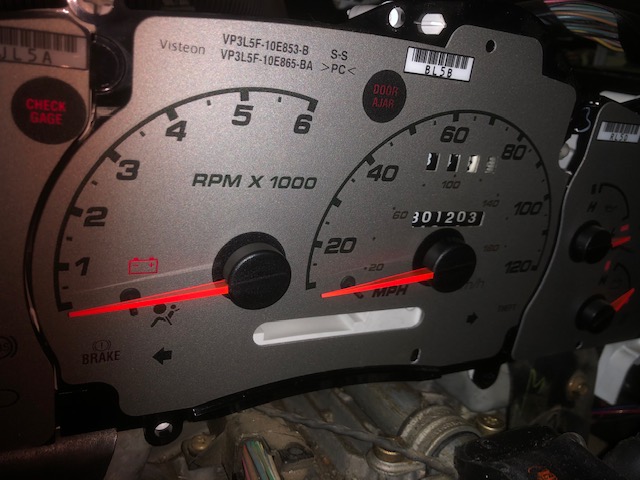

Cluster now put back on the bench and all screws put back in, ready for re install
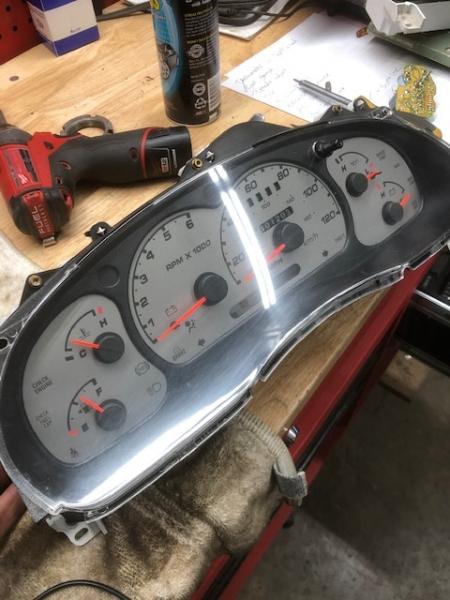

Done, moving on

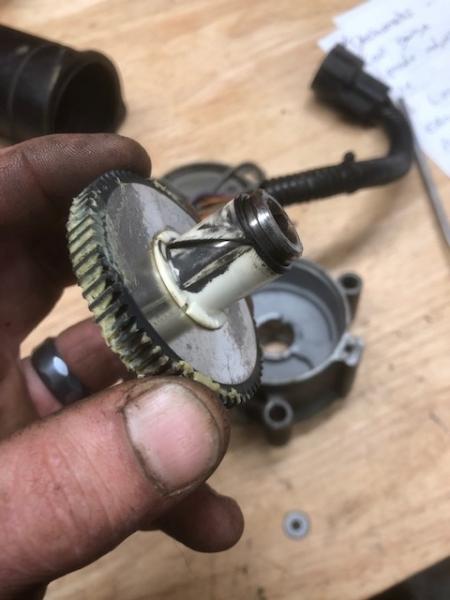
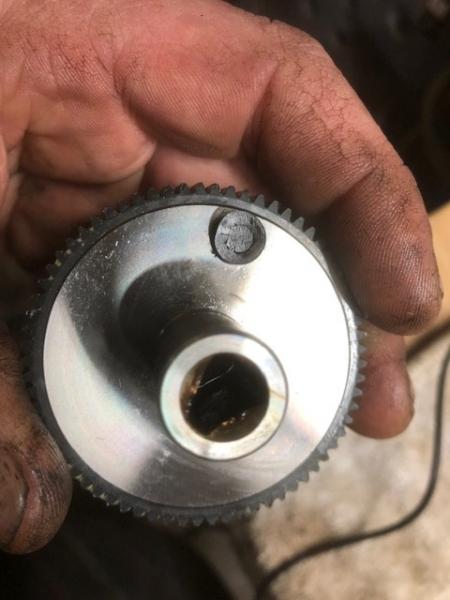
#4, Lazy 4x4 shift. So this truck is still using the Ranger shift motor on the transfer case and I was unable to get the low range shift. Truck in N, foot on brake, no low shift. 4 high was also taking a while. I know this is a lazy shift motor so I decided to remove it and give it a soft rebuild.

Shift MOTOR (LOL!!) placed on the bench and taken apart. First mark the stator housing so you can be sure to put it back together in the exact same position. Looks to be 301K miles inside, plenty of dirt and grime.
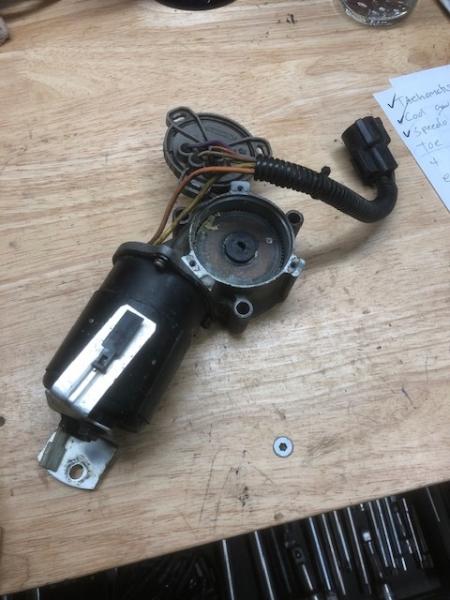

nasty look at the stator, it is not supposed to be black!
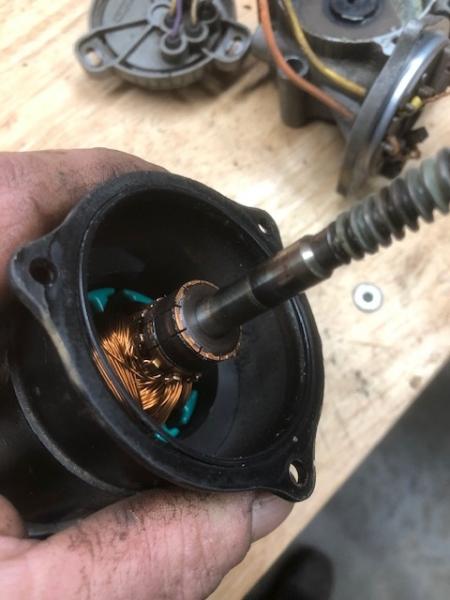

rouge on the stator gear shaft also
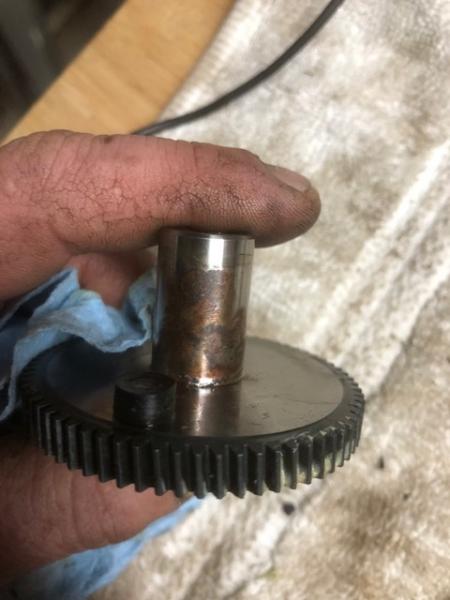


Nasty brushes too
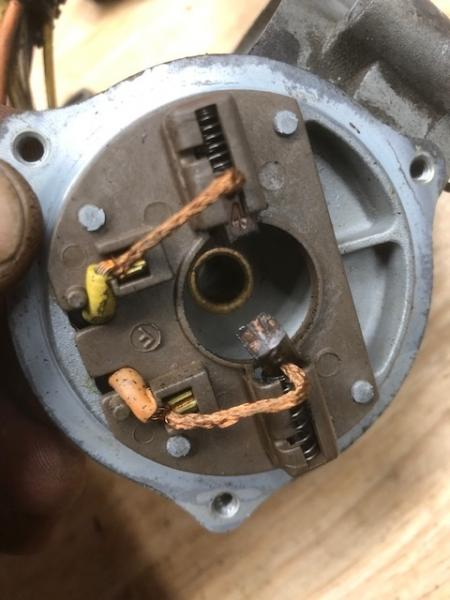

Parts will all be cleaned up
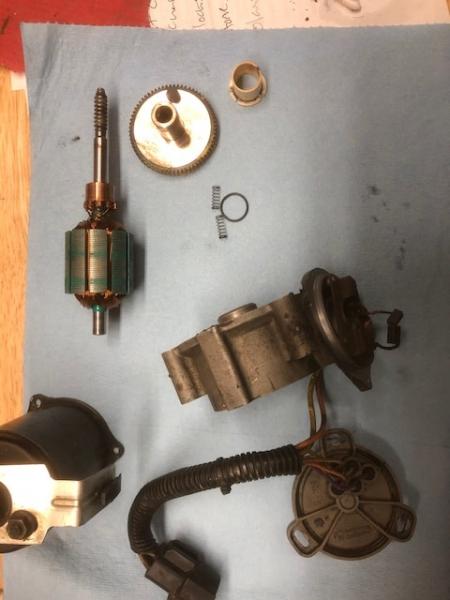

scotch brite, sandpaper and PB blaster are all that is needed, and some Q tips.

way better
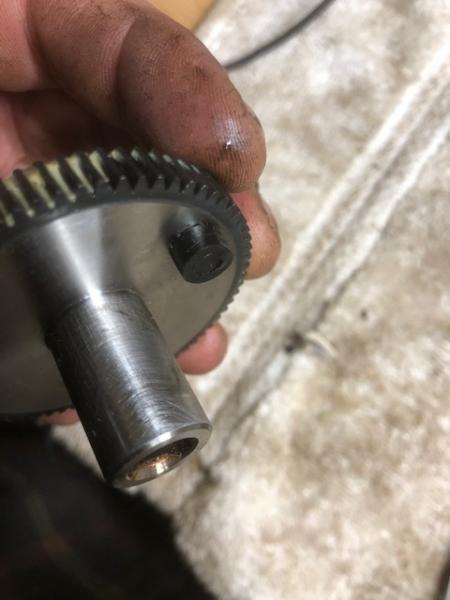


everything is clean, the stator, the brushes, housing, bushings, gears, and case.
Now to re assemble, I use some white grease on the rotating bits and some anti seize on the plastic bushing.

Clean brushes are now seated on their springs and using the little tabs in the plastic the wires can hold them back so you can insert the rotor...nice of Ford to do this, the older motors DID not have this.
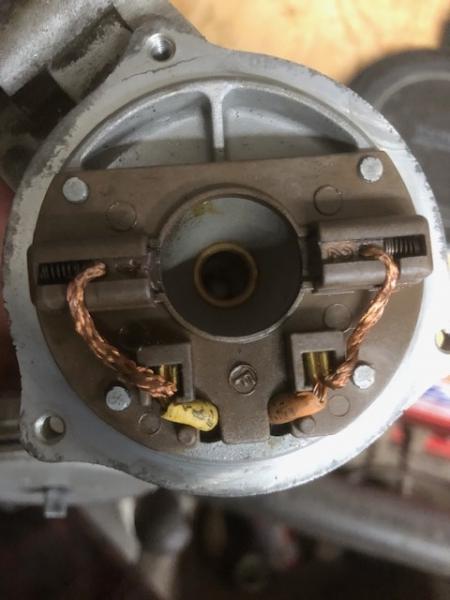
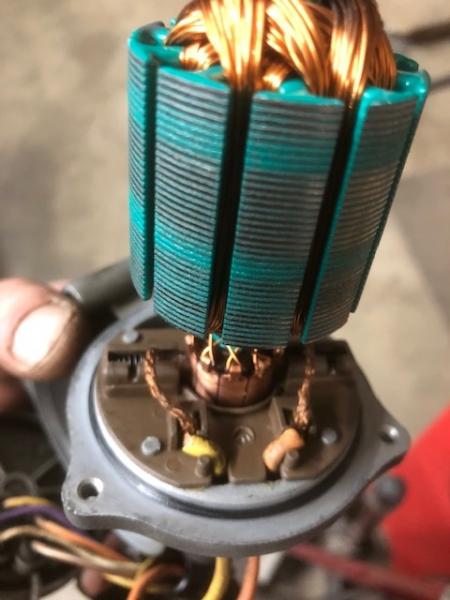

With the rotor in place the brush wires are released, now you can CAREFULLY install the case/magnets. Holding the worm drive in place makes things go together easily.

Motor is re installed on the truck and the 4x4 shift is checked. 
WOW what an improvement, I can hear the motor shift and the shift relays click behind the dash. 2wd to 4 high is VASTLY improved. It was taking 2-3 seconds to shift... not anymore

However still no LOW RANGE. Lucky for me I know EXACTLY where to look

#5, no low range

Okay so this one is a bit tricky and has stumped many people over the years. Lucky for me we have run into this a few times before. You see in order for the truck to allow the shift from 4hi to 4 low you must be stopped and in N. So how does the truck know you are stopped? signal from the VSS to the gem module of course. How does it know you have your foot on the brake? Signal from the BPP (brake pedal pos) switch to the GEM module of course. How does it know you are in Neutral...well there is a wire that feeds the GEM module directly from the neutral safety switch on the side of the transmission. Also known as the DTRS (digital transmission range sensor). So what gives?
Well the 5.0 explorers never had electronic shift controls, they were all either RWD or full time AWD> no 4x4. So Ford for whatever reason left this one wire out ONLY ON SOME TRUCKS! The crazy thing is the wire is shown as existing in all of the wiring books. However when we go to check we can see, sure enough although the wire exists on the truck side of things it is MIA on the 5.0 engine/trans harness.

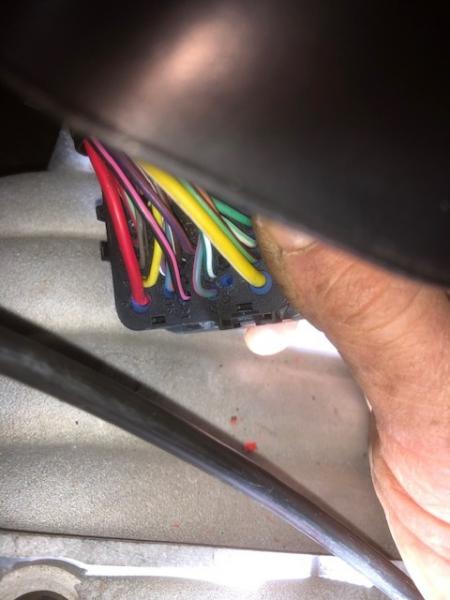
Pin 33 is Red/White circuit 463, NSS (neutral safety sensor) from trans DTRS through the 42 pin connector to the truck
Fuzzy but you can see pin 33 is MIA on the engine side
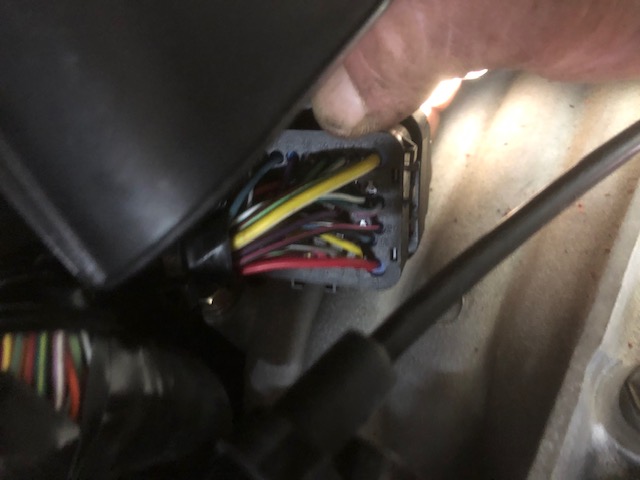

I drilled out the blank spot

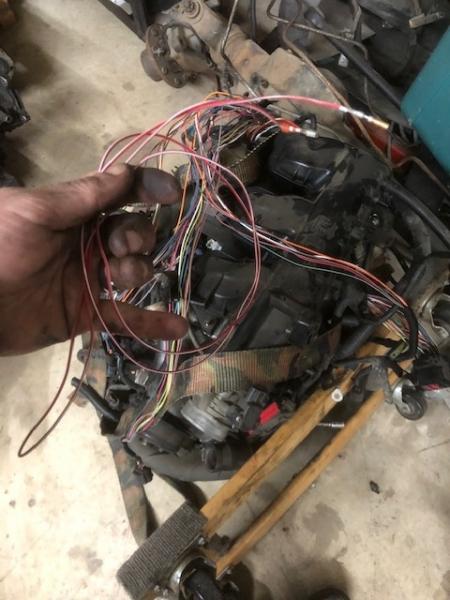
Now I need a wire, the best thing to do is use the SAME wire from the old 4.0 harness
This guy is carefully removed from the old harness
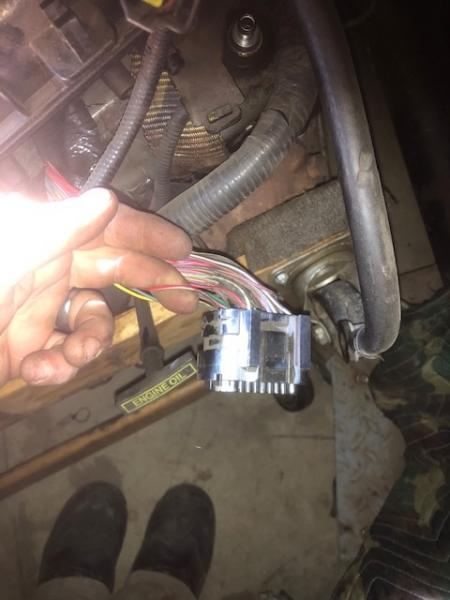

from 42 pin plug to transmission DTRS unpinned on both sides and pulled out
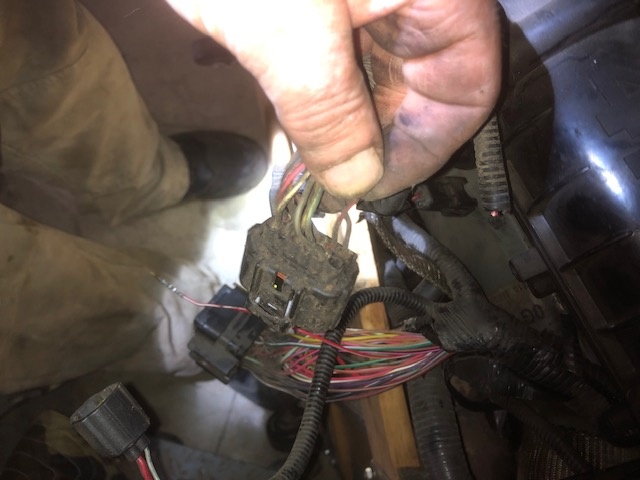


Now to install on truck/5.0 harness
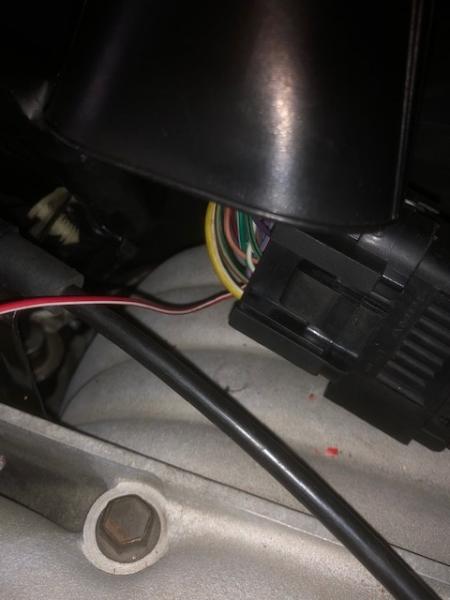

It was late Sunday night so I decided to stop here. But before I could sleep I had to know, did it work? I know that the NSS signal is simply a ground (when in Neutral the transmission sends ground through this wire) so I placed it on the - battery terminal, put truck in N and with foot on the brake without hesitation the truck EASILY shifted into LOW RANGE!!
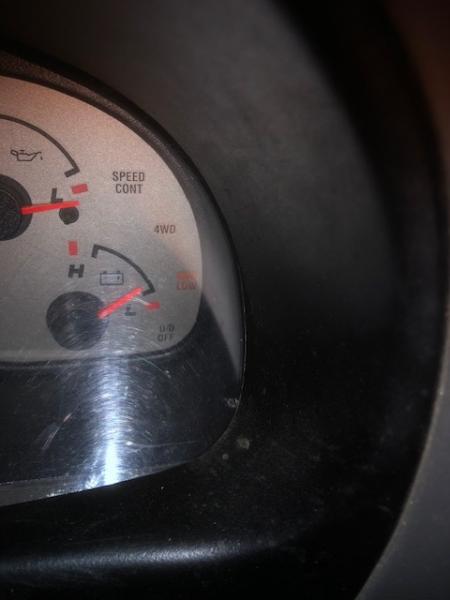

Success!! Today I will properly route the wire and install in the v8 DTRS harness.
Slept like a baby

List of things to fix is now very very short, as in I just need to adjust the front alignment / toe, that will happen this am


____________________
I build custom RBV, specializing in drivetrain conversions, wiring, suspension and complete custom trucks
Back To Top PM Quote Reply

 Posted: Mon Nov 30th, 2020 08:58 pm
PM Quote Reply
133rd Post
410customs

Idahome


Joined: Wed May 2nd, 2018
Location: Panhandle, Idaho USA
Posts: 2165
Name: Jamie ...
Occupation: Elevator Design Worlds Tallest Buildings ...
Interests: Ranger Based Vehicles and OFFROAD ...
Status: 
Offline
Reputation: 
Reputation Points: 2165
the new circuit 463 red with white wire (RD/WH) was run to the 4r70w transmission DTRS, pin 8.
research shows you must also add a ground wire to the pin next to it.
Again I turned to the old v6 harness and nabbed the black ground wire for pin 9


red and black wires seen here in their new home. This plug on the 5.0 truck side was empty as these two wires are dedicated to the 4x4 electronic shift system......

The ground wire was kept very short and is actually terminated at the red bolt top left of this picture. The t case body and brackets make for a solid negative ground - 


4406 E shift transfer case fully functional, check.  :cool:


____________________
I build custom RBV, specializing in drivetrain conversions, wiring, suspension and complete custom trucks
Back To Top PM Quote Reply

 Posted: Wed Dec 2nd, 2020 09:28 am
PM Quote Reply
134th Post
410customs

Idahome


Joined: Wed May 2nd, 2018
Location: Panhandle, Idaho USA
Posts: 2165
Name: Jamie ...
Occupation: Elevator Design Worlds Tallest Buildings ...
Interests: Ranger Based Vehicles and OFFROAD ...
Status: 
Offline
Reputation: 
Reputation Points: 2165
#6 front end alignment

All right since I replaced the inner tie rod ends on this truck and the old ones were bent. The old tires on this truck were cooked and the owner is bringing brand new set of tires for the drive home, we needed a decent alignment.
Adjusting the toe on these trucks could not be much easier if you know how. RWD trucks get set at 1/8" toe in. Why? You ask.... because a RWD truck when you hit the gas the rear axle drives forward which pushes the front tires outward, so the stock setting of 1/8" toe in (1/16" per side!!) allows the tires to straighten out when you hit the throttle.

Toe can be adjusted with some jack stands and string. First the steering wheel is set dead center, the tire pressures are all checked to be even!! Next jack stands and string are setup to be perfectly aligned to the rear tire.


Make sure string is at similar height front to back, target is the center of the wheel, for us that is 14.5" from shop floor

Next set the jack stands so the string is EXACTLY the same distance from the rear tire at the front and rear of the tire. Measurements are taken from the "crown" of the sidewall


Once it is set perfectly you now have a string that is parallel to your rear tire extending past the front tire. You can now measure the front tire to see how far the toe is out.
Write down your settings, I was using a MM gauge but wanted to show you can also use a tape measure no problem


The numbers do not lie, this tire is "toed out" too far, meaning at the rear of the tire I recorded 5.5mm and at the front 4.5mm so a full 1mm out. 
To adjust it, I need to move the tie rod end 1/2mm and it would be set at 0 toe. I want 1/16" of toe in per side so I made appropriate adjustments


7/8" wrench to make sure the outer tie rod end does not move. 7/8" wrench on the jam nut to loosen it, 1/2" wrench on the inner tie rod for adjustments. Make sure you loosen the clamp on the inner tie rod end boot so that the ITRE can spin inside the boot
I needed 1/8" of adjustment so I moved the jam nut out that far

then I twisted the inner tie rod to match, check my tire again and then jam the nut back down.

At the tie rod with these front ends, adjustments are super simple. 
Release the jamb nut, spin the inner tie rod in or out as needed to adjust the distance needed, check measurements and then jamb down the jam nut. 

Both sides were done the same way.

End results this truck is 1/16" toe in per side. This method can be very accurate if you take your time and triple check all measurements. 
Make sure the steering wheel stays dead center. :)

Front end TOE adjustment DONE


____________________
I build custom RBV, specializing in drivetrain conversions, wiring, suspension and complete custom trucks
Back To Top PM Quote Reply

 Posted: Wed Dec 2nd, 2020 08:13 pm
PM Quote Reply
135th Post
410customs

Idahome


Joined: Wed May 2nd, 2018
Location: Panhandle, Idaho USA
Posts: 2165
Name: Jamie ...
Occupation: Elevator Design Worlds Tallest Buildings ...
Interests: Ranger Based Vehicles and OFFROAD ...
Status: 
Offline
Reputation: 
Reputation Points: 2165
#7 door lock cylinder replacement

Using the door locks from the v8 donor explorer will give our ranger one key that works both doors and the ignition.
The 2000 Explorer donor and this 2000 Ranger both use the same part number for the driver and passenger door locks, so there is nothing exotic about changing these out.
Most explorers come with keyless entry so their physical door locks do not get much use. For this reason they are often sticky and difficult to work. I spent much time cleaning them and lubricating so they operate smoothly. Now both doors function like a new truck!

First up, remove the door panel. There are 3 screws on a Ranger.... and then you can pry the door handle piece off, it uses press clips. 


press clips 


Don't forget this screw!

That exposes the final 4th screw before the panel can be carefully lifted straight up and off

Now to carefully pry out the door lock cylinder locking key


Old lock can now be removed from the door, reach in and move the cylinder so it points upward = the plastic arm will slide off of the pushrod.


All surfaces cleaned while the panel is off


New lock cylinder placed, this is what it looks like inside the door


clever anti squeak mods!!


I might have to borrow this one to fix any sagging or noisy door panels!

New locks in and work fantastic.


Done.... last thing to do before a couple more test drives
Clean, vacuum and charge the air conditioning


____________________
I build custom RBV, specializing in drivetrain conversions, wiring, suspension and complete custom trucks
Back To Top PM Quote Reply

 Posted: Fri Dec 4th, 2020 09:06 pm
PM Quote Reply
136th Post
Tsquare
Member


Joined: Fri Nov 10th, 2017
Location: Suwanee, Georgia USA
Posts: 1540
Name: 
Occupation: Controlled Insanity ...
Interests: 
Status: 
Offline
Reputation: 
Reputation Points: 1540
Interesting. The 04 ha 4 screws in the door. Two at the handle. one in the lower rear area, and one under the handle insert.

BTW: Thanks for the tutorial on removing the door locks. I did a poor job on the driver side taping them up for the paint job. I will pull them for the next coat.


____________________
Tony
NE ATL
'04 XLT regular cab 3.slo stepside
Semi retirement
Back To Top PM Quote Reply

 Posted: Sat Dec 5th, 2020 01:28 pm
PM Quote Reply
137th Post
410customs

Idahome


Joined: Wed May 2nd, 2018
Location: Panhandle, Idaho USA
Posts: 2165
Name: Jamie ...
Occupation: Elevator Design Worlds Tallest Buildings ...
Interests: Ranger Based Vehicles and OFFROAD ...
Status: 
Offline
Reputation: 
Reputation Points: 2165
Yes sorry! there are 4 screws total
3 are exposed the 4th is hidden behind the black door handle bit

The truck is on her way home! Owner arrived this morning and we fit her with brand new Cooper 285/16 all terrains on sweet Gen III explorer wheels with a nice black powder coat and custom painted center caps.

That is one sweet Ranger, about as close as you are gonna get to a "new" 2000 and now a bulletproof v8 1/2 ton drivetrain.

I sure enjoyed building it and testing the truck out. 
I hope to hear there are no issues with the 5+ hour drive home an that she makes it to 500K miles..........................No problem for a 306/4r70w/4406 31 spline 8.8 with 1330 series U joints. 
Ranger is OVER BUILT!! Reliability and longevity, this is why we build V8 4wd rangers


____________________
I build custom RBV, specializing in drivetrain conversions, wiring, suspension and complete custom trucks
Back To Top PM Quote Reply

 Posted: Sat Dec 5th, 2020 04:46 pm
PM Quote Reply
138th Post
Eddie Money
Member


Joined: Mon Nov 13th, 2017
Posts: 1587
Name: 
Occupation: 
Interests: Burt gummer life ...
Status: 
Offline
Reputation: 
Reputation Points: 1587
Probably too late but, i would like to see it with the new wheels n tires


____________________


I know my crazy! Do you?
2007 Sport 4door 4x4 4.0L SOHC V6 Ranger
Back To Top PM Quote Reply

 Posted: Sun Dec 6th, 2020 10:45 am
PM Quote Reply
139th Post
410customs

Idahome


Joined: Wed May 2nd, 2018
Location: Panhandle, Idaho USA
Posts: 2165
Name: Jamie ...
Occupation: Elevator Design Worlds Tallest Buildings ...
Interests: Ranger Based Vehicles and OFFROAD ...
Status: 
Offline
Reputation: 
Reputation Points: 2165
Oh there will be pictures!!
The owner has some wicked cool final touches planned, lazer etching the fender badges and engine plate.
I want to see her with the new wheels and tires too, it was so cold yesterday am we had to swap tires, get them on their way and driving home


She made it home with one small issue? Something about the power steering line fitting developed a leak and she lost her PS fluid!!! 

Otherwise she made it and he is very happy with the truck. Happy enough to let me work on some of his other projects too!.........in the spring when its not so cold HAHAHAHAHA

Truck runs so nicely you guys, she was a real pleasure to drive...so smooth!!! The old tired 301K mile 4.0 pushrod is no match for this new setup, like night and day


____________________
I build custom RBV, specializing in drivetrain conversions, wiring, suspension and complete custom trucks
Back To Top PM Quote Reply

 Posted: Mon Dec 7th, 2020 09:53 am
PM Quote Reply
140th Post
410customs

Idahome


Joined: Wed May 2nd, 2018
Location: Panhandle, Idaho USA
Posts: 2165
Name: Jamie ...
Occupation: Elevator Design Worlds Tallest Buildings ...
Interests: Ranger Based Vehicles and OFFROAD ...
Status: 
Offline
Reputation: 
Reputation Points: 2165
At home with new wheels and new grill! Truck has been home 1 day and already getting some serious upgrades
stay tuned!


____________________
I build custom RBV, specializing in drivetrain conversions, wiring, suspension and complete custom trucks
Back To Top PM Quote Reply

 Posted: Mon Dec 7th, 2020 12:57 pm
PM Quote Reply
141st Post
Tires1
Member
 

Joined: Mon Dec 7th, 2020
Location: Virginia USA
Posts: 13
Name: 
Occupation: 
Interests: 
Status: 
Offline
Reputation: 
Reputation Points: 13
HEY GUYS I HAVE A 2000 FORD RANGER 2WD WITH A 1997 MERCURY MOUNTAINNER 5.0 I CANT IT TO START ANY IDEAS WHAT YOU GUYS DID WITH THE WIRING TO GET IT TO RUN COMPLETE TRUCK JUST NO START

Back To Top PM Quote Reply

 Posted: Tue Dec 8th, 2020 01:36 pm
PM Quote Reply
142nd Post
Junglejoe
Member


Joined: Tue Jun 30th, 2020
Location: Missouri USA
Posts: 293
Name: 
Occupation: 
Interests: 
Status: 
Offline
Reputation: 
Reputation Points: 293
J... Simply amazing! Looks absolutely perfect!
 Question: once you pl those needles off of the cluster, how do you put them back to make sure thw needle reads  correct.


____________________
2000 EFI 302 Zspec T5 swap ranger
Back To Top PM Quote Reply

 Posted: Tue Dec 8th, 2020 01:37 pm
PM Quote Reply
143rd Post
Junglejoe
Member


Joined: Tue Jun 30th, 2020
Location: Missouri USA
Posts: 293
Name: 
Occupation: 
Interests: 
Status: 
Offline
Reputation: 
Reputation Points: 293
Tires1 wrote:
HEY GUYS I HAVE A 2000 FORD RANGER 2WD WITH A 1997 MERCURY MOUNTAINNER 5.0 I CANT IT TO START ANY IDEAS WHAT YOU GUYS DID WITH THE WIRING TO GET IT TO RUN COMPLETE TRUCK JUST NO START
So it spins over, but no fire?


____________________
2000 EFI 302 Zspec T5 swap ranger
Back To Top PM Quote Reply

 Posted: Tue Dec 8th, 2020 03:31 pm
PM Quote Reply
144th Post
410customs

Idahome


Joined: Wed May 2nd, 2018
Location: Panhandle, Idaho USA
Posts: 2165
Name: Jamie ...
Occupation: Elevator Design Worlds Tallest Buildings ...
Interests: Ranger Based Vehicles and OFFROAD ...
Status: 
Offline
Reputation: 
Reputation Points: 2165
the needles are carefully pressed back onto the cluster while the truck is running!!!! So I have my scanner out and I can see the engine RPM, the tach needle is placed on the little peg with truck running, then if your happy with where it sits press it all the way on. delicate process but it works.
The speedometer needle you simply press it on while resting fully on the stop "peg"
Check your work before finally adding the clear plastic shield and putting the dash all back together.
instrument cluster work is part of the deal, with every conversion.... 302K that tachometer was toast! the motor rattles when you shake it....they are not supposed to do that!

Crank no fire = 
check for spark while cranking
check fuel pressure at the rail


____________________
I build custom RBV, specializing in drivetrain conversions, wiring, suspension and complete custom trucks
Back To Top PM Quote Reply

 Posted: Tue Dec 8th, 2020 04:25 pm
PM Quote Reply
145th Post
Junglejoe
Member


Joined: Tue Jun 30th, 2020
Location: Missouri USA
Posts: 293
Name: 
Occupation: 
Interests: 
Status: 
Offline
Reputation: 
Reputation Points: 293
10-4 J


____________________
2000 EFI 302 Zspec T5 swap ranger
Back To Top PM Quote Reply

 Posted: Sun Dec 13th, 2020 11:55 am
PM Quote Reply
146th Post
410customs

Idahome


Joined: Wed May 2nd, 2018
Location: Panhandle, Idaho USA
Posts: 2165
Name: Jamie ...
Occupation: Elevator Design Worlds Tallest Buildings ...
Interests: Ranger Based Vehicles and OFFROAD ...
Status: 
Offline
Reputation: 
Reputation Points: 2165
Truck had an alignment yesterday, I was a little off :) I should have spent more time with the toe adjustments, like square up the string to the truck... what I did was a quick and dirty front toe alignment knowing it was going to be on brand new tires for a 5+ hour ride home. The owner took truck in for a real alignment and my drivers tire was a little too far toed in :) 

The good news is she still runs like a top, owner is very very happy with the truck and MORE updated pics will be coming our way!!


____________________
I build custom RBV, specializing in drivetrain conversions, wiring, suspension and complete custom trucks
Back To Top PM Quote Reply

 Posted: Sun Jan 24th, 2021 10:36 am
PM Quote Reply
147th Post
Junglejoe
Member


Joined: Tue Jun 30th, 2020
Location: Missouri USA
Posts: 293
Name: 
Occupation: 
Interests: 
Status: 
Offline
Reputation: 
Reputation Points: 293
Hey J, on those wicked performance coils, what's your opinion on those? Any higher output than the stockers?


Also , the Taylor wires you used on the truck, how was the fitment? Any headers issues with them?


____________________
2000 EFI 302 Zspec T5 swap ranger
Back To Top PM Quote Reply

 Posted: Thu Feb 18th, 2021 10:38 am
PM Quote Reply
148th Post
410customs

Idahome


Joined: Wed May 2nd, 2018
Location: Panhandle, Idaho USA
Posts: 2165
Name: Jamie ...
Occupation: Elevator Design Worlds Tallest Buildings ...
Interests: Ranger Based Vehicles and OFFROAD ...
Status: 
Offline
Reputation: 
Reputation Points: 2165
So far the performance coils have been just fine, however the factory Ford DIS ignition system is VERY GOOD and you only really need good plugs are wires, no need to upgrade the coil packs
The taylor wires are my favorite, they perform awesome for years and years. They will fit with headers, just get the 45 degree boots
They are some tough ass wires and they hold up to our under hood environment
Use plenty of heat shielding, careful routing and plenty of grease to keep moisture out

The truck is doing very good! The owner had an issue, for a while the truck had a slight miss and was throwing a trouble code for cylinder 7 misfire
injectors were replaced and then a compression test / leak down test was performed. Luckily the Jasper engine is fine................so what would cause cyl 7 to misfire? The injectors were checked, ignition was checked, cam sensor aligned, etc........ Finally a smoke test revealed that at high RPM the EGR diaphragm was allowing air past....the EGR valve was replaced and the code and misfire went away.

Last I hear the Ranger was blazing through the deep snow that Seattle received last week!! Another happy V8 Ranger being daily driven and put to work!!!

That is what this is all about!!


____________________
I build custom RBV, specializing in drivetrain conversions, wiring, suspension and complete custom trucks
Back To Top PM Quote Reply

Current time is 05:18 pm Top Page:  First Page Previous Page  1  2  3  4  5  6     

Ford-Rangers.com Ranger Forum > Ranger Engine Tech > 8 Cylinder Gasoline > 2000 Ranger 300K earned a v8

Users viewing this topic


PHP Version: 8.2.28
Server version: 10.6.22-MariaDB
UltraBB 2.01.01 Copyright © 2008-2025 Jim & Chris
Page processed in 0.0940 seconds (40% database + 60% PHP). 101 queries executed.