Ford-Rangers.com Ranger Forum HomeFord-Rangers.com Ranger Forum Home
Home Recent Topics New posts Search search Menu menu Not logged in - Login | Register
Ford-Rangers.com Ranger Forum > Tech Section > How-To Section > How to: Rear Disc Swap a 31 Spline Axle

Ford-rangers.com is a discussion forum, a Ranger forum for people who have questions about fixing or modifying
their Ford Rangers or people who just admire their Ranger. Please join and enjoy sharing experiences!

How to: Rear Disc Swap a 31 Spline Axle       #: 561
 Moderated by: NoPower, Mike69, MaDMaXX,
New Topic Reply
 Rate Topic 
 Posted: Mon Feb 5th, 2018 11:20 pm
PM Quote Reply
1st Post
Kealel
Certified Ranger Nutjob


Joined: Sat Oct 21st, 2017
Posts: 174
Name: Keegan ...
Occupation: Engineer ...
Interests: Rangers. Duh. Also Robots. ...
Status: 
Offline
Reputation: 
Reputation Points: 174
In this How To, I am going to show you how to swap disc brakes onto your 31 spline rear axle.

THIS IS ONLY FOR THE FOLLOWING AXLES:
2002 RANGER FX4
2003 - 2007 RANGER FX4 LEVEL II
2007+ RANGERS WITH AXLE CODE XR8
EXPLORERS WITH REAR DRUM BRAKES


NEITHER I NOR FORD-RANGERS.COM IS RESPONSIBLE FOR ANY INJURIES / DEATHS / LOSS OF MONEY / GENERAL MISFORTUNE THAT MAY OCCUR WHILST YOU ATTEMPT THIS ON YOUR OWN. RESULTS MAY VARY. 


The disc brake we will be using is the Explorer one. The years range from 1995 to 2001, Any 2 or 4 door Explorer minus the Sport Trac.


Needed parts are:

~Explorer Disc Backing Plates~Rotors~Pads~Calipers~Caliper mounting kit~Parking brake kit~Brake lines~Parking brake cables~Differential Fluid

With all that ugliness out of the way now, lets continue.
Step one: remove everything off of the ends of the axle that you can (Wheels, drum and hardware, parking brake cable, etc.). You really only need to remove the wheel and drum, but this eliminates adding in extra steps of removing all the extra parts later.


Note: If your axle is in yo
ur truck and not on a bench like mine, remember to put the rear end on jack stands and put blocks on the front wheels to minimize the possibility of being crushed.
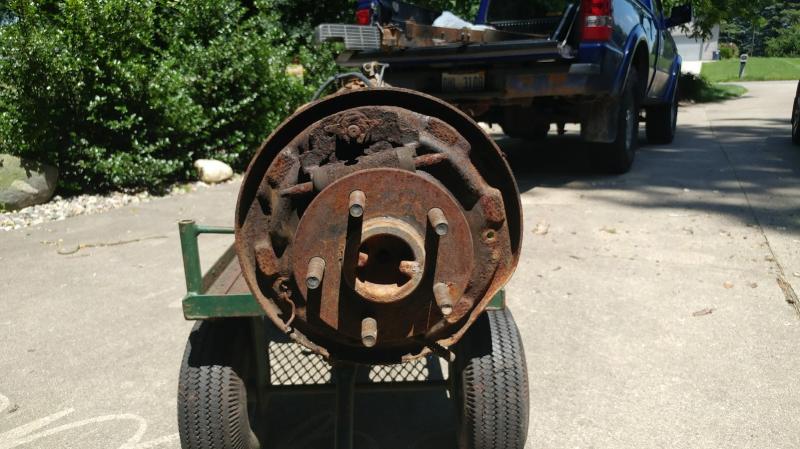


Step Two: Now that the external parts of the axle shafts are free, it is time to free them from the inside. For this step, remove the 1/2" bolts holding the differential cover on. I left the top bolt halfway in and had a drain pan underneath to catch the oil. I then gently pried the bottom of the cover off so that the oil would drain and the top bolt kept the cover from falling.


Step Three: Once the diff fluid is drained, you want to remove the center pin. This is held in by a 8mm bolt. Once the bolt is removed, the pin slides straight out. It may not matter, but remember what side of the pin goes on the left or right, it is best to install things exactly how they were.
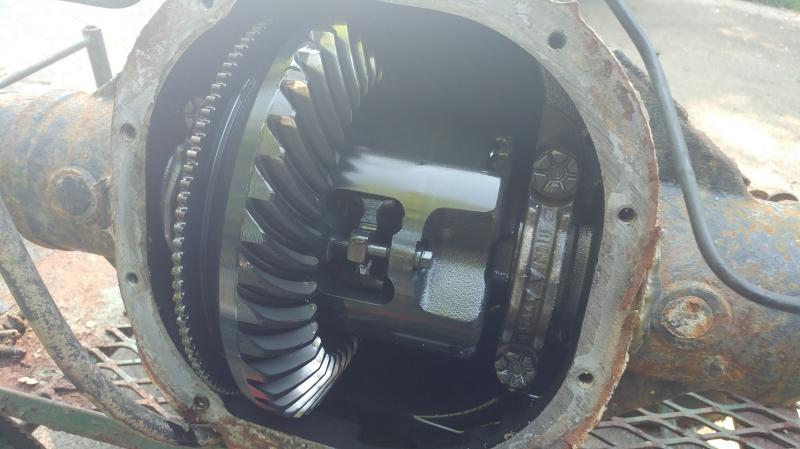
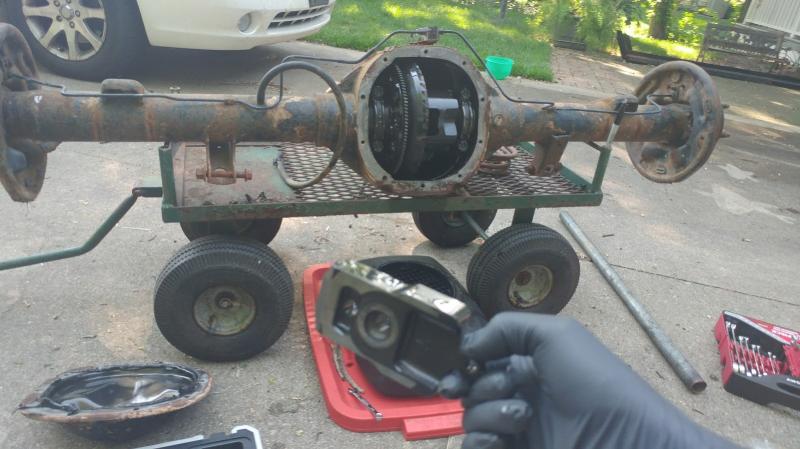
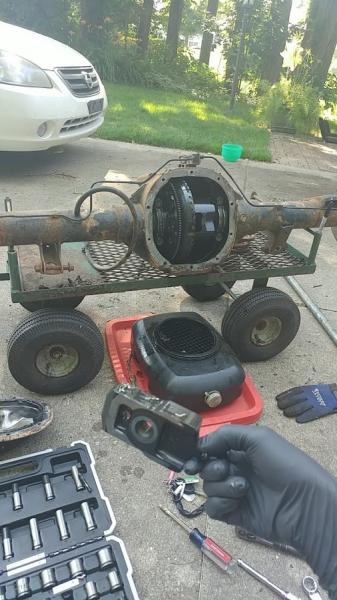


Step Four: With the pin removed, the axle shafts can be pushed in. This is where having the brake hardware removed is helpful, while most of the time is not needed. With the shafts pushed in, You can see the C clip that holds them in place. This pin, if you do it correctly, pulls off directly towards you and frees the shaft allowing it to come off. My hand was too large to get the clip off with my fingers, so I used two bent screwdrivers to help walk the clip off.


Pro tip: To keep the shafts pushed in far enough for the clip to slide off, use a ratchet strap or some rope to keep the shaft from sliding back out. The axle seal that rests against the axle shaft pushes it out and makes this job much harder without any outside help (whether it be a tool or a person)
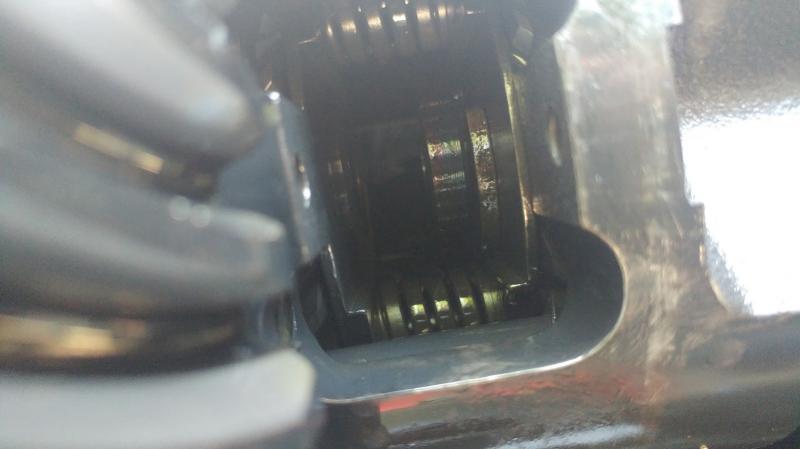


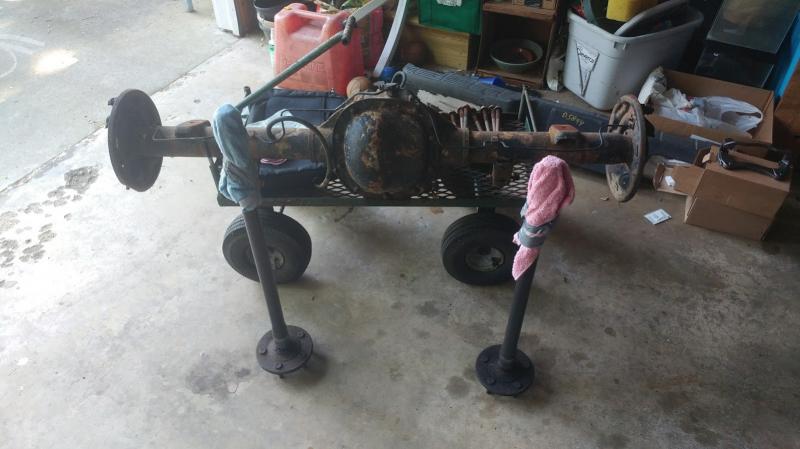
Step Five: Once the shafts can be removed, remove them. If the shafts will be sitting outside for a while, put a rag on them to prevent them from rust and dirt.


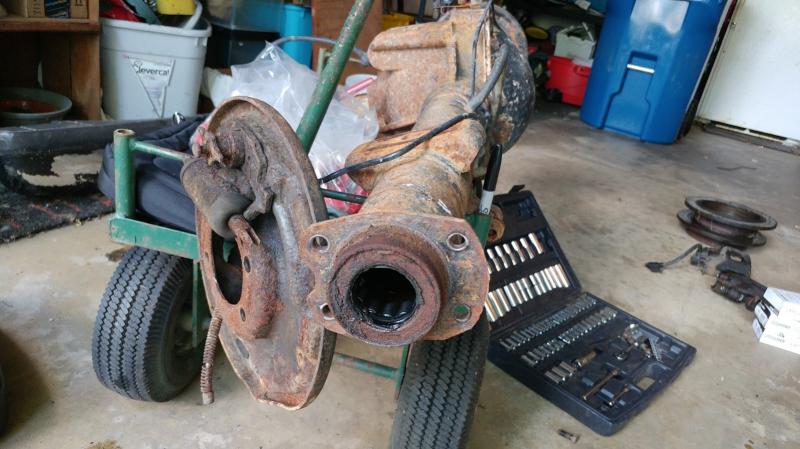
Step Six: With the axle shafts out, you can now remove the drum brake backing plate and install the disc brake one.
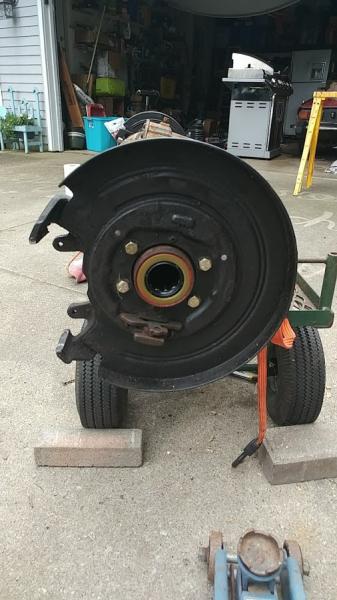


Step Seven: Put the axle shafts back in. Do not install the parking brake shoes before this as you will not be able to push the shafts in far enough to put the C clips back on.
Step Eight: Install the center pin the same orientation as it was originally and reinstall the securing bolt. 


WARNING: THIS BOLT SHOULD BE REPLACED AS IT COULD HAVE ITS HEAD SNAP OFF WHEN YOU TIGHTEN IT DOWN, AND WHEN YOU REPLACE THIS BOLT, BE SURE TO USE LOCTITIE TO PREVENT IT FROM FLYING OUT AS YOU DRIVE.


Step Nine: Install the diff cover along with the gasket type of your choice. Fill it with oil now before you forget.
Step Ten: Put on the rotors, pads, parking brake shoes, and calipers. This all goes together like any other disc brake setup, so I will not go into detail here.
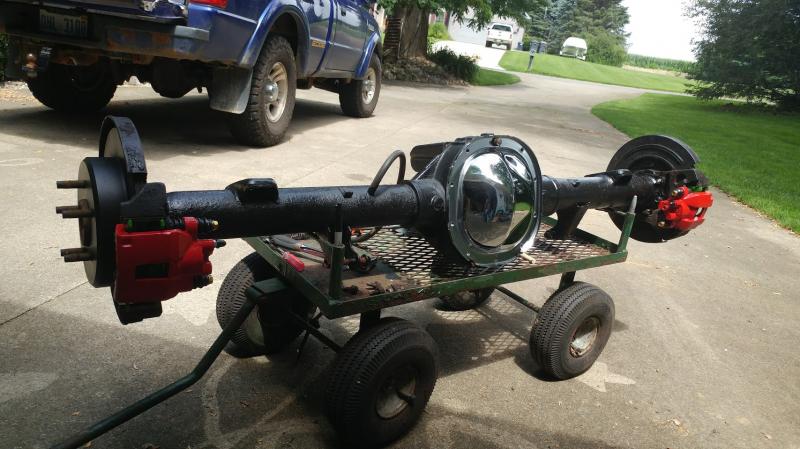


Step Eleven: At this point, the only thing left is to get the brakes connected to the system. There are many ways to connect the calipers, the easiest option is to use the stock Explorer system which uses more rubber lines than I feel comfortable with as they can wear and remove pedal feel. I went with a custom flexible stainless steel setup, At this step and the next it is best to just let your creativity shine if you want something better than Explorer stock.


Step Twelve: The last thing needing to be hooked up is the parking brake cable. I currently have not passed this hurdle and am creating custom cables, however some claim that Explorer cables will work as long as you adjust the tension slightly.


Step Thirteen: Put your wheels back on and take a nice slow test drive. 


Can you stop? Then you are done! If you can't, I recommend a tow truck and a mechanic.


____________________
Past:
Baby Girl: 2006 XL 3.0 ~RIP~ 1/26/2015

Current:
Penguin: 2002 XLT 3.SLOW 4x2

River/Kaitlyn: 2003 EDGE 3.GO! 4x2... For now?
~Aspiring Mini Level 2~

The Duck: 2003 Ford Ranger FX4 Level 2 - TWIN STICKS!

Back To Top PM Quote Reply

 Posted: Tue Feb 6th, 2018 06:00 am
PM Quote Reply
2nd Post
JAMMAN

Owns A Torsen


Joined: Mon Sep 18th, 2017
Location: Grove City, Ohio USA
Posts: 6436
Name: Jim ...
Occupation: 5 axis cnc programmer ...
Interests: RBV's ...
Status: 
Offline
Reputation: 
Reputation Points: 6436
I like it! Looks like it could be done while in the truck if necessary? (the rear end)


____________________
00 XLT 4WD RCSB 3.GO! Jalapeño
01 XLT 2WD RC Steppie 3.0 auto Silver
The future belongs to those who show up.
Back To Top PM Quote Reply

 Posted: Tue Feb 6th, 2018 06:50 am
PM Quote Reply
3rd Post
Kealel
Certified Ranger Nutjob


Joined: Sat Oct 21st, 2017
Posts: 174
Name: Keegan ...
Occupation: Engineer ...
Interests: Rangers. Duh. Also Robots. ...
Status: 
Offline
Reputation: 
Reputation Points: 174
JAMMAN wrote: I like it! Looks like it could be done while in the truck if necessary? (the rear end)
Yes, looking back, I think I would have preferred having it in the truck as it liked to roll around a lot while I was working on it. In the truck the only downside is the headroom you have when removing the diff cover, center pin, and C clips.


____________________
Past:
Baby Girl: 2006 XL 3.0 ~RIP~ 1/26/2015

Current:
Penguin: 2002 XLT 3.SLOW 4x2

River/Kaitlyn: 2003 EDGE 3.GO! 4x2... For now?
~Aspiring Mini Level 2~

The Duck: 2003 Ford Ranger FX4 Level 2 - TWIN STICKS!

Back To Top PM Quote Reply

 Posted: Tue Feb 6th, 2018 03:12 pm
PM Quote Reply
4th Post
Scrambler82
Old Bastard !


Joined: Fri Dec 22nd, 2017
Location: California USA
Posts: 2108
Name: Grev B ...
Occupation: Quality Assurance Engineer ...
Interests: Rangers, Photography, Metal Bending ...
Status: 
Offline
Reputation: 
Reputation Points: 2108
Kealel,Nice write up !
Although I have never done one in the truck, if you had a home-made stand, then out of the truck is easier... AND it lets you look at all of the piece to make sure they are in good shape, two birds with one stone !

Just two suggestions, look at the gears and differiental while the diff cover is off, look for any chipping, or even cracks, spin the diff and see how the bearings feel and maybe even sound, now is a good time.

Two... if you are replacing any brake lines, use Stainless Steel Lines if available, it will reduce future problems with rusting.

Just me thinking out loud !

Last edited on Tue Feb 6th, 2018 03:14 pm by Scrambler82


____________________
Ltr,
2003 EDGE, Std Cab, Steppie, E4 Red, 5sp, 4x
5" SuperLift, 33" x 12.50 x 15"
Hurst Shifter
Mod'd Backrack to fit Steppie
Front and Rear Bumpers by Custom 4x4 Fabrication, OK; now Mike's Welding and Fabrication.
Working on more Mods, just need more time, longer days would work !
Back To Top PM Quote Reply

 Posted: Sun Feb 11th, 2018 06:49 pm
PM Quote Reply
5th Post
Kealel
Certified Ranger Nutjob


Joined: Sat Oct 21st, 2017
Posts: 174
Name: Keegan ...
Occupation: Engineer ...
Interests: Rangers. Duh. Also Robots. ...
Status: 
Offline
Reputation: 
Reputation Points: 174
Scrambler82 wrote: Kealel,Nice write up !
Although I have never done one in the truck, if you had a home-made stand, then out of the truck is easier... AND it lets you look at all of the piece to make sure they are in good shape, two birds with one stone !

Just two suggestions, look at the gears and differiental while the diff cover is off, look for any chipping, or even cracks, spin the diff and see how the bearings feel and maybe even sound, now is a good time.

Two... if you are replacing any brake lines, use Stainless Steel Lines if available, it will reduce future problems with rusting.

Just me thinking out loud !

Lots of good points, I eventually held the axle in place with ratchet straps, and unlimited headroom along with great lighting did make things nice.

My neighbors are actually axle engineers who were deeply involved in this project, so once I took my cover off they looked over every part. This is something that everyone should do when they are in there.

I also replaced my axle bearings and seals just so that I wouldn't need to worry about them anytime soon. With everything removed, it is worth the $20-30 to do this.


____________________
Past:
Baby Girl: 2006 XL 3.0 ~RIP~ 1/26/2015

Current:
Penguin: 2002 XLT 3.SLOW 4x2

River/Kaitlyn: 2003 EDGE 3.GO! 4x2... For now?
~Aspiring Mini Level 2~

The Duck: 2003 Ford Ranger FX4 Level 2 - TWIN STICKS!

Back To Top PM Quote Reply

 Posted: Mon Feb 19th, 2018 01:05 pm
PM Quote Reply
6th Post
Scrambler82
Old Bastard !


Joined: Fri Dec 22nd, 2017
Location: California USA
Posts: 2108
Name: Grev B ...
Occupation: Quality Assurance Engineer ...
Interests: Rangers, Photography, Metal Bending ...
Status: 
Offline
Reputation: 
Reputation Points: 2108
Morning all... 
Colder here in SoCal.


Re-reading the write-up, thanks for doing the writeup, I am in the position NOW... where one of my back brakes is locking up and everything I do does nothing to stop it, scary at times !


Sooo... I am thinking this could be a good alternative.


Are there any kits available ?
What parts / kit / Ford Part Numbers did you use ?


I have seen a kit on the Summit Racing Site, didn't bookmark it but it cant be too hard to find, might be something to look at again !


Thanks,


____________________
Ltr,
2003 EDGE, Std Cab, Steppie, E4 Red, 5sp, 4x
5" SuperLift, 33" x 12.50 x 15"
Hurst Shifter
Mod'd Backrack to fit Steppie
Front and Rear Bumpers by Custom 4x4 Fabrication, OK; now Mike's Welding and Fabrication.
Working on more Mods, just need more time, longer days would work !
Back To Top PM Quote Reply

 Posted: Mon Feb 19th, 2018 10:03 pm
PM Quote Reply
7th Post
Kealel
Certified Ranger Nutjob


Joined: Sat Oct 21st, 2017
Posts: 174
Name: Keegan ...
Occupation: Engineer ...
Interests: Rangers. Duh. Also Robots. ...
Status: 
Offline
Reputation: 
Reputation Points: 174
Scrambler82 wrote:
Morning all... 
Colder here in SoCal.


Re-reading the write-up, thanks for doing the writeup, I am in the position NOW... where one of my back brakes is locking up and everything I do does nothing to stop it, scary at times !


Sooo... I am thinking this could be a good alternative.


Are there any kits available ?
What parts / kit / Ford Part Numbers did you use ?


I have seen a kit on the Summit Racing Site, didn't bookmark it but it cant be too hard to find, might be something to look at again !


Thanks,

Mine actually did that too, one of the big reasons I did this swap. A quick fix for me was to remove the parking brake bracket inside the drum, didn't fix the problem completely but my rear wheels stoped locking on the highway.


There is a kit available, but it is more expensive than the swap this is about (Explorer parts) and is also discontinued so getting parts would get expensive to do a brake job. This swap makes it easy down the road to go to an auto parts store and pick up any parts you need for a brake job.


I don't actually have any part numbers as it was all easy to find Explorer parts. I can find my website list of stuff I bought for the swap to post here later.


____________________
Past:
Baby Girl: 2006 XL 3.0 ~RIP~ 1/26/2015

Current:
Penguin: 2002 XLT 3.SLOW 4x2

River/Kaitlyn: 2003 EDGE 3.GO! 4x2... For now?
~Aspiring Mini Level 2~

The Duck: 2003 Ford Ranger FX4 Level 2 - TWIN STICKS!

Back To Top PM Quote Reply

 Posted: Tue Feb 20th, 2018 11:44 am
PM Quote Reply
8th Post
Scrambler82
Old Bastard !


Joined: Fri Dec 22nd, 2017
Location: California USA
Posts: 2108
Name: Grev B ...
Occupation: Quality Assurance Engineer ...
Interests: Rangers, Photography, Metal Bending ...
Status: 
Offline
Reputation: 
Reputation Points: 2108
I have seen the Mustang Kit and kits that are called out as Explorer Parts but as always too pricey.


Ford Explorer Kit looks similar to a Mustang kit, maybe the same parts but different names.


Parts availability, the explorer kit sounds good but as Ford always does they drop parts that aren't making money and then the people that own the older trucks are left out, just short of that first down.


Again thanks for writing this, I will do some investigation and give the swap a try.


____________________
Ltr,
2003 EDGE, Std Cab, Steppie, E4 Red, 5sp, 4x
5" SuperLift, 33" x 12.50 x 15"
Hurst Shifter
Mod'd Backrack to fit Steppie
Front and Rear Bumpers by Custom 4x4 Fabrication, OK; now Mike's Welding and Fabrication.
Working on more Mods, just need more time, longer days would work !
Back To Top PM Quote Reply

 Posted: Sat Feb 24th, 2018 03:26 pm
PM Quote Reply
9th Post
Kealel
Certified Ranger Nutjob


Joined: Sat Oct 21st, 2017
Posts: 174
Name: Keegan ...
Occupation: Engineer ...
Interests: Rangers. Duh. Also Robots. ...
Status: 
Offline
Reputation: 
Reputation Points: 174
Scrambler82 wrote:
I have seen the Mustang Kit and kits that are called out as Explorer Parts but as always too pricey.


Ford Explorer Kit looks similar to a Mustang kit, maybe the same parts but different names.


Parts availability, the explorer kit sounds good but as Ford always does they drop parts that aren't making money and then the people that own the older trucks are left out, just short of that first down.


Again thanks for writing this, I will do some investigation and give the swap a try.


Mustangs and Explorers have completely different setups and are not interchangeable. Mustang parts will swap onto Rangers with 28 spline rear ends with some modifications, however they will not work with 31 splines.


Mustangs use the brake pads used for normal braking as the parking brake as well with the parking brake cable attaching to the caliper. Explorers us the caliper mounting bracket as a mount for the drum brake setup that is the parking brake, and the cable attaches to the rear of the bracket.


____________________
Past:
Baby Girl: 2006 XL 3.0 ~RIP~ 1/26/2015

Current:
Penguin: 2002 XLT 3.SLOW 4x2

River/Kaitlyn: 2003 EDGE 3.GO! 4x2... For now?
~Aspiring Mini Level 2~

The Duck: 2003 Ford Ranger FX4 Level 2 - TWIN STICKS!

Back To Top PM Quote Reply

 Posted: Sun Feb 25th, 2018 11:16 am
PM Quote Reply
10th Post
Scrambler82
Old Bastard !


Joined: Fri Dec 22nd, 2017
Location: California USA
Posts: 2108
Name: Grev B ...
Occupation: Quality Assurance Engineer ...
Interests: Rangers, Photography, Metal Bending ...
Status: 
Offline
Reputation: 
Reputation Points: 2108
I knew about the E-Brkae but the rest of the kit looked similar but I have not seen the parts up close.
I am thinking on the Ex-Kit now.


____________________
Ltr,
2003 EDGE, Std Cab, Steppie, E4 Red, 5sp, 4x
5" SuperLift, 33" x 12.50 x 15"
Hurst Shifter
Mod'd Backrack to fit Steppie
Front and Rear Bumpers by Custom 4x4 Fabrication, OK; now Mike's Welding and Fabrication.
Working on more Mods, just need more time, longer days would work !
Back To Top PM Quote Reply

 Posted: Tue Feb 27th, 2018 03:41 pm
PM Quote Reply
11th Post
V8 Level II
Member


Joined: Tue Dec 5th, 2017
Location: Michigan, USA
Posts: 118
Name: 
Occupation: 
Interests: 
Status: 
Offline
Reputation: 
Reputation Points: 118

I have seen the Mustang Kit and kits that are called out as Explorer Parts but as always too pricey.Ford Explorer Kit looks similar to a Mustang kit, maybe the same parts but different names.Parts availability, the explorer kit sounds good but as Ford always does they drop parts that aren't making money and then the people that own the older trucks are left out, just short of that first down.Again thanks for writing this, I will do some investigation and give the swap a try.


Thoughts/observations on the Explorer 31-spline rear disc swap:


1) Since most of these parts are "wear items", new replacement parts should be available well into the foreseeable future. The only possible exception that I see is the backing plates. This is just the kind of part that Ford might discontinue and I can't believe that it would be  worthwhile for the aftermarket to pick it up. Probably a junkyard item unless you can find them new.


2) Ford Racing Performance Parts had a kit available that was nothing more than a bundled collection of most of the Explorer rear disc brake parts shown in the How-to above. The kit included backing plates, parking brakes, 11" rotors and calipers - all off-the-shelf Gen II Explorer stuff. No longer available from FRPP or Summit but there are a few on eBay and elsewhere. 


Kit M-2300-G


There is also the M-2300-G2 kit. I haven't done this one personally but it looks like it MIGHT work. The G2 is similar to the well-established Mustang brake swap but it's made for the 31-spline truck axle instead. The big difference is in the parking brake which is incorporated in the caliper itself instead of the "drum under the hat" as used in the M-2300-G and the Gen II Explorer. Also, the disc diameter is 11.8" and minimum recommended wheel size is 16". Should verify fitment w/FRPP tech line  before choosing this one. (800)FORD788


M-2300-G2:


3) The original left rear Explorer brake hose is a combination assembly that includes the left caliper hose, tee block and the drop down distribution hose. The Explorer brake hose layout is very different from the Ranger brake line routing so the LH Ex piece is not a bolt on. Even worse with a lifted truck. IMO, it is better to use 2 right side Explorer hoses for a swap to a Ranger 31-spline axle. Then just shorten the existing Ranger axle hard lines and reflare to attach to the Ex rubber hoses or stainless replacements.


RH Ex hose on Ranger right side w/shortened Ranger hard line:


RH Ex hose on Ranger left side w/shortened Ranger hard line:


____________________
2003 FX4 Level II, Supercharged 5.0L V8, Headers, Duals, BW4406 manual T/C
Aussie Locker, Torsen L/S, 4.10's, Bilstein 7100 rezzies, Cadillac/Mustang rear discs, Duff traction bars
Keypad Entry, Lock LEDs, sway bar discos, Heated seats, Explorer EATC, Trip Computer and consoles

Other rides:
2016 C-MAX Energi (plug-in Hybrid)
2011 Taurus SEL (highway cruiser)
2003 Ranger 2.3L M5ODR1 Regular Cab (drudge)

Back To Top PM Quote Reply

Current time is 01:16 pm Top  

Ford-Rangers.com Ranger Forum > Tech Section > How-To Section > How to: Rear Disc Swap a 31 Spline Axle

Users viewing this topic


PHP Version: 8.2.28
Server version: 10.6.22-MariaDB
UltraBB 2.01.01 Copyright © 2008-2025 Jim & Chris
Page processed in 0.0575 seconds (46% database + 54% PHP). 69 queries executed.