Ford-Rangers.com Ranger Forum HomeFord-Rangers.com Ranger Forum Home
Home Recent Topics New posts Search search Menu menu Not logged in - Login | Register
Ford-Rangers.com Ranger Forum > Tech Section > How-To Section > How To: Properly Using Crimp Connectors

Ford-rangers.com is a discussion forum, a Ranger forum for people who have questions about fixing or modifying
their Ford Rangers or people who just admire their Ranger. Please join and enjoy sharing experiences!

How To: Properly Using Crimp Connectors       #: 241
 Moderated by: NoPower, Mike69, MaDMaXX,
New Topic Reply
 Rate Topic 
 Posted: Sat Nov 25th, 2017 02:48 pm
PM Quote Reply
1st Post
TheArcticWolf1911
Gunslinger


Joined: Sat Nov 4th, 2017
Location: Evansville, Indiana USA
Posts: 426
Name: Cameron ...
Occupation: Process Technician ...
Interests: Firearms & Ammunition, Ford Rangers, electronics ...
Status: 
Offline
Reputation: 
Reputation Points: 426
If you know me, you know I don't like crimp connectors. Some will call me a 'soldering snob' or the like, but there is a good reason or two why I chose this way. I'm going to tell you why, and I'm going to show you how to build a better mouse trap by improving upon crimp connectors as they are today.
Let's talk about the 'why' first. Why complicate things?
Well, to start with, crimp connectors are not the be-all-to-end-all, plain and simple. No matter how tight you crimp them, a wire can always be pulled loose, and they are always susceptible to corrosion, causing problems in your projects.
Several years ago, my father worked for a tow truck company. The cab lights were installed using crimp type connectors. Frequently, they'd find the lights stopped working and would need to be redone. These problems stopped after he ditched the crimp connectors in favor of a soldering iron. Anecdotal evidence? Yes, but my point remains. A job worth doing is one doing right.
When it gets down to it, a crimp connector is a piece of metal squashed onto another piece of metal. No more, no less. Unfortunately, we can't get around using them in some cases, so what's a guy to do?
Grab your soldering iron and follow me.
 
Good, you made it. Plug in your soldering iron and let it come up to temperature while we prep the connector and wire end to be soldered. First thing we need to deal with is this pesky plastic piece. A set of needle nose pliers can be used here. One pair gets put inside the plastic piece, gripping only the plastic, and the other on the connector itself. Simply pull and the plastic will come off. It can be cut off, but it is a chore and a half to do. This process will work for any connector similar in design to the one shown here, whether it be red, blue, or yellow, which indicates connector gauge size.

Note: This process does not work well with 'butt' connectors. Twist and solder your wires together using either the Western Union or NASA technique. Choice is yours.

PSA :giveup: I've seen a few videos, namely by Scotty Kilmer on youtube, where he has used wire nuts to join wires together. These types of "connectors" are not even close to suitable for automotive applications, even for a prototyping scenario. The connection is weaker than crimping and just as susceptible to corrosion. Wire nuts are not designed to be jostled around in a vehicle. They were meant for home applications, such as connecting fixtures.


Next, strip the end of the wire. I prefer automatic wire strippers, but any kind will do. With the end of the wire stripped, I recommend tinning the wire first. This will make the process go quicker, but not strictly necessary.

Remember: Slide your heat shrink over the wire BEFORE you solder on the connector, while keeping it far enough away that it does not shrink prematurely. This will protect against the elements and short circuits. In the case of spade connectors, ensure the heat shrink slides up over the entirety of the female connector. Slide the heat shrink only over the solder lug on the male side. An extra layer of heat shrink can be used on top if desired. This is a good idea to do when the connection will be exposed to the elements.
 
Slide the connector over and crimp it down over the wire. This will hold it steady while we solder. Use the tip of the iron to heat the connector, allowing the solder on the wire to melt. Add more solder if desired, the end goal being a nice fillet of solder inside the connector. Once the connector is cool enough to touch, slide the heat shrink over and shrink with either a lighter or hairdryer/heat gun.
The end result is a connector that is much stronger than crimping alone, and will also fair better in the elements.


Last edited on Sat Nov 25th, 2017 07:08 pm by TheArcticWolf1911


____________________
1999 Ford Ranger XLT - 3.0 V6 4x4 - Loaded (Totaled) 143k. Rest in Peace, Gold Dust.
Back To Top PM Quote Reply

 Posted: Sat Nov 25th, 2017 02:52 pm
PM Quote Reply
2nd Post
JAMMAN

Owns A Torsen


Joined: Mon Sep 18th, 2017
Location: Grove City, Ohio USA
Posts: 6436
Name: Jim ...
Occupation: 5 axis cnc programmer ...
Interests: RBV's ...
Status: 
Offline
Reputation: 
Reputation Points: 6436
I would like to add please that if an appropriate Zippo lighter is not available OR you ran out of fluid to drip in the cotton when you open the lighter up, a heat gun or butane soldering iron (most have heat shrink tubing adapters) will work also :)


____________________
00 XLT 4WD RCSB 3.GO! Jalapeño
01 XLT 2WD RC Steppie 3.0 auto Silver
The future belongs to those who show up.
Back To Top PM Quote Reply

 Posted: Sat Nov 25th, 2017 05:47 pm
PM Quote Reply
3rd Post
Tsquare
Member


Joined: Fri Nov 10th, 2017
Location: Suwanee, Georgia USA
Posts: 1540
Name: 
Occupation: Controlled Insanity ...
Interests: 
Status: 
Offline
Reputation: 
Reputation Points: 1540
I have a butane portable solder torch. I also do not like crimp connectors. The only exception is the crimp, heat-shrink all in ones used for splicing wires together and I use them sparingly.


____________________
Tony
NE ATL
'04 XLT regular cab 3.slo stepside
Semi retirement
Back To Top PM Quote Reply

 Posted: Sat Nov 25th, 2017 07:07 pm
PM Quote Reply
4th Post
TheArcticWolf1911
Gunslinger


Joined: Sat Nov 4th, 2017
Location: Evansville, Indiana USA
Posts: 426
Name: Cameron ...
Occupation: Process Technician ...
Interests: Firearms & Ammunition, Ford Rangers, electronics ...
Status: 
Offline
Reputation: 
Reputation Points: 426
Already got that part covered, Jamman. In all truth, a heat gun is probably better (or hair dryer) as it doesn't seem to scorch the heat shrink as easily as what a flame can.


____________________
1999 Ford Ranger XLT - 3.0 V6 4x4 - Loaded (Totaled) 143k. Rest in Peace, Gold Dust.
Back To Top PM Quote Reply

 Posted: Sat Nov 25th, 2017 08:32 pm
PM Quote Reply
5th Post
Undrstm8ed
Seasoned...


Joined: Sat Oct 21st, 2017
Posts: 1299
Name: 
Occupation: 
Interests: Life, Experiences, and adventures. ...
Status: 
Offline
Reputation: 
Reputation Points: 1299
Some of us APPRECIATE fellow soldering snobs just FYI.. lol


____________________
"Be never first, never last and never noticed." - Unknown

"The slave is held most securely when he is held by the chains of his own will and of his own fears, and when he is locked down by his own slavish desires for a comfortable life." - Michael Bunker

"Mundus vult decipi, ergo decipiatur" - ~ attributed to Petronius (Gaius Petronius Arbiter (ca. 27–66 AD))
Roman courtier during the reign of Nero.

"Those who expect to reap the blessings of freedom, must, like men, undergo the fatigue of supporting it." - Thomas Paine


~ Undrstm8ed Truckumentry Write Up Pg.

~ Undrstm8ed Trailermentry Write Up Pg.
.
Back To Top PM Quote Reply

 Posted: Sat Nov 25th, 2017 08:35 pm
PM Quote Reply
6th Post
TheArcticWolf1911
Gunslinger


Joined: Sat Nov 4th, 2017
Location: Evansville, Indiana USA
Posts: 426
Name: Cameron ...
Occupation: Process Technician ...
Interests: Firearms & Ammunition, Ford Rangers, electronics ...
Status: 
Offline
Reputation: 
Reputation Points: 426
Good to hear! I see so many wiring jobs crimped together and it just makes me cringe. Esspecially when I see a heavy wire going to a thin wire on the same circuit, but that's another story.


____________________
1999 Ford Ranger XLT - 3.0 V6 4x4 - Loaded (Totaled) 143k. Rest in Peace, Gold Dust.
Back To Top PM Quote Reply

 Posted: Sat Nov 25th, 2017 08:39 pm
PM Quote Reply
7th Post
Undrstm8ed
Seasoned...


Joined: Sat Oct 21st, 2017
Posts: 1299
Name: 
Occupation: 
Interests: Life, Experiences, and adventures. ...
Status: 
Offline
Reputation: 
Reputation Points: 1299
Agreed, although I will admit, with the right tools and done the right way they all are a working connection but I prefer my soldering and military splices [still soldered] for long term use and abuse.

It never fails when I see an install of something and I question it as if it was a trail-rigged-get-me-home and they look at me like whats wrong with it? Aye aye ayee...


____________________
"Be never first, never last and never noticed." - Unknown

"The slave is held most securely when he is held by the chains of his own will and of his own fears, and when he is locked down by his own slavish desires for a comfortable life." - Michael Bunker

"Mundus vult decipi, ergo decipiatur" - ~ attributed to Petronius (Gaius Petronius Arbiter (ca. 27–66 AD))
Roman courtier during the reign of Nero.

"Those who expect to reap the blessings of freedom, must, like men, undergo the fatigue of supporting it." - Thomas Paine


~ Undrstm8ed Truckumentry Write Up Pg.

~ Undrstm8ed Trailermentry Write Up Pg.
.
Back To Top PM Quote Reply

 Posted: Mon Nov 27th, 2017 11:31 pm
PM Quote Reply
8th Post
sheltonfilms
Electronicals / Forscan Expert


Joined: Fri Nov 24th, 2017
Location: Hoover, Alabama USA
Posts: 125
Name: 
Occupation: 
Interests: 
Status: 
Offline
Reputation: 
Reputation Points: 125
They make a special ratcheting crimpers that will curl the terminal more for added grip. 


I have switched to using flag style terminals. More expensive, have to custom order terminals, and the crimper has to be ordered but it's the closest to OEM you will find. The pull out force is insane (you will break wire strands before the terminal releases).


Last edited on Mon Nov 27th, 2017 11:31 pm by sheltonfilms


____________________
2000 XLT 2.5L A/T 2WD
Mods:
Power Windows/Locks Mirrors using OEM harness and parts
Explorer Sportrac White Face Cluster
Explorer OHC and Auto-dim Mirror
Auto Door Locks
Full HID Projector Retrofit
Back To Top PM Quote Reply

 Posted: Tue Nov 28th, 2017 12:29 am
PM Quote Reply
9th Post
TheArcticWolf1911
Gunslinger


Joined: Sat Nov 4th, 2017
Location: Evansville, Indiana USA
Posts: 426
Name: Cameron ...
Occupation: Process Technician ...
Interests: Firearms & Ammunition, Ford Rangers, electronics ...
Status: 
Offline
Reputation: 
Reputation Points: 426
I will admit, that is a very nice looking connection. If I was doing this for a living, I'd probably invest in that kind of tooling.

Makes me feel like I should find something to wire up, perhaps.


____________________
1999 Ford Ranger XLT - 3.0 V6 4x4 - Loaded (Totaled) 143k. Rest in Peace, Gold Dust.
Back To Top PM Quote Reply

 Posted: Tue Nov 28th, 2017 12:32 am
PM Quote Reply
10th Post
sheltonfilms
Electronicals / Forscan Expert


Joined: Fri Nov 24th, 2017
Location: Hoover, Alabama USA
Posts: 125
Name: 
Occupation: 
Interests: 
Status: 
Offline
Reputation: 
Reputation Points: 125
TheArcticWolf1911 wrote: I will admit, that is a very nice looking connection. If I was doing this for a living, I'd probably invest in that kind of tooling.

Makes me feel like I should find something to wire up, perhaps.


Crimper wasn't that bad. I paid $25 for it at the time. I bought it when I rewired my daughters powerwheels mustang. I added a 24V scooter controller.


Here is the one I got: 
https://www.amazon.com/gp/product/B0050KDKUC/ref=oh_aui_detailpage_o05_s00?ie=UTF8&psc=1


____________________
2000 XLT 2.5L A/T 2WD
Mods:
Power Windows/Locks Mirrors using OEM harness and parts
Explorer Sportrac White Face Cluster
Explorer OHC and Auto-dim Mirror
Auto Door Locks
Full HID Projector Retrofit
Back To Top PM Quote Reply

 Posted: Tue Nov 28th, 2017 06:02 am
PM Quote Reply
11th Post
JAMMAN

Owns A Torsen


Joined: Mon Sep 18th, 2017
Location: Grove City, Ohio USA
Posts: 6436
Name: Jim ...
Occupation: 5 axis cnc programmer ...
Interests: RBV's ...
Status: 
Offline
Reputation: 
Reputation Points: 6436
I remember those, I worked at a stamping place that made terminals. A place called interlock in michigan. After I left they were bought by T&B. That's what the big guys use evidently since all they did was automotive.

They had a testing lab where they would slowly crank the amperage on the terminals while taking a vid with some infrared camera similar to the modern day flirs. Would determine the weak spots and we would change the dies to leave more material in those areas.


____________________
00 XLT 4WD RCSB 3.GO! Jalapeño
01 XLT 2WD RC Steppie 3.0 auto Silver
The future belongs to those who show up.
Back To Top PM Quote Reply

 Posted: Tue Nov 28th, 2017 11:57 am
PM Quote Reply
12th Post
mhoward
Hey look ~ they ~ bounce!


Joined: Sun Oct 22nd, 2017
Location: Evansville, USA
Posts: 2736
Name: Michael ...
Occupation: Technology Manager ...
Interests: Trucks / Guitars & Music / Things that go BANG ...
Status: 
Offline
Reputation: 
Reputation Points: 2736
I have to admit, I would be confident in that crimp. It looks strong and reliable. In this case, you *DO* get what you pay for!


____________________
-- Michael

2003 Ranger Edge / Extended Cab / Flareside / 3.0L FLEX / 5r44e Auto / 2WD / 8.8 LS 4:10 / Sonic Blue Pearl

So many mods... so little time...


Back To Top PM Quote Reply

 Posted: Thu Apr 11th, 2019 01:54 pm
PM Quote Reply
13th Post
Scrambler82
Old Bastard !


Joined: Fri Dec 22nd, 2017
Location: California USA
Posts: 2108
Name: Grev B ...
Occupation: Quality Assurance Engineer ...
Interests: Rangers, Photography, Metal Bending ...
Status: 
Offline
Reputation: 
Reputation Points: 2108
Hello to all, Sorry for any confusion I had nothing to do today and started reading through some of the How-To's and came across this posting about Proper Crimping... (can of worms) !
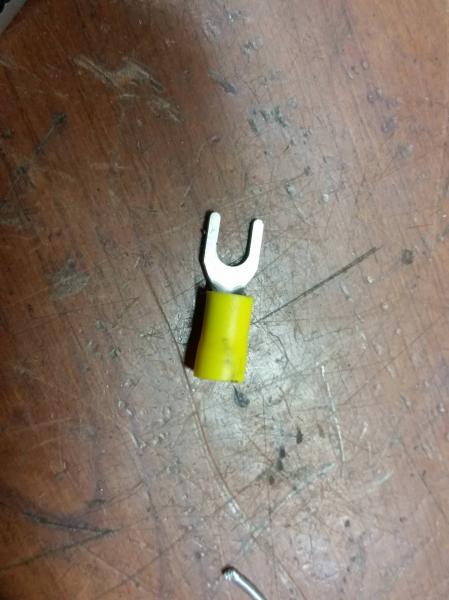
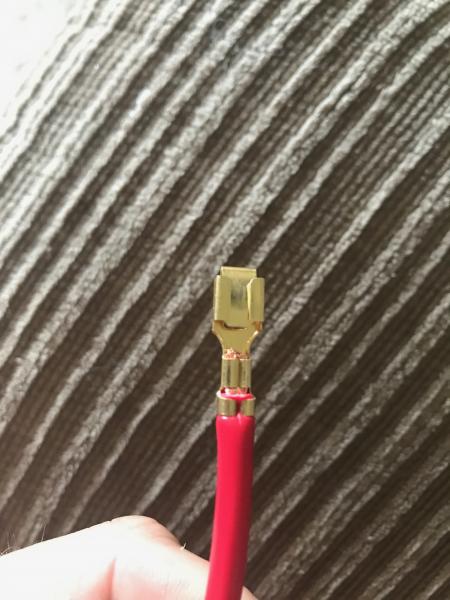
I.e. the picture:


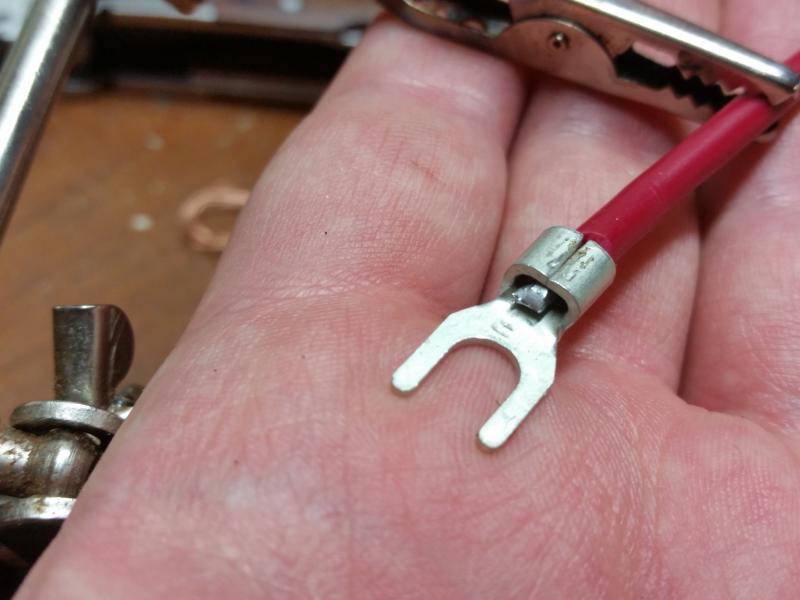
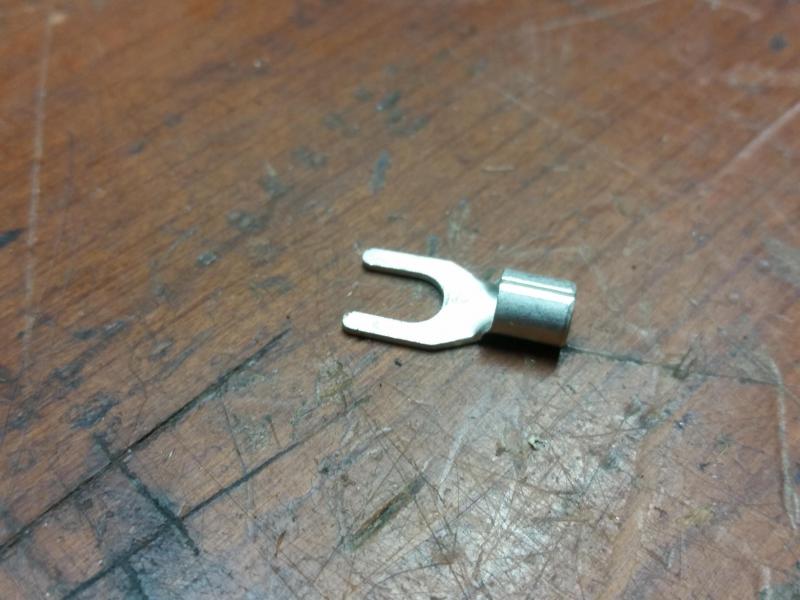
IMO..., When looking at the crimped lug you can see the actual contact point is to left side about 1/2 the length of the crimped area, not a lot of contact.
All lugs should be crimped with the wire unsoldered, the wire can be twisted, not super tight, but have a good mechanical bond before adding solder, which isn't a bad idea, IF cleaned properly after soldering, which would mean cleaning with Alcohol, not the booze.  Residue after soldering can corrode, even with Heat- Shrink, causing a bad connection.
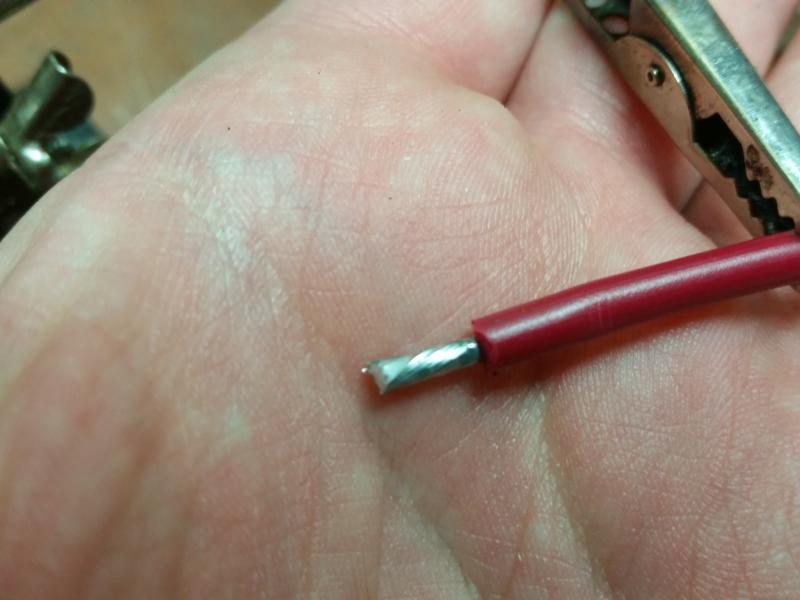
This picture shows a good solder flow in the wire BUT minimal wire to Lug Contact, which will create a resistance, even after soldering; IF this Lug were to heat up, from a shorted condition, and the solder melting, the wire could slip out and if hot, could create a fire.

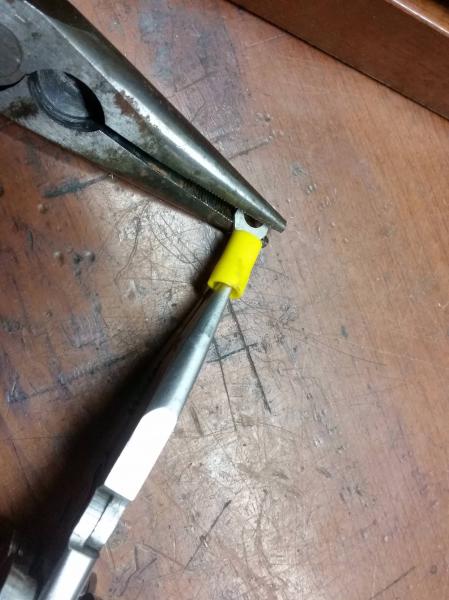
Always, crimp wire in lugs before soldering, get a good mechanical bond, pull on the lug to see if it stays on the wire, THEN... add solder to the connection as a bonding assist.
Note:  A solid mechanical bond, (crimped properly, will allow the most wire to Lug contact and the most conductivity in the connection), and using heat shrink with Adhesive on the inside, will last and be water-proof... !  
Also, double check your Lug Crimpers, there should be a Nub on one side, that Nub should go against the solid portion of the Lug, not the split, and impress inward, spreading the wires within the indent without separating the split, allowing full contact, so using the correct crimpers make a big difference too.

When using Heat Shrink in an automotive circuit, you should strive for a water-proof connection when ever possible, use the Heat Shrink type with adhesive on the inside, and make sure once the Heat Shrink is shrunk, you can see the adhesive coming out of the end of the Heat Shrink, this makes it water-proof.

These steps make for a more secure, water-proof connection with less worries about corrosion and a bad connection.

So where so I get off stepping in here and saying things about someone else hard word at a writeup... I know, what an A-Hole !
I base my comment on a long-term Quality Assurance/Control Methods Writing, within many Military/Government Facilities, and on a longing of doing things so they do not have to be "EVER done over".   I love my Ranger and all of the info on these Ranger Sites but I an not trying in any way to cause a problem of call anyone wrong... everyone has THEIR way !
I agree with "TheArticWolf1911" is his methods, I do things the same way except for his crimping, and believe me everyone definitely has their own way of crimping.

My apologies to TheArticWolf1911, if there is any conflict, it wasn't meant to be.

Ltr

Last edited on Thu Apr 11th, 2019 06:10 pm by Scrambler82


____________________
Ltr,
2003 EDGE, Std Cab, Steppie, E4 Red, 5sp, 4x
5" SuperLift, 33" x 12.50 x 15"
Hurst Shifter
Mod'd Backrack to fit Steppie
Front and Rear Bumpers by Custom 4x4 Fabrication, OK; now Mike's Welding and Fabrication.
Working on more Mods, just need more time, longer days would work !
Back To Top PM Quote Reply

 Posted: Mon Dec 2nd, 2019 01:41 am
PM Quote Reply
14th Post
TheArcticWolf1911
Gunslinger


Joined: Sat Nov 4th, 2017
Location: Evansville, Indiana USA
Posts: 426
Name: Cameron ...
Occupation: Process Technician ...
Interests: Firearms & Ammunition, Ford Rangers, electronics ...
Status: 
Offline
Reputation: 
Reputation Points: 426
No harm done, Scrambler. I would have answered sooner, if it weren't for my hiatus.

You make a very valid point, and I'm not one to turn my nose up at constructive criticism. I make no claims that my methods or my opinions are in the mind of greatness, I only say what works for me and what I've learned through my experiences.

Of course different people have different experiences and therefor different opinions.

I normally do crimp more solidly than that, and my methods have evolved with time.

Never apologize for adding more useful information. Anyone who reads this can read both my ideas and yours and draw their own conclusion best suited to their application with the most information.


____________________
1999 Ford Ranger XLT - 3.0 V6 4x4 - Loaded (Totaled) 143k. Rest in Peace, Gold Dust.
Back To Top PM Quote Reply

 Posted: Mon Dec 2nd, 2019 12:19 pm
PM Quote Reply
15th Post
Scrambler82
Old Bastard !


Joined: Fri Dec 22nd, 2017
Location: California USA
Posts: 2108
Name: Grev B ...
Occupation: Quality Assurance Engineer ...
Interests: Rangers, Photography, Metal Bending ...
Status: 
Offline
Reputation: 
Reputation Points: 2108
Eight months, not too bad for a response time.

When you look at Crimping within the electronics Industry, there are so many difference opinions it is almost funny.

When I looked at my method, right or wrong, I always think that why don't people do it my way, it is the RIGHT way, look at it, LoL, but everyone has their own opinion on what is the BEST way.

People just need to understand that soldering a lug and using a good quality Heat Shrink with adhesive inside, is the best way to make and keep good connections.

Ltr

Last edited on Mon Dec 2nd, 2019 12:23 pm by Scrambler82


____________________
Ltr,
2003 EDGE, Std Cab, Steppie, E4 Red, 5sp, 4x
5" SuperLift, 33" x 12.50 x 15"
Hurst Shifter
Mod'd Backrack to fit Steppie
Front and Rear Bumpers by Custom 4x4 Fabrication, OK; now Mike's Welding and Fabrication.
Working on more Mods, just need more time, longer days would work !
Back To Top PM Quote Reply

 Posted: Mon Dec 2nd, 2019 03:59 pm
PM Quote Reply
16th Post
Mike69

Mustang Nut


Joined: Sun Oct 22nd, 2017
Location: Horsepasture, USA
Posts: 1692
Name: Mike ...
Occupation: Semi-retired ...
Interests: Vintage Mustangs, RBV's, car shows, & woodworking ...
Status: 
Offline
Reputation: 
Reputation Points: 1692
When I started to do the wiring on my 69 Mustang I invested in a nice ratcheting crimper to do the connections & I used a heat gun on the shrink tubing to cover the connections. Here is the crimper I purchased.
https://www.amazon.com/Astro-9477-Professional-Interchangeable-Tool/dp/B0045CUMLQ/ref=sr_1_1?gclid=Cj0KCQiAiZPvBRDZARIsAORkq7fU_rylxCkGur54jygJ3xTzLcSF0gNtEjDenim9qbtR7sM0mW1DZRkaAi3yEALw_wcB&hvadid=198231259671&hvdev=c&hvlocphy=9003992&hvnetw=g&hvpos=1t1&hvqmt=e&hvrand=5731816383734968268&hvtargid=aud-840076997981%3Akwd-297532904393&hydadcr=29011_10168378&keywords=astro+9477+crimper&qid=1575320239&sr=8-1


____________________
21 Bronco Sport Big Bend (Wife's DD)
05 F150 XLT Reg Cab, 2WD, 5.4L, Auto (My DD)
69 Mustang Coupe 5.0, 5 spd 9" rear(Project)
14 Kawasaki Vulcan (Wife's Toy)
Back To Top PM Quote Reply

 Posted: Mon Dec 2nd, 2019 04:39 pm
PM Quote Reply
17th Post
mhoward
Hey look ~ they ~ bounce!


Joined: Sun Oct 22nd, 2017
Location: Evansville, USA
Posts: 2736
Name: Michael ...
Occupation: Technology Manager ...
Interests: Trucks / Guitars & Music / Things that go BANG ...
Status: 
Offline
Reputation: 
Reputation Points: 2736
Woohoo! That's a pricey crimper! Looks to be very well made and heavy duty. My guess is that you are pleased with the tools performance.


____________________
-- Michael

2003 Ranger Edge / Extended Cab / Flareside / 3.0L FLEX / 5r44e Auto / 2WD / 8.8 LS 4:10 / Sonic Blue Pearl

So many mods... so little time...


Back To Top PM Quote Reply

 Posted: Mon Dec 2nd, 2019 08:16 pm
PM Quote Reply
18th Post
Mike69

Mustang Nut


Joined: Sun Oct 22nd, 2017
Location: Horsepasture, USA
Posts: 1692
Name: Mike ...
Occupation: Semi-retired ...
Interests: Vintage Mustangs, RBV's, car shows, & woodworking ...
Status: 
Offline
Reputation: 
Reputation Points: 1692
mhoward wrote:
Woohoo! That's a pricey crimper! Looks to be very well made and heavy duty. My guess is that you are pleased with the tools performance.
Yes, very happy with its performance.


____________________
21 Bronco Sport Big Bend (Wife's DD)
05 F150 XLT Reg Cab, 2WD, 5.4L, Auto (My DD)
69 Mustang Coupe 5.0, 5 spd 9" rear(Project)
14 Kawasaki Vulcan (Wife's Toy)
Back To Top PM Quote Reply

 Posted: Mon Dec 2nd, 2019 10:37 pm
PM Quote Reply
19th Post
Scrambler82
Old Bastard !


Joined: Fri Dec 22nd, 2017
Location: California USA
Posts: 2108
Name: Grev B ...
Occupation: Quality Assurance Engineer ...
Interests: Rangers, Photography, Metal Bending ...
Status: 
Offline
Reputation: 
Reputation Points: 2108
Mike69 wrote:
When I started to do the wiring on my 69 Mustang I invested in a nice ratcheting crimper to do the connections & I used a heat gun on the shrink tubing to cover the connections. Here is the crimper I purchased.
https://www.amazon.com/Astro-9477-Professional-Interchangeable-Tool/dp/B0045CUMLQ/ref=sr_1_1?gclid=Cj0KCQiAiZPvBRDZARIsAORkq7fU_rylxCkGur54jygJ3xTzLcSF0gNtEjDenim9qbtR7sM0mW1DZRkaAi3yEALw_wcB&hvadid=198231259671&hvdev=c&hvlocphy=9003992&hvnetw=g&hvpos=1t1&hvqmt=e&hvrand=5731816383734968268&hvtargid=aud-840076997981%3Akwd-297532904393&hydadcr=29011_10168378&keywords=astro+9477+crimper&qid=1575320239&sr=8-1


The Racket Crimpers work well as long as you don't solder first.  

I know there are a lot of Crimping Tools out there, some generic, and some universal, my favorite is the Stake-On Crimper with the Nub on one Die, cutting tip with a deep reach.

Nice Crimper you bought, you will have that for a while.

mhoward wrote:
Woohoo! That's a pricey crimper! Looks to be very well made and heavy duty. My guess is that you are pleased with the tools performance.
If want to do the job right and a second time with the same tools then you buy good tools.


____________________
Ltr,
2003 EDGE, Std Cab, Steppie, E4 Red, 5sp, 4x
5" SuperLift, 33" x 12.50 x 15"
Hurst Shifter
Mod'd Backrack to fit Steppie
Front and Rear Bumpers by Custom 4x4 Fabrication, OK; now Mike's Welding and Fabrication.
Working on more Mods, just need more time, longer days would work !
Back To Top PM Quote Reply

 Posted: Tue Dec 3rd, 2019 07:56 am
PM Quote Reply
20th Post
mhoward
Hey look ~ they ~ bounce!


Joined: Sun Oct 22nd, 2017
Location: Evansville, USA
Posts: 2736
Name: Michael ...
Occupation: Technology Manager ...
Interests: Trucks / Guitars & Music / Things that go BANG ...
Status: 
Offline
Reputation: 
Reputation Points: 2736
"If want to do the job right and a second time with the same tools then you buy good tools."

I couldn't agree more!


____________________
-- Michael

2003 Ranger Edge / Extended Cab / Flareside / 3.0L FLEX / 5r44e Auto / 2WD / 8.8 LS 4:10 / Sonic Blue Pearl

So many mods... so little time...


Back To Top PM Quote Reply

 Posted: Mon Dec 9th, 2019 09:50 am
PM Quote Reply
21st Post
4.0power
Member


Joined: Sun Nov 5th, 2017
Location: USA
Posts: 496
Name: 
Occupation: 
Interests: 
Status: 
Offline
Reputation: 
Reputation Points: 496
What's everyone thoughts on shirk tube/soldier connectors? I've had great luck with them just curious.


____________________
2002 xlt 4.0 5r55e 4x4 4.10 rear disc brake swap from sn95 **currently swapping in a 5.0***
2003 2.3 2wd 5 speed single cab dropped 9 inches looks like crap rides like crap but for some reason it’s cool to me
2004 gmc 2500hd 6.6 diesel LLY
1989 foxbody 347 stroker t5 trans
Back To Top PM Quote Reply

 Posted: Mon Dec 9th, 2019 10:45 am
PM Quote Reply
22nd Post
mhoward
Hey look ~ they ~ bounce!


Joined: Sun Oct 22nd, 2017
Location: Evansville, USA
Posts: 2736
Name: Michael ...
Occupation: Technology Manager ...
Interests: Trucks / Guitars & Music / Things that go BANG ...
Status: 
Offline
Reputation: 
Reputation Points: 2736
I always prefer solder / shrink.  Only exception is when there is no room to work.  The whole gist of this thread is when you *DO* use crimp connectors, there are good and bad crimps and good and bad (spelled CHEAP) connectors.  Also, in one example, you can crimp AND solder... that is also quite acceptable.


____________________
-- Michael

2003 Ranger Edge / Extended Cab / Flareside / 3.0L FLEX / 5r44e Auto / 2WD / 8.8 LS 4:10 / Sonic Blue Pearl

So many mods... so little time...


Back To Top PM Quote Reply

Current time is 10:45 am Top  

Ford-Rangers.com Ranger Forum > Tech Section > How-To Section > How To: Properly Using Crimp Connectors

Users viewing this topic


PHP Version: 8.2.28
Server version: 10.6.22-MariaDB
UltraBB 2.01.01 Copyright © 2008-2025 Jim & Chris
Page processed in 0.0939 seconds (36% database + 64% PHP). 99 queries executed.