TheArcticWolf1911
Gunslinger
Joined: Sat Nov 4th, 2017
Posts: 426
Name: Cameron ... Occupation: Process Technician ... Interests: Firearms & Ammunition, Ford Rangers, electronics ...
Reputation Points: 426

|
If you can't tell by now, I like lights. Sometimes I think I'm part moth.
Now, normally you see people go from the three bulb setup to only two. However, I like going from two to three.
From 1993 to 1999 (Pre-93 I cannot say one way or another), Ford used a three bulb setup. This consists of a turn signal, a brake/running combo light, and the reverse light. The placement of these changed a couple of times, but the overall result was the same, namely the brake lamp and turn signal were separate.
In 2000, Ford switched over to the 'combination' signal design which continued for the next eleven years until the Ranger was axed in America.
I do not like combination lights, and many share that sentiment with me, but for those wondering why I have a preference at all, allow me to explain.
Combination signals are a cheap way out. The majority of the time, they do their job very well. However, under a few conditions, they become a very real hazard. Take for example a foggy road. You pull over and activate your hazards to wait for a bit to see if conditions improve. The vehicle you are driving comes equipped with combination signals.
The car coming behind you a few minutes later sees these lights flashing, but in these conditions, he cannot tell if you are moving or stopped. This could cause an accident, the magnitude of which will depend on how fast he is going and where he hits you, but an accident no less it can cause.
Secondly, take a vehicle driving in front of you, also equipped with lazily designed combination signals. The driver in front of you puts on his turn signals and begins to brake. Perhaps he's easing on and off or perhaps his brake light switch is going out. Regardless, the end result (what you see) are two or more flashing lights. Is he turning? Is he stopping? Are those his hazards?
These different conditions can greatly impact effective communication. "What about my third brake light? Won't that help?" You may ask. It might. Let's go back to our first example. When you pull over and park, do you sit there with your foot on the brake or do you put it in park? I'm willing to bet the latter of the two is what you do. Secondly, in fog as thick as to hinder the rearward driver's perception of your movement, will he be able to tell the third brake light is even active? Remember that even the 921 (which is usually used here), while brighter than a 194, is not even close to being as bright as a 3157's high filament. Not only that, but the third brake light is a smaller lens. A smaller, dimmer, light won't be as easily perceived as what bigger brighter lights will be.
In our second example, it might help you a bit more, but his main brake lights and his turn signals are still flashing about, making it harder to tell which way he's turning IF he's turning at all. Remember, the only reason you know he turned on his signal is because I told you he did. In real life, you aren't going to know unless he tells you he did. If he had a three bulb setup (provided they work), then it's no question if he's turning or not. If you're in foggy conditions with a three bulb setup, rest your foot on the brake while in park. Anyone coming behind you will be grateful.
Okay, that was a lot longer of an explanation than I intended, but it gets my point across. So, on with the mod.
Believe it or not, this is very simple. Right now though, I need to urge you to STAY AWAY from those adapters that plug into your trailer hitch and do the same thing as we're about to do. My father tried one to convert his 03 and it broke down and caused an even worse scenario than what I detailed before with the van driver. Do it this way and you will be thankful for it later after you don't get rear-ended.
Suppose you want to know what you need for this, huh? Alright, fine.
-Wire strippers (Auto or manual)
-Test light or multi-meter
-Several feet of wire
-Wire loom
-zip ties (preferably black)
-pick set (optional)
-wire cutters
-silicone spray
-heat shrink
-a lighter or heat gun/hair dryer (ask your wife FIRST)
-pair of 3156 sockets for your new rear lenses to fit the turn signal slots
-a pair of 3156 bulbs, either LED or incandescent. Each socket purpose is keyed differently (IE, brake, turn, reverse) so ensure the sockets you have will fit the new ones. We're reusing the existing brake and reverse sockets)
-a pair of new or used 93-97 or 98-99 tail lights. Optionally, you can 'convert' the unique 2000 lenses to add the cutout for the extra chamber that Ford blocked off with a set of files and a drill bit.
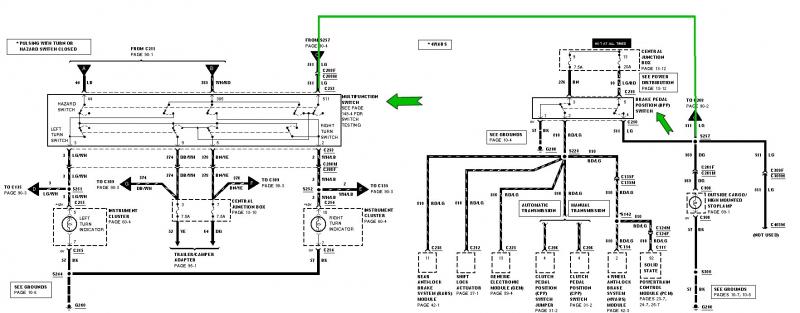
First off, how do combination lights work? It's rather simple how they combine them, actually. One wire comes up from the brake light switch and runs into the back of the multifunction switch. That's it. There's two ways you can separate the signals out, and I'll cover both. Having a wiring diagram can help you, here but not strictly necessary. I have provided an example from a 2000 Ford Ranger, however this should be the same or very close from 2001-2011, and perhaps other Ford vehicles of similar years. Please confirm with a test light or multi-meter for your specific application. Higher resolution available here. (click me!)
First way: Disassemble the column cover. There are three or four Philips screws holding the cover together. It might take some wiggling to get it apart, but it does come apart. Set the bottom piece aside and rotate the top piece out of the way. Unplug both connectors and search for, what is usually, a plain green wire. To help you some, look at the brake light switch on the brake pedal. There's a small handful of wires coming out of it. Write down what colors you see on it and look for those wires in the plugs that feed the multifunction switch. Use either a test light or multi-meter and poke around until you find the wire that goes 'hot' with +12 when the brake is pressed and goes back to zero (or close) when released. With a set of picks, remove the connector's lock. You can find a small tab of plastic that can be pried out of the way to release the wire from the connector. Remove it, reinstall the lock and plug everything back in. With either a friend or something heavy, activate one turn signal and press the brake. Only the third brake should continue to work at this point while the main two do not show brake lights. If this is true, continue.
Second way: Identify which wire goes hot (+12) when the pedal is pressed and off (0V or close) with either a multi-meter OR a test light. With the wire identified, cut it in half. With either a friend or something heavy, activate one turn signal and press the brake. Only the third brake should continue to work at this point while the main two do not show brake lights. If this is true, continue.
Should go without saying that I prefer door number 1, but the choice is yours. Do remember to heat shrink the resulting loose end in either case. Now, you will need enough wire to run all the way from the brake pedal, out the cab and to the rear of the truck. Try to use the same gauge wire as what is already on the truck to avoid potential problems. Go thicker when in doubt.
Tag this new wire onto the wire we identified earlier using one of two methods, which I will picture below. The top method allows us to use heat shrink, which by now you can tell I really enjoy using, but has the disadvantage that we're cutting into the existing wire then reconnecting it. This isn't necessarily a problem as long as the joint is strong.
Note: DO NOT use a T-Tap to do this! Strip and solder only! If the T-tap fails (which I have personally seen first-hand) you are left with NO brake lights! It should go without saying that this is a very dangerous condition, and since you don't look at your brake lights, you won't know when it happens. Strip, solder, thank yourself later. </rant>
The second method allows us to keep from cutting the wire in half, but also means we can't slide any heat shrink onto the connection. Being inside the cab, tape will hold up better, but not as good as heat shrink. Again, choice is yours. In either case, ensure your joint is nicely soldered. If you can see the strands clearly, add more.
Now, we need a way to get this wire out of the cab. This is actually very easy to do. On the firewall, the hood release cable goes through a rubber grommet which can have a hole poked in it for the wire to go through. Also on the floor, there may be a grommet waiting for you when you get there. In either case, use a pick or something small and sharp to poke a hole in the rubber, and use some silicone to help the wire go through. There are plenty of exit points already there to use, so there's no need to make a new one.
Take your new wire and run it along the frame rail, using wire loom and zipties to protect and hang it, all the way to the rear.
Tip: Follow the existing harness as much as you can. If Ford can put a wire there, so can you.
Now, this is where things get a little more difficult, but only by comparison to what we've done earlier.
As it sits now, the brake light bulbs will only work as turn signals. If we simply wire it up to our new 3156 sockets and stuff them in the lenses, we'll wind up with amber brakes and red turn signals, which is no good. We need to do a little flipping to get things the right way around.
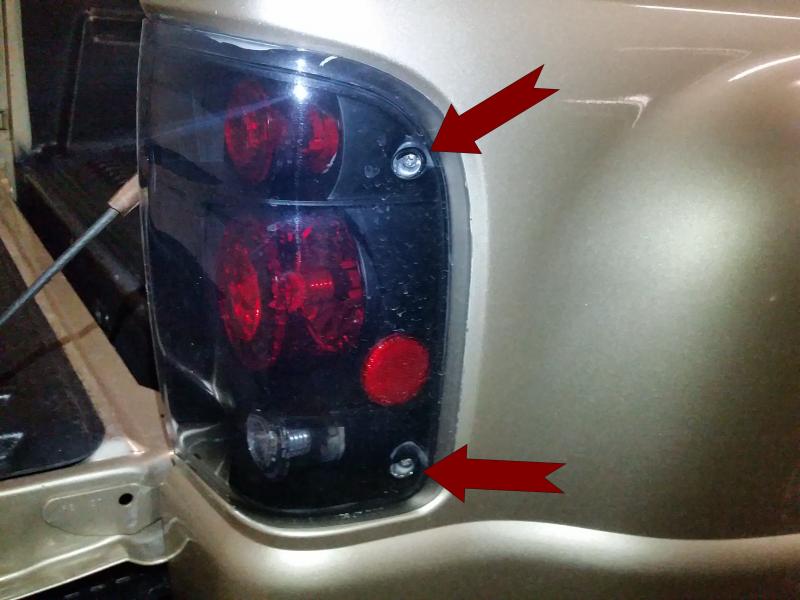
To begin this part of the process, remove the tail lights. To do this is very simple. Lower the tailgate, removing it entirely if you desire. Next, with a Philips head screwdriver, remove the four screws holding the lights in place. There are two on the inside where the tailgate normally is and two on the outside near the beside fender.

Now is a good opportunity to clean up these rusty screws and paint them black.
With the tail lights removed and set aside, grab your magnifying glass and flashlight because a little detective work needs to be done. In a previous "How To:" I mentioned an easy way to figure out which wire did what without any tools. We're going to use this same trick again.
For those who aren't familiar, take the socket and turn it around in your hand to look at it's bottom. You will see three markings on it. GND, Major, and Minor. GND stands for Ground, Major is the bright filament and Minor is the dimmer filament. Major is usually a bright colored wire and minor is usually a brown wire, but check on the socket to make sure.
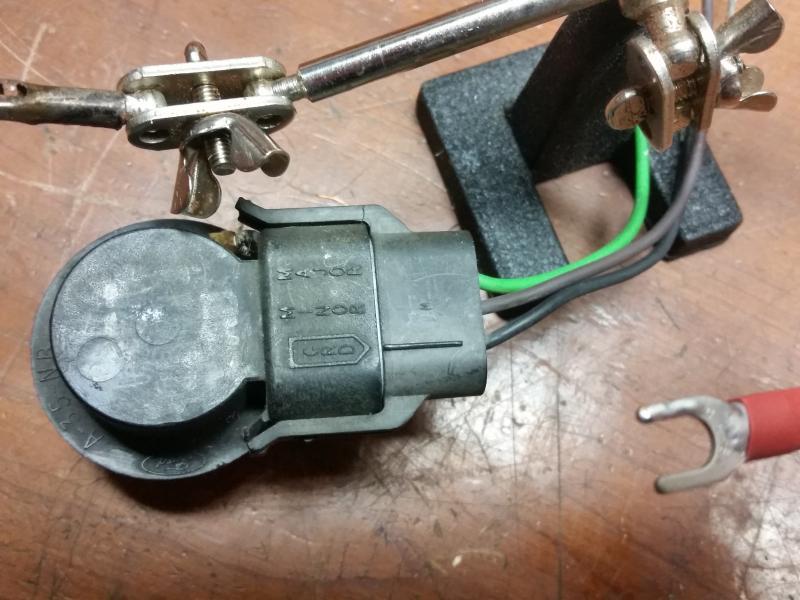
Grab your wire cutters and cut the wire marked Major, but leave enough wire on the socket to connect to later. We're reusing these sockets! Ignore the ground and minor wires, as these can be left alone.
Go back under the truck and split the wire we've run into two. We need to route it so that it can go to each brake light. Follow the harness as we've done before, using zip ties when necessary. Strip and solder the new brake light wire to the major wire of the sockets. Remember to use heat shrink and plenty of solder.
With that done, check to make sure the brake lights work as intended before shrinking the tube and continuing.
Now, grab your new tail lights. This will help us keep things handy. Fit the reverse light and brake light sockets into the lenses, as well as the new turn signal sockets. The harness-side of the wire we just cut likely won't be long enough to stretch to the new socket. If it isn't, tag on a wire and use heat shrink. It's best to get sockets that have long enough wires to do this. The fewer connections the better.
Now, there's one wire left to sort out, and that's the ground wire on the newly installed sockets. These wires can be simply pulled down and tagged onto the existing ground wires at either the brake or reverse sockets, using one of the methods I showed you earlier while we wired the brake light wire in earlier. Heat shrink is preferable here as it will be exposed to the elements.
Look over your work and ensure all the wires are hooked up correctly, then install the new lenses into the bed. At this point, get your friend back or that heavy thing you used earlier and step on the brakes. The red portions should light up proudly with the brakes. Activate the hazards and the turn signals one at a time to check for function. Check if the following is true:
-Brake lights remain solid and bright
-Amber signals flash brightly at the correct pace
-the third brake light remains solid and proud.
If it does, you're good to go! If any of the lights appear dim, ensure the wires are connected properly as well as being sturdy. If they are, replace the bulb and try again.
Enjoy your new 3 bulb setup!
Last edited on Sun Nov 26th, 2017 10:43 pm by TheArcticWolf1911
____________________
1999 Ford Ranger XLT - 3.0 V6 4x4 - Loaded (Totaled) 143k. Rest in Peace, Gold Dust.
|