Ford-Rangers.com Ranger Forum HomeFord-Rangers.com Ranger Forum Home
Home Recent Topics New posts Search search Menu menu Not logged in - Login | Register
Ford-Rangers.com Ranger Forum > Tech Section > Member's Projects Showcase > 410Custom's builds a 2007 Ranger V8 - cu

Ford-rangers.com is a discussion forum, a Ranger forum for people who have questions about fixing or modifying
their Ford Rangers or people who just admire their Ranger. Please join and enjoy sharing experiences!

410Custom's builds a 2007 Ranger V8 - cu       #: 1712
 Moderated by: NoPower, Mike69, MaDMaXX, Page:  First Page Previous Page  ...  2  3  4  5  6  7  8  9  10  11  12  ...  Next Page Last Page  
New Topic Reply
 Rating:  Rating
 Posted: Thu Mar 3rd, 2022 06:34 am
PM Quote Reply
151st Post
12° North Industries
SITE SPONSOR


Joined: Thu Nov 23rd, 2017
Location: Las Vegas, Nevada USA
Posts: 389
Name: 
Occupation: Vehicle Upfitter ...
Interests: The great outdoors, nature, back to basics ...
Status: 
Offline
Reputation: 
Reputation Points: 389
Man those sliders look good.. ; )


____________________
North Industries
Las Vegas, Nevada 89118
Web http://www.12degnorth.com


Back To Top PM Quote Reply

 Posted: Thu Mar 3rd, 2022 01:44 pm
PM Quote Reply
152nd Post
Eddie Money
Member


Joined: Mon Nov 13th, 2017
Posts: 1587
Name: 
Occupation: 
Interests: Burt gummer life ...
Status: 
Offline
Reputation: 
Reputation Points: 1587
12° North Industries wrote:
Man those sliders look good.. ; )
Thank you buddy!!! Looking forward to putting them to use!!!😊


____________________


I know my crazy! Do you?
2007 Sport 4door 4x4 4.0L SOHC V6 Ranger
Back To Top PM Quote Reply

 Posted: Thu Mar 17th, 2022 12:22 am
PM Quote Reply
153rd Post
Eddie Money
Member


Joined: Mon Nov 13th, 2017
Posts: 1587
Name: 
Occupation: 
Interests: Burt gummer life ...
Status: 
Offline
Reputation: 
Reputation Points: 1587
Ok,time to catch up!!! Sorry about the double up in post 147


____________________


I know my crazy! Do you?
2007 Sport 4door 4x4 4.0L SOHC V6 Ranger
Back To Top PM Quote Reply

 Posted: Thu Mar 17th, 2022 12:27 am
PM Quote Reply
154th Post
Eddie Money
Member


Joined: Mon Nov 13th, 2017
Posts: 1587
Name: 
Occupation: 
Interests: Burt gummer life ...
Status: 
Offline
Reputation: 
Reputation Points: 1587
"Added by eddie, posted by 410custom "

So much to catch up on................


When we left off I had finished the paint on the front frame rails and we are ready for final install of the front suspension, also the transfer case was ready to go in
Well the t case is in, I will get some pictures of that
Meanwhile I have been finishing the suspension install and have made LOTS of progress

Let's start with some pics!!


My notes from the last time I installed a 31 spline 8.8 into a lifted ranger (the 300K jasper 306 truck v8 build here)
That is all we need to mock up and start welding!!

RuffStuff kit, some nice stuff!
U bolts are too short, its all right I can use them on an Explorer


the new spring perches come with tabs on them, these would fit a 3" axle tube nicely


Well our 31 spline 8.8 has 3.25" axle tubes, so off with the TWO END tabs, leave the middle for nice weld spacing


much better

Now to center the axle under the truck, and measure the pinion angle
I measure in from each backing plate and check my marks a couple of times
mock up rear axle loosely with new perches, stock blocks, new U bolts (12.5" long), and spring plates.


Once she is close to center I make sure the perches are in EXACTLY the same spot on the axle, distance from backing plates. I also check to ensure they are 38.5" apart center to center, This ensures our axle is centered and our leaf springs are straight


Perfect.

Now to set the pinion angle
Stock Ranger pinion angle is 7 degrees
I know from the last umpteen V8 4406 Rangers I have built that with a 2 u joint rear driveshaft (4406 slip yoke) we want to match the new pinion angle to the tail housing angle on the transfer case. Which is 7 degrees...
Now the Chevy leaf spring setup with the inverted rear shackle is a bit different from other rangers but I am still able to easily set my pinion angle at 7 degrees by measuring 0 degrees at the old explorer spring perches. I always leave the old explorer spring under perches on these axles because:
They have the bolts that retain our brake lines in place
They make an excellent spot for your floor jack
This truck MIGHT go spring under someday down the road
The ranger U bolts will clear every time, the explorer and ranger leaf spring center line distance is within 1/2"

Transfer case was installed
Tailhousing angle was checked
Pinion angle adjusted to exactly 7 degrees
Spring perches can now be tack welded to axle tubes


Time to mock up the new shock mounts


____________________


I know my crazy! Do you?
2007 Sport 4door 4x4 4.0L SOHC V6 Ranger
Back To Top PM Quote Reply

 Posted: Thu Mar 17th, 2022 12:31 am
PM Quote Reply
155th Post
Eddie Money
Member


Joined: Mon Nov 13th, 2017
Posts: 1587
Name: 
Occupation: 
Interests: Burt gummer life ...
Status: 
Offline
Reputation: 
Reputation Points: 1587
"Added by eddie, posted by 410custom "

Some notes on the Kartek rear shackle hangers and how they install with these Chevy 64" 1500 springs


As you can see clearances are very tight. So which direction you install your bolts/nuts is very important


They go this way


We must put a washer underneath between the hanger and the frame / where these bolts go through the frame, this is so we help clearance the factory rivet in this location


another view


view from the back of the truck


I am now torching the old explorer sway bar mounts off of our axle tubes so I can locate/tack weld the rear shock mounts
in the meantime I focused back on our front suspension for a minute


____________________


I know my crazy! Do you?
2007 Sport 4door 4x4 4.0L SOHC V6 Ranger
Back To Top PM Quote Reply

 Posted: Thu Mar 17th, 2022 12:38 am
PM Quote Reply
156th Post
Eddie Money
Member


Joined: Mon Nov 13th, 2017
Posts: 1587
Name: 
Occupation: 
Interests: Burt gummer life ...
Status: 
Offline
Reputation: 
Reputation Points: 1587
"Added by eddie, posted by 410custom "

Guess who came for morning coffee?


Momma and her two kiddos


trying to sneak up on our crabapple tree at 6am....our dogs thwarted that attempt!! poor moosey maybe tomorrow

Working on the final install of the front suspension!!! WOOO HOOO!!
First up was to finish all the prep paint on exposed bare frame


Our used Superlift drop brackets have some powder coat issues yuck
I couldn't bring myself to install like this so I had to peel and paint this one bracket.... the others will need similar someday, good future project!! (Hi Eddie yes I'm talking to you!)


not perfect but way better


All right now onto the good stuff.............

I have issue with True Travel instructions. They are telling us to re use the stock lower control arm mounting bolts


Problem is this would be WRONG!!
The stock LCA bolts have a shoulder on them that DOES NOT FIT the True Travel LCA bushing and sleeve
If installed this way you would expand the metal sleeve into the bushing AND you would only be riding the sleeve on the shoulder portion of the factory bolt!! NOT GOOD IMO


DOES NOT FIT
If you have this kit and installed it this way I personally would order some new bolts
You need 5" long, grade 8, 5/8" bolts, with 18 pitch fine thread, washers, lock washers, and nuts
rough thread 5/8" bolts will not fit the sleeves

ASK ME HOW I KNOW....


This is not a fit make (Yoda speak)

New bolts 5/8" grade 8 Hardware, 5" length, 18 pitch, fine thread


Beefy, final Lca torque is done when truck is at ride height or you can tear your new bushings


____________________


I know my crazy! Do you?
2007 Sport 4door 4x4 4.0L SOHC V6 Ranger
Back To Top PM Quote Reply

 Posted: Thu Mar 17th, 2022 12:42 am
PM Quote Reply
157th Post
Eddie Money
Member


Joined: Mon Nov 13th, 2017
Posts: 1587
Name: 
Occupation: 
Interests: Burt gummer life ...
Status: 
Offline
Reputation: 
Reputation Points: 1587
"Added by eddie, posted by 410custom "

Once I had all the correct hardware I could finally hang the front suspension on the frame rails.

First I mocked up the drivers side with both shocks and knuckle so I could locate the brake line


Drivers side brake line WHAT A FIASCO!! So when I was cutting out the factory suspension parts I nicked the drivers side brake line with my grinder. No biggie, its like a $15 part, right? WRONG! NO SUCH PART! You can buy the 3 other hard lines anywhere, the drivers side???? Dealer item only I'm guessing..... completely out of stock on the entire internet??? This is how my luck works people, welcome to my world.
So lucky I am well versed in making these brake lines. The drivers side was cut, prepped and re flared. Also carefully re bent to reach our desired brake line location

The stock Ford parts were used to hold the hard lines in place, carefully routed away from our new shock tower supports and the King coils
New holes were drilled in the frame and some self tapper torx bolts were used to hold them


end result drivers


passenger


ready for suspension!!
Superlift drop brackets installed with all new grade 8 hardware, 5/8" bolts through frame heavy duty. All fasteners final torqued, front diff hangers and brackets also final torque


checking all clearances


All fasteners are treated with anti seize, spherical bearings, bolts, bushings, all of it


Drivers side mostly assembled, we are still waiting for RCV to come through with replacement CV axle so switch focus to pass side for now

Passenger side given same treatment, first brake line mounted, then everything cleaned and final assembly


This time we include CV axle!!


Motorcraft wheel bearing installed with clean bolts and red loctite


Preliminary ride height


Last edited on Thu Mar 17th, 2022 12:44 am by Eddie Money


____________________


I know my crazy! Do you?
2007 Sport 4door 4x4 4.0L SOHC V6 Ranger
Back To Top PM Quote Reply

 Posted: Thu Mar 17th, 2022 12:47 am
PM Quote Reply
158th Post
Eddie Money
Member


Joined: Mon Nov 13th, 2017
Posts: 1587
Name: 
Occupation: 
Interests: Burt gummer life ...
Status: 
Offline
Reputation: 
Reputation Points: 1587
"Added by eddie, posted by 410custom "

With all components now in place can look at limit strap and bump stop possible locations

The factory structure for the bump stop is still in place on purpose, this will give our bump can a good base


potential LCA strike location


____________________


I know my crazy! Do you?
2007 Sport 4door 4x4 4.0L SOHC V6 Ranger
Back To Top PM Quote Reply

 Posted: Thu Mar 17th, 2022 12:51 am
PM Quote Reply
159th Post
Eddie Money
Member


Joined: Mon Nov 13th, 2017
Posts: 1587
Name: 
Occupation: 
Interests: Burt gummer life ...
Status: 
Offline
Reputation: 
Reputation Points: 1587
"Added by eddie, posted by 410custom "

We are going to need some brakes

Eddie already sent me the paint to use on these new calipers
Powerstop drilled and slotted rotors
Raybestos new calipers factory coated


Prepped for paint


2 coats of red, 2 coats of clear (clear not pictured here)


Notice we are using the 02-04 Sport / Sport trac front rotors. Our later generation Superlift knuckles have provisions for them hooray!


However now the brake dust shields I have here do not clear?? Will have to source some proper ones or just live without them like I do on all of my personal trucks


Passenger side DONE, ready for final torque on LCA and CV axle, then TIRE


Ride height ish


EYE CANDY

Fun facts
every single one of these 16 King shock spacers had to be shaved down to fit the True travel shock tower and LCA mounts
Fun times


Also King provides these nifty urethane bushings that protect the upper and lower spherical bearing, but only for the coilover?
I am asking Brett if we can get 8 more for the shock too? I put a liberal amount of marine bearing grease in order to help keep water out....


The amount of suspensions parts on the project table is finally dwindling!


Getting closer to rolling!


ABS line routed
Tie rod end extension was also fully threaded with loc tite


Last edited on Thu Mar 17th, 2022 12:53 am by Eddie Money


____________________


I know my crazy! Do you?
2007 Sport 4door 4x4 4.0L SOHC V6 Ranger
Back To Top PM Quote Reply

 Posted: Thu Mar 17th, 2022 01:02 am
PM Quote Reply
160th Post
Eddie Money
Member


Joined: Mon Nov 13th, 2017
Posts: 1587
Name: 
Occupation: 
Interests: Burt gummer life ...
Status: 
Offline
Reputation: 
Reputation Points: 1587
"Added by eddie, posted 410custom "

Working on a little something to support our Superlift drop bracket kit


Torsion bars maybe good at something after all!


Solid stock! Cut at just the right angle + Factory t bar shields


We are going to need some reinforcements and connecting bits


One thing leads to another


and now our templates are scaled into AutoCAD and the dwg file is sent to my buddy
@fordpickupman
who cut these out for us from 1/4" plate.
We are bartering for 5.0 parts............ PERFECT!

THANK YOU!!!!!!! Teamwork makes the dream work

Commuter this time of year


____________________


I know my crazy! Do you?
2007 Sport 4door 4x4 4.0L SOHC V6 Ranger
Back To Top PM Quote Reply

 Posted: Sun Mar 27th, 2022 09:02 pm
PM Quote Reply
161st Post
Eddie Money
Member


Joined: Mon Nov 13th, 2017
Posts: 1587
Name: 
Occupation: 
Interests: Burt gummer life ...
Status: 
Offline
Reputation: 
Reputation Points: 1587
Continuing on.

"Added by eddie, posted by 410custom "

The factory Lca bolts are a strange thing indeed, they are not 14mm and they are

Not 16mm, they are not 5/8 they have a metric head and nut. There is no such thing as a 10.9 class 15mm bolt. There is no way to purchase a bolt with that shoulder built in without going to ford. The entire true travel kit uses 5/8” hardware with 18 pitch threads so I was not surprised to learn they are the only bolt that properly fits the new lca bushings. I Re checked the true travel instructions they indeed tell us to Re use the factory lca bolts. Not going to work on our 07 ranger project (actually Built in 06)

I can tell you that the local hardware stores and bolt depot.com love me, I have developed quite a collection of fasteners going through these battles, we have a nice
Mini hardware store Going here in the shop
I don't just buy one I buy a handful so I will always have extras except when they are 9.49 each!!!!

These little things take time to research and locate the parts for these are the battles that allow us to win the war. Once it's done, it's done correctly and we can be sure this truck is correct. My dad drilled it into my head and now I into yours, “there is only one way to do a job”


____________________


I know my crazy! Do you?
2007 Sport 4door 4x4 4.0L SOHC V6 Ranger
Back To Top PM Quote Reply

 Posted: Sun Mar 27th, 2022 09:06 pm
PM Quote Reply
162nd Post
Eddie Money
Member


Joined: Mon Nov 13th, 2017
Posts: 1587
Name: 
Occupation: 
Interests: Burt gummer life ...
Status: 
Offline
Reputation: 
Reputation Points: 1587
"Added by eddie, posted by 410custom"

I could go on and on about all of the cool homesteading stuff that goes on around here but that will have to wait! I have a chance to post some more update on the truck!!


I tried to upload some higher res pics of the finished pass side? Not sure if these are more clear

rear axle mock up
I needed to make a new attachment for our "mockshock" tool.
I still had threaded rod around so I made a longer bit with a larger bushing that will work for locating rear shock mounts as well as front


In action


Ranger shock mounts are fun to locate. They are spaced 13" in from the disc brake backing plate to the center of the shock mount +/-.
The perch itself is located 13.75" from the backing plate of the axle to the inner most point of the perch (diff side)
Then they are set at 50 degrees from horizontal and they must line up and be in phase with the shock bolt.
The perch is then tack welded and the process repeated on the other side
Spring perches also tack welded in to position
The axle is then removed for final grinding, weld prep, welding, paint, new brake hard line, install new diff cover, e brakes, rear disc brakes installed and then it goes back in the truck for final time! I can then hopefully flex the suspension and measure for shocks.


Had to grind all this smooth


grinder was used for rough prep, dremmel used for final prep...then all metal parts cleaned, then finally welded!
New 60" 3/8" brake line will be bent up to match stock


You can see CV axle end, this will be used on drivers side to hold wheel bearing together while truck is finished. No parts from RCV, no word from True Travel..... I will follow up AGAIN


While is was happening the rear springs and hangers were removed. All holes drilled out for 3/4" grade 8 hardware, rails cleaned and painted.
Spring perches and shackles also getting some paint


prep


paint


Soon she will be rolling!!

Ready for alignment and ride height adjustments
Once that happens she comes over to Bay 1 and gets on the lift 


____________________


I know my crazy! Do you?
2007 Sport 4door 4x4 4.0L SOHC V6 Ranger
Back To Top PM Quote Reply

 Posted: Sun Mar 27th, 2022 09:11 pm
PM Quote Reply
163rd Post
Eddie Money
Member


Joined: Mon Nov 13th, 2017
Posts: 1587
Name: 
Occupation: 
Interests: Burt gummer life ...
Status: 
Offline
Reputation: 
Reputation Points: 1587
"Added by eddie, posted by 410custom "

All right back to the progress!!


Working on final touches for front suspension, rear suspension final install, heavy modifications to the rock sliders, and fabricating our new drop bracket suspension supports..... check it out

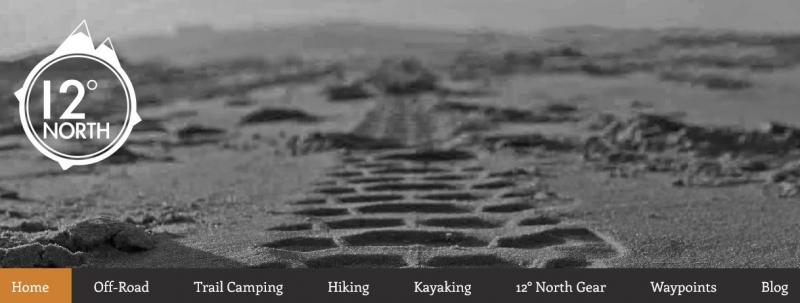
Drivers front is all assembled, time for our CV axle stub shaft to hold the wheel bearing together while we roll this around and wait for a CV axle solution from RCV?


shop dog, her name is "Ranger" of course yes a ranger can be a girl 


Upper control arm bolts replaced with aftermarket camber adjusters


this will make alignments sooo much easier

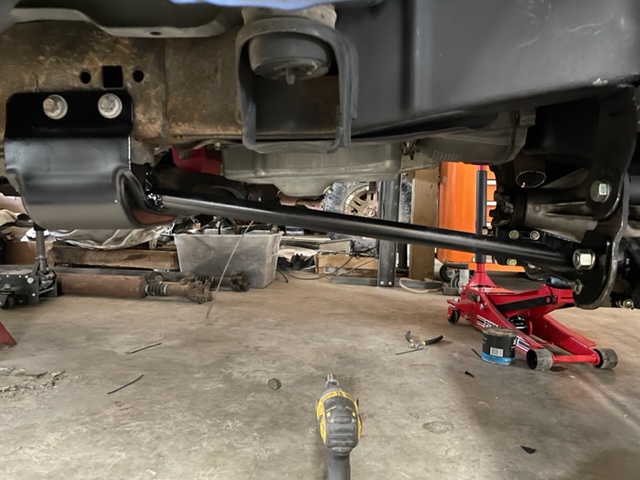
Now to some fabrication, we are building supports using some stock pieces that will bolt onto the ranger and heavily support the front suspension drop brackets from wanting to fold backwards. With all the leverage of the torsion bar delete / coil overs and mid travel kit, large tires, all added to the Superlift drop brackets, it is a good idea to put back some structure..
Our buddy @FordTruckMan plasma cut some 1/4" plate tabs for us THANK YOU!


Here is where the small ones go


The back of the lower control arm drop bracket

The other ones go here


with some trimming


The now shortened torsion bar (solid stock) will land somewhere in here


Parts ready for tack welding

In the meantime crappy picture of the 4406e transfer case in place


but a picture none the less

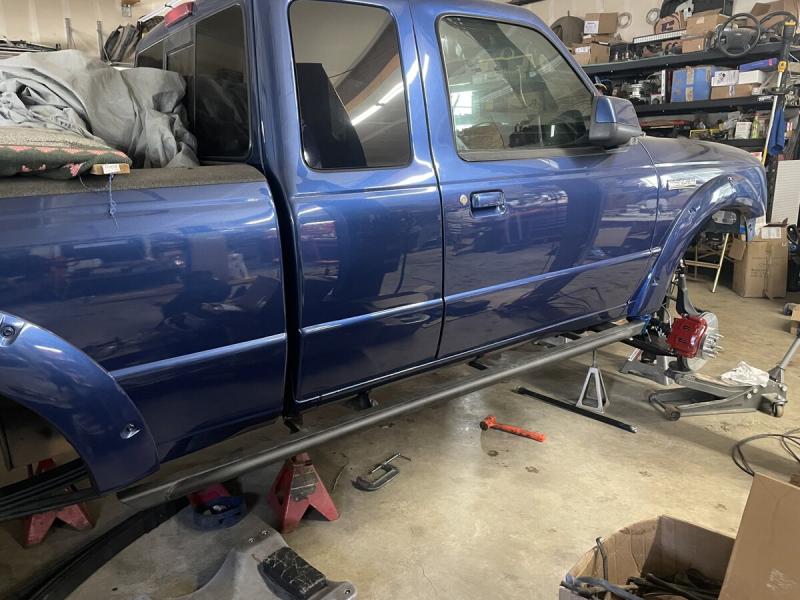
The rock sliders were not going on this truck the way they were delivered. A few pages back we discussed this, these things are designed nice enough but they come with some major flaws that I will not allow on this Ranger!
Sliders like this should either be mounted to the body or the frame NOT BOTH, not unless your Ranger has solid body mounts??
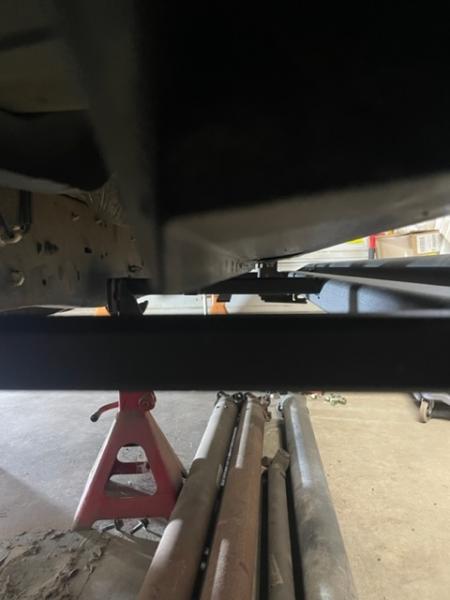
The sliders the way they are shipped mounted to the frame, and were way too close to the body. When the truck flexes the sliders would strike the body seam on our ranger?? NO WAY!! We do not have a body lift on this truck, this is not acceptable. The sliders were sent with some whimpey outriggers, and although they may be strong, for us they were just not correct.
So we put MUCH thought into this. I say we because my good neighbor spends much time in the shop helping me out and we came up with this one together. The sliders now mount to the BODY ONLY
no frame attachments.
We used/modified the factory step mounts to make this happen. Then we cut and turned the slider "outriggers" to mate up with the rocker structure of our truck.

Check it out.....some teaser pics for you guys to wrap your heads around what's going on here, the passenger side is basically done I just need to get some longer bolts. The sliders now bolt to the body with 10 bolts, easy to remove for touch up.
We also tried to keep from disrupting the factory powder coat on these as much as possible while still:
-Making them strong enough to easily support the weight of the truck
-giving enough room for your foot to land on them to help enter the truck
-stick them out enough to help protect the paint from mud, snow, rocks, etc. Our front tires will be sticking out past the fender so every little bit helps


mock up!
Factory front step supports were swapped side to side (drivers to passenger) because well they look and function better that way


all 3 of these outriggers were then cut with some 45 degree angles that allowed us to turn them up 90 degrees, cut to length, drill some holes, source some square plastic caps, a little welding, some bolts and BOOM sliders that mount to the truck BODY / ROCKER with 5 supports and 10 bolts........ STRONG!!!!! (and proper!)


Last edited on Sun Mar 27th, 2022 09:12 pm by Eddie Money


____________________


I know my crazy! Do you?
2007 Sport 4door 4x4 4.0L SOHC V6 Ranger
Back To Top PM Quote Reply

 Posted: Sun Mar 27th, 2022 09:28 pm
PM Quote Reply
164th Post
Eddie Money
Member


Joined: Mon Nov 13th, 2017
Posts: 1587
Name: 
Occupation: 
Interests: Burt gummer life ...
Status: 
Offline
Reputation: 
Reputation Points: 1587
"Added by eddie, posted by 410custom "

Now back to the rear suspension final install, drivers side

I will take you through what is involved in swapping to the Chevy 64" spring, moving the factory hanger, and adding the Kartek flip shackle hanger all without removing the bed or dropping the fuel tank! Okay I cheated a little I did have to loosen the fuel tank to get all my bolts in

Check it out......


Drivers front spring hanger, this sucker has been moved forward on the frame about 8"
The suspension /axle were mocked up and I know this is going to work out, so it is time to actually drill some holes.

center punch, small bit, 5/8" bit and my favorite uber cool Dewalt 90 degree drill, so handy!


This is what it looks like from my perspective


Now careful people, there is a plastic fuel tank right here! So I need some protection, no problem we always have some license plates hanging around the shop a plain ol Washington tag will work


Back to drilling... all holes were drilled out to 5/8", frame rail was sanded, cleaned and prepped for paint.
Spring hanger and shackle also cleaned and painted

Gas tank was loosened to make it possible to get these bolts in. Also the fuel lines, wiring, brake line, EVAP lines all protected/re routed so they do not get in the way of the drill or bolts


We need two thick washers here. Why? Because the Ranger rear frame is two pieces and the spring hanger overlaps the gap.


The washers keep things nice and aligned.


We can see them in action well on the other side (pass)

Nice eh?


Have to drill some holes for the new Kartek hanger also


Ready for a spring /shackle on the drivers side


The two bolts pictured above on the right MUST BE PUT IN PLACE because we cut the rivets that actually hold the two pieces of frame together


The passenger side has been done for a bit now, both springs just waiting for me to finish welding the rear axle up


Had to go to town to get some more C02/ Argon shielding gas..........I run two bottles and I cant believe I never filled the backup bottle all winter!


The factory exhaust will go away, I left it in place to give me an idea of tailpipe routing and muffler location


More coming soon...............making daily progress on this truck

Last edited on Sun Mar 27th, 2022 09:29 pm by Eddie Money


____________________


I know my crazy! Do you?
2007 Sport 4door 4x4 4.0L SOHC V6 Ranger
Back To Top PM Quote Reply

 Posted: Sun Mar 27th, 2022 09:31 pm
PM Quote Reply
165th Post
Eddie Money
Member


Joined: Mon Nov 13th, 2017
Posts: 1587
Name: 
Occupation: 
Interests: Burt gummer life ...
Status: 
Offline
Reputation: 
Reputation Points: 1587
"Added by eddie, posted by 410custom "
More on the sliders


Last edited on Sun Mar 27th, 2022 09:32 pm by Eddie Money


____________________


I know my crazy! Do you?
2007 Sport 4door 4x4 4.0L SOHC V6 Ranger
Back To Top PM Quote Reply

 Posted: Sun Mar 27th, 2022 09:37 pm
PM Quote Reply
166th Post
Eddie Money
Member


Joined: Mon Nov 13th, 2017
Posts: 1587
Name: 
Occupation: 
Interests: Burt gummer life ...
Status: 
Offline
Reputation: 
Reputation Points: 1587
"Added by eddie, posted by 410custom "
More on the t case you can see the 4406 fits a ranger perfectly
You can also see why I shave the ears off so we get good clearances all around


____________________


I know my crazy! Do you?
2007 Sport 4door 4x4 4.0L SOHC V6 Ranger
Back To Top PM Quote Reply

 Posted: Sun Mar 27th, 2022 09:40 pm
PM Quote Reply
167th Post
Eddie Money
Member


Joined: Mon Nov 13th, 2017
Posts: 1587
Name: 
Occupation: 
Interests: Burt gummer life ...
Status: 
Offline
Reputation: 
Reputation Points: 1587
"Added by eddie, posted by 410custom "

More of the finished drivers rear, pre leaf spring


Last edited on Sun Mar 27th, 2022 09:41 pm by Eddie Money


____________________


I know my crazy! Do you?
2007 Sport 4door 4x4 4.0L SOHC V6 Ranger
Back To Top PM Quote Reply

 Posted: Thu Mar 31st, 2022 09:18 pm
PM Quote Reply
168th Post
Eddie Money
Member


Joined: Mon Nov 13th, 2017
Posts: 1587
Name: 
Occupation: 
Interests: Burt gummer life ...
Status: 
Offline
Reputation: 
Reputation Points: 1587
"Added by eddie, posted by 410custom "

Update time! Rear suspension is ready to rock and roll, which is good I need to flex it out so I can do final measurements for shocks.

It looks like we will be using a 12" stroke King 3.0 in the back but it might require a 14" stroke depending on how she sits when finally ride height adjusted and aligned in the front. Either way we are going to have to strap this rear to keep from overextending the shocks. There is a lot of action in the shackle as the spring takes the trucks weight.

Daddy like

First things first... I have a ton of pictures to get through!
When we left off I was ready to hang the drivers leaf spring and shackle, final weld the rear axle, finish up the new drop bracket brace, weld up the modified sliders (while the welder it out), final torque the front suspension, adjust camber and toe (preliminary) and install rear end with brakes.........

shop was a mess, but only because parts we no longer need are finally being purged to storage
rear axle in the middle of all the mess...it's all cleaned up now 


we are starting to get an idea of the track width with the plus 2.5" mid travel kit


Turns out the True travel supplied brake lines are too short when turning (no pun)
So some nice Rough Country parts to the rescue, these are for 6" lifted IFS rangers

mounted


retained to coil w zip ties in effort to keep brake line out of coil spring


drivers done, ready for final torque and alignment


passenger similar


perfect length now

Onto rear axle


____________________


I know my crazy! Do you?
2007 Sport 4door 4x4 4.0L SOHC V6 Ranger
Back To Top PM Quote Reply

 Posted: Thu Mar 31st, 2022 09:23 pm
PM Quote Reply
169th Post
Eddie Money
Member


Joined: Mon Nov 13th, 2017
Posts: 1587
Name: 
Occupation: 
Interests: Burt gummer life ...
Status: 
Offline
Reputation: 
Reputation Points: 1587
"Added by eddie, posted by 410custom "

drivers leaf spring and shackle were installed

time for some welding

First up the Superlift drop bracket support brace built from stock parts, custom cut tabs of 1/4" plate and plenty of love


Parts in place for final time, final cutting and fabrication was done, and tack welded.


Sleek!! Small, sleek, easy to clean, simple, strong, serviceable, built from recycled parts..... what's not to love about this?


Removed and final welded


I should have pre heated the torsion bar! This was pointed out to me.... that's okay I know we got some heat into those welds with the 220 mig. Lesson learned
Lots of welding to do on this prototype!


Good practice for when I do the rear axle next

more fab on front support tab


These tabs actually fit up inside the old torsion bar pad structure and transfer the load into the frame at the trans crossmember
We wanted them to be strong..


Parts were wire brushed, cleaned, primed and painted with 3 coats of black enamel


brace complete!
Sun is out


Done and finally installed, bolts on at the lower control arm rear bolt. We added a second smaller bolt for more strength


____________________


I know my crazy! Do you?
2007 Sport 4door 4x4 4.0L SOHC V6 Ranger
Back To Top PM Quote Reply

 Posted: Thu Mar 31st, 2022 09:27 pm
PM Quote Reply
170th Post
Eddie Money
Member


Joined: Mon Nov 13th, 2017
Posts: 1587
Name: 
Occupation: 
Interests: Burt gummer life ...
Status: 
Offline
Reputation: 
Reputation Points: 1587
"Added by eddie, posted by 410custom "

Lets get her rolling

First up we are welding the axle tubes to the center chunk in an effort to keep them from spinning. With heavy truck, heavy foot, big tires and a locker the factory plug welds have been known to let go and you can spin a tube
Welding now can prevent that. Weld 1" at a time, let cool, to prevent warping


moving around the rear axle, spring perches, tubes, and shock mounts were done final


until it is all welded


Axle was then moved outside, cleaned, wire brushed, and cleaned some more. All old paint was removed, welds cleaned, prepped for primer and paint


all this had to be knocked off...crusty


rust eating primer was used and allowed to cure


spring around here, the ice pack was melting.... its long gone now being replaced with green grass!


and maybe a little mud
put that v8 bronco to work! DAILY..... yes my door is blue, long story, this summer she is getting a fresh coat of liner


we wont be using my wheels tires for mock up....at least not like this


____________________


I know my crazy! Do you?
2007 Sport 4door 4x4 4.0L SOHC V6 Ranger
Back To Top PM Quote Reply

 Posted: Thu Mar 31st, 2022 09:33 pm
PM Quote Reply
171st Post
Eddie Money
Member


Joined: Mon Nov 13th, 2017
Posts: 1587
Name: 
Occupation: 
Interests: Burt gummer life ...
Status: 
Offline
Reputation: 
Reputation Points: 1587
"Added by eddie, posted by 410custom "

rear axle was painted from 3 sides, 3 times at least.... 3 coats of black satin enamel


time to go back under the truck for the final time


Spring plates and factory blocks were also painted


rehab rear calipers


time to do the oh so fun 8.8 E brake setup. I have gotten much better at setting these up over the years. When do you enough of them you learn some tricks
whole area cleaned with wire brush and compressed air, don't forget to lube the contact points


This is how I hold the retainer clips, set the shoes in place, hold with one hand, insert clip with the other


in place, time for top spring


fish spring in from one side to the other, staying under the cable adjuster assembly


Here's the shortcut
Use a tool to pull the spring over to the other shoe.... this is the easiest way, takes some pulling for sure


This piece of rod is actually for dropping turkeys into the fryer, but hey at least I found something that worked!
not easy
set in place on the hook and carefully slide tool out. Push spring into pad hook and you are golden


time to setup bottom spring and star adjuster


Done


Make sure you set shoes in proper location on the backing plate, the backing plate has a raised circle that acts as a guide. This ensures your rotor will fit over the brake easily.

Now for the good stuff, rear rotors, calipers, and carbon fiber ceramic brake pads!


next round of parts


rear axle coming along!


____________________


I know my crazy! Do you?
2007 Sport 4door 4x4 4.0L SOHC V6 Ranger
Back To Top PM Quote Reply

 Posted: Thu Mar 31st, 2022 09:37 pm
PM Quote Reply
172nd Post
Eddie Money
Member


Joined: Mon Nov 13th, 2017
Posts: 1587
Name: 
Occupation: 
Interests: Burt gummer life ...
Status: 
Offline
Reputation: 
Reputation Points: 1587
"Added by eddie, posted by 410custom "

4 rotors!! truck supported by springs!


Time to turn attention back to the front suspension, final details before tires!

Starting to look at mounting of limit straps. I picked up some upper adjusters, so we can adjust limits as the straps stretch. Must limit the droop travel to keep the cv axles, tire rod ends, and uniball iupper and lower joints all within travel limits.


7" of shock travel from full compression suspension travel (1/2" past stock bump stop) puts limit strap somewhere in here. (per True travel instructions)


sorry for the dust!

Rock sliders have also been getting some fab


major fab


that can wait until later


____________________


I know my crazy! Do you?
2007 Sport 4door 4x4 4.0L SOHC V6 Ranger
Back To Top PM Quote Reply

 Posted: Thu Mar 31st, 2022 09:39 pm
PM Quote Reply
173rd Post
Eddie Money
Member


Joined: Mon Nov 13th, 2017
Posts: 1587
Name: 
Occupation: 
Interests: Burt gummer life ...
Status: 
Offline
Reputation: 
Reputation Points: 1587
"Added by eddie, posted by 410custom "

Final torque on front suspension so we can mount some wheels and roll her into bay 1 on the lift

so earlier we installed camber shim adjusters on UCA heim joints
It was pointed out to me earlier in the thread that the True Travel kit needs the heim joints threaded basically all the way in to get decent camber readings.
I found this to be true.
A little bit of a pita to remove the upper camber shims/bolts.... remove UCA from mounts, loosen jamb nuts and run them all in....
Done now and we have acceptable camber for a prelim alignment

Jacks were used to bring control arms up and the king coil overs took the weight of the truck, this is somewhere around our final ride height. Lower balljoint/uniball and upper uniball were torqued to 140 ft lbs. Lower control arm and upper camber shims tightened also to 140, CV axle nut torqued to 220.
Ready for tires!


Each time the upper control arm heims need adjusting all of this must be removed, I'm hoping camber and caster are within spec and I wont have to do this again.

Way too far out, all 4 heims were threaded all the way in


better


Heim jamb nuts torqued down, camber shims back in place


____________________


I know my crazy! Do you?
2007 Sport 4door 4x4 4.0L SOHC V6 Ranger
Back To Top PM Quote Reply

 Posted: Thu Mar 31st, 2022 09:43 pm
PM Quote Reply
174th Post
Eddie Money
Member


Joined: Mon Nov 13th, 2017
Posts: 1587
Name: 
Occupation: 
Interests: Burt gummer life ...
Status: 
Offline
Reputation: 
Reputation Points: 1587
Are you all following along? Comment and let me know you like it....

Next update, it will be ROLLIN!!!

Last edited on Fri Apr 1st, 2022 10:56 am by Eddie Money


____________________


I know my crazy! Do you?
2007 Sport 4door 4x4 4.0L SOHC V6 Ranger
Back To Top PM Quote Reply

 Posted: Fri Apr 1st, 2022 09:19 pm
PM Quote Reply
175th Post
Eddie Money
Member


Joined: Mon Nov 13th, 2017
Posts: 1587
Name: 
Occupation: 
Interests: Burt gummer life ...
Status: 
Offline
Reputation: 
Reputation Points: 1587

Last edited on Fri Apr 1st, 2022 09:21 pm by Eddie Money


____________________


I know my crazy! Do you?
2007 Sport 4door 4x4 4.0L SOHC V6 Ranger
Back To Top PM Quote Reply

Current time is 10:38 pm Top Page:  First Page Previous Page  ...  2  3  4  5  6  7  8  9  10  11  12  ...  Next Page Last Page    

Ford-Rangers.com Ranger Forum > Tech Section > Member's Projects Showcase > 410Custom's builds a 2007 Ranger V8 - cu

Users viewing this topic


PHP Version: 8.2.28
Server version: 10.6.22-MariaDB
UltraBB 2.01.01 Copyright © 2008-2025 Jim & Chris
Page processed in 0.1127 seconds (37% database + 63% PHP). 107 queries executed.