Ford-Rangers.com Ranger Forum HomeFord-Rangers.com Ranger Forum Home
Home Recent Topics New posts Search search Menu menu Not logged in - Login | Register

Ford-rangers.com is a discussion forum, a Ranger forum for people who have questions about fixing or modifying
their Ford Rangers or people who just admire their Ranger. Please join and enjoy sharing experiences!

Headlights - Wiring Diagram       #: 2441
 Moderated by: NoPower, Mike69, MaDMaXX,
New Topic Reply
 Rate Topic 
 Posted: Sun Sep 19th, 2021 09:55 pm
PM Quote Reply
1st Post
Scrambler82
Old Bastard !


Joined: Fri Dec 22nd, 2017
Location: California USA
Posts: 2108
Name: Grev B ...
Occupation: Quality Assurance Engineer ...
Interests: Rangers, Photography, Metal Bending ...
Status: 
Offline
Reputation: 
Reputation Points: 2108
Hello to all,   hope all is well !

I just installed my Projector Headlights with Halos and high-output Parking/Directional bulbs.

First my Headlights, high and low beams are backwards, I know I need to change two of the wires.

I need to know the correct way to get the pins out or take apart the connector ?

I can ring out the wires to see what is what but if someone knows please post.

Thanks ahead of time !


____________________
Ltr,
2003 EDGE, Std Cab, Steppie, E4 Red, 5sp, 4x
5" SuperLift, 33" x 12.50 x 15"
Hurst Shifter
Mod'd Backrack to fit Steppie
Front and Rear Bumpers by Custom 4x4 Fabrication, OK; now Mike's Welding and Fabrication.
Working on more Mods, just need more time, longer days would work !
Back To Top PM Quote Reply

 Posted: Sun Sep 19th, 2021 10:57 pm
PM Quote Reply
2nd Post
12° North Industries
SITE SPONSOR


Joined: Thu Nov 23rd, 2017
Location: Las Vegas, Nevada USA
Posts: 389
Name: 
Occupation: Vehicle Upfitter ...
Interests: The great outdoors, nature, back to basics ...
Status: 
Offline
Reputation: 
Reputation Points: 389
Should be but... as usual, ford would run out of a color of wire and randomly put something close but no cigar in its place.

 LEFT
Low Beam - light green/black
High Beam - white/light green
Ground - black

RIGHT
Low Beam - light green/black

High Beam - dark blue/light green
Ground - black


____________________
North Industries
Las Vegas, Nevada 89118
Web http://www.12degnorth.com


Back To Top PM Quote Reply

 Posted: Mon Sep 20th, 2021 10:38 am
PM Quote Reply
3rd Post
Scrambler82
Old Bastard !


Joined: Fri Dec 22nd, 2017
Location: California USA
Posts: 2108
Name: Grev B ...
Occupation: Quality Assurance Engineer ...
Interests: Rangers, Photography, Metal Bending ...
Status: 
Offline
Reputation: 
Reputation Points: 2108
12° North Industries wrote:
Should be but... as usual, ford would run out of a color of wire and randomly put something close but no cigar in its place.

 LEFT
Low Beam - light green/black
High Beam - white/light green
Ground - black

RIGHT
Low Beam - light green/black

High Beam - dark blue/light green
Ground - black

Thanks for the wiring list, that helps and shortens the task ahead.

12o , 
Do you happen to know if the pins come out of the socket or do I need to cut and paste wiring ?


____________________
Ltr,
2003 EDGE, Std Cab, Steppie, E4 Red, 5sp, 4x
5" SuperLift, 33" x 12.50 x 15"
Hurst Shifter
Mod'd Backrack to fit Steppie
Front and Rear Bumpers by Custom 4x4 Fabrication, OK; now Mike's Welding and Fabrication.
Working on more Mods, just need more time, longer days would work !
Back To Top PM Quote Reply

 Posted: Mon Sep 20th, 2021 11:02 am
PM Quote Reply
4th Post
Tsquare
Member


Joined: Fri Nov 10th, 2017
Location: Suwanee, Georgia USA
Posts: 1540
Name: 
Occupation: Controlled Insanity ...
Interests: 
Status: 
Offline
Reputation: 
Reputation Points: 1540
If they are the round pins you will need a tool that will slip over the pin. It will be slightly larger than the pin and it will depress the catch. The tool has a plunger so that you can push the pin out of the housing. You do not want to pull the wire.

If they are the flat pins you can take a small spring hook and reach around the catch to hold it down. I also recommend pushing the male pin out and not pulling on the wire. 

I have seen the wires cut, swapped, and soldered then covered with  heat shrink because they couldn't get the pins out.  (last resort)


____________________
Tony
NE ATL
'04 XLT regular cab 3.slo stepside
Semi retirement
Back To Top PM Quote Reply

 Posted: Tue Sep 21st, 2021 12:21 pm
PM Quote Reply
5th Post
12° North Industries
SITE SPONSOR


Joined: Thu Nov 23rd, 2017
Location: Las Vegas, Nevada USA
Posts: 389
Name: 
Occupation: Vehicle Upfitter ...
Interests: The great outdoors, nature, back to basics ...
Status: 
Offline
Reputation: 
Reputation Points: 389
Scrambler82 wrote:
12° North Industries wrote:

Should be but... as usual, ford would run out of a color of wire and randomly put something close but no cigar in its place.

 LEFT
Low Beam - light green/black
High Beam - white/light green
Ground - black

RIGHT
Low Beam - light green/black

High Beam - dark blue/light green
Ground - black

Thanks for the wiring list, that helps and shortens the task ahead.

12o , 
Do you happen to know if the pins come out of the socket or do I need to cut and paste wiring ?


All Connectors with very limited few can be un-pinned.

If you're forced into "Cut & Paste", I'd recommend a military splice whether you solder it or not just makes it even better of a splice.

If you wanted to replicate "OUR Anal retentiveness"  I'd suggest spending a few dollars and just source yourself a set of male/female plugs and create a plug & play pigtail, now there's no compromises environment or electrically wise.


Tsquare wrote:
If they are the round pins you will need a tool that will slip over the pin. It will be slightly larger than the pin and it will depress the catch. The tool has a plunger so that you can push the pin out of the housing. You do not want to pull the wire.

If they are the flat pins you can take a small spring hook and reach around the catch to hold it down. I also recommend pushing the male pin out and not pulling on the wire. 

I have seen the wires cut, swapped, and soldered then covered with  heat shrink because they couldn't get the pins out.  (last resort)


https://www.delcity.net/store/Metri!Pack-&-Weather-Pack-Tools/p_804412.h_810949

https://www.delcity.net/store/Metri!Pack-&-Weather-Pack-Tools/p_804412.h_810947

Two best tools ever... for roughly $15 will save you hundreds if not thousands of dollars in headaches and "Oh F&$@ it's!"  Not that we swear in our shop..  nope,.. not us

Last edited on Tue Sep 21st, 2021 12:23 pm by 12° North Industries


____________________
North Industries
Las Vegas, Nevada 89118
Web http://www.12degnorth.com


Back To Top PM Quote Reply

 Posted: Tue Sep 21st, 2021 01:50 pm
PM Quote Reply
6th Post
Scrambler82
Old Bastard !


Joined: Fri Dec 22nd, 2017
Location: California USA
Posts: 2108
Name: Grev B ...
Occupation: Quality Assurance Engineer ...
Interests: Rangers, Photography, Metal Bending ...
Status: 
Offline
Reputation: 
Reputation Points: 2108
I took it to the "Nth" Degree, I cut the wires and reversed them, left the ground alone.
I always make a good mechanical connection before soldering the joint(s), even when I install a connector.
Crimping is OK, but after making sure the crimp is secure I use a Heat Shrink with adhesive in side... SEAL IT UP !
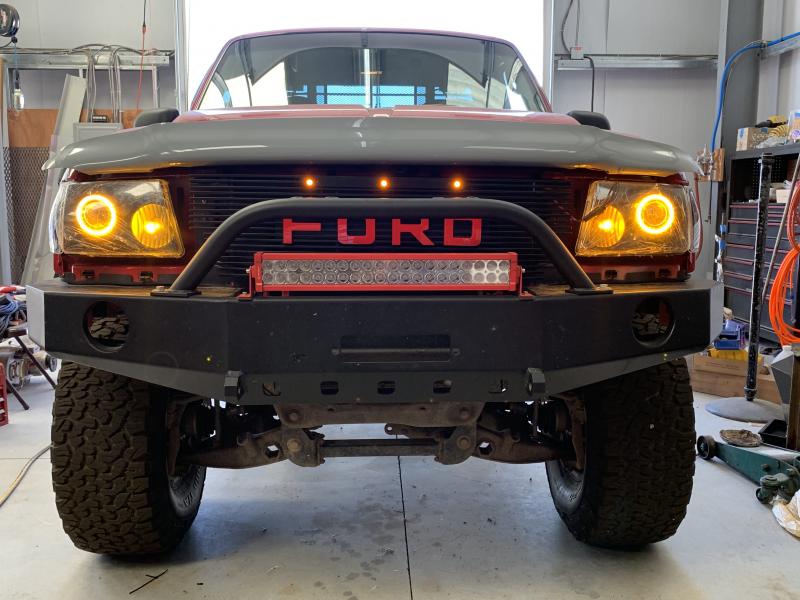
headlights work as they should, need alignment, Parkers work as they should, except once in a while they parking lights turn white, and the Grille Lights work as as they should.

I still need to install the new LED Fog Lights, not projectors but they will do for now...  Thinking Projector but up in the air on which ones to use.

Here is a picture of the front end, things are just sitting there, still need to final touches.
Fog Light holes in the Bumper, location for the Winch, and still need the Skid Plate.


____________________
Ltr,
2003 EDGE, Std Cab, Steppie, E4 Red, 5sp, 4x
5" SuperLift, 33" x 12.50 x 15"
Hurst Shifter
Mod'd Backrack to fit Steppie
Front and Rear Bumpers by Custom 4x4 Fabrication, OK; now Mike's Welding and Fabrication.
Working on more Mods, just need more time, longer days would work !
Back To Top PM Quote Reply

 Posted: Wed Sep 22nd, 2021 08:55 pm
PM Quote Reply
7th Post
Tsquare
Member


Joined: Fri Nov 10th, 2017
Location: Suwanee, Georgia USA
Posts: 1540
Name: 
Occupation: Controlled Insanity ...
Interests: 
Status: 
Offline
Reputation: 
Reputation Points: 1540
Crimping is a future problem.  Solder only.


____________________
Tony
NE ATL
'04 XLT regular cab 3.slo stepside
Semi retirement
Back To Top PM Quote Reply

 Posted: Fri Sep 24th, 2021 01:03 am
PM Quote Reply
8th Post
Scrambler82
Old Bastard !


Joined: Fri Dec 22nd, 2017
Location: California USA
Posts: 2108
Name: Grev B ...
Occupation: Quality Assurance Engineer ...
Interests: Rangers, Photography, Metal Bending ...
Status: 
Offline
Reputation: 
Reputation Points: 2108
Headlights are wired and working  the way they should.

Thanks to all that posted.

On to Horns and DRLs (Grille Lights and Halos) !


____________________
Ltr,
2003 EDGE, Std Cab, Steppie, E4 Red, 5sp, 4x
5" SuperLift, 33" x 12.50 x 15"
Hurst Shifter
Mod'd Backrack to fit Steppie
Front and Rear Bumpers by Custom 4x4 Fabrication, OK; now Mike's Welding and Fabrication.
Working on more Mods, just need more time, longer days would work !
Back To Top PM Quote Reply

Current time is 01:45 am Top  

Ford-Rangers.com Ranger Forum > Tech Section > Electrical Tech > Headlights - Wiring Diagram

Users viewing this topic


PHP Version: 8.2.28
Server version: 10.6.21-MariaDB
UltraBB 2.01.01 Copyright © 2008-2025 Jim & Chris
Page processed in 0.0583 seconds (44% database + 56% PHP). 56 queries executed.