TheArcticWolf1911
Gunslinger

Joined: Sat Nov 4th, 2017
Posts: 426
Name: Cameron ... Occupation: Process Technician ... Interests: Firearms & Ammunition, Ford Rangers, electronics ...
Reputation Points: 426

|
If you like to use your truck as a portable music player, chances are you're aware that it's kind of a compromise to do so. You either have to leave the key in 'accessory' and listen to it chime away with your music, or you leave it in 'run' and run down your battery, not to mention leave your keys in the truck.
If these things are not what you want to put up with, but you still want to use your radio when you please, then this mod is for you.
To begin, it's a good idea to know how the circuit works from the factory. The radio has two primary power wires coming off it. In the case of my 1999, the two wires we're concerned about are yellow with black & light green with violet, from here on abbreviated YE/BK and LG/VT, respectively, as per the Ford factory wiring diagram. Your year may yield different colors, so use a test light to find the wires necessary.
LG/VT is hot all the time, regardless of what position the key is in. This wire is truly what powers the radio while it is being used, and what allows it to keep it's memory when turned off.
YE/BK is a trigger wire/signal wire/switched wire, whatever you wish to call it. When this wire is connected to +12, the radio turns on. When +12 is taken away, the radio turns off.
"So, tag a wire onto YE/BK, then?" Not exactly. Although that would work, you would wind up powering everything else on the same circuit, which is not ideal. We need a way to isolate this wire solely to the radio when we want to use it, but allow it to automatically switch back when we're done.
There are two ways to do this, one is relatively simple, the other is harder. Neither has any particular advantage to each other, ignoring difficulty and comes down to preference and what you have available.
I'll cover the easiest way first, which only requires one part: a switch. We need a SPDT style switch, which stands for Single Pole, Double Throw. The wire we're powering draws next to nothing, so current capabilities is not important. These come in a few styles, so pick one you like.
There is one caveat worth mentioning, here however. Some SPDT switches have a center 'off' position. For best results, try to find a switch that does not stay in the center 'off' position. If all you have allows for the center off position, it can be used, but you may be left wondering why your radio isn't working when you turn the key, if its left in the center position. Just be aware of that potential frustration.
Got your switch? Alright, get an iron and let's get cracking. Here is the hilariously simple schematic, probably the second simplest schematic you will see.
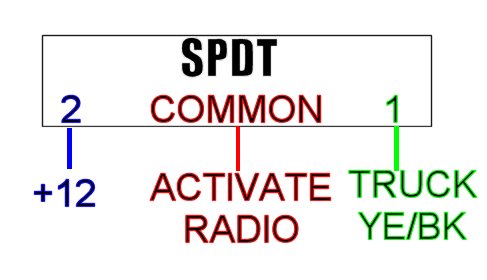
To implement this, take the radio's signal wire that we talked about earlier, and snip it in half. The radio should stay off when the key is turned to either accessory or run. Take the radio end of this wire and extend it to where you want the switch to go. Once you're done, solder on a crimp connector (I showed you how to do this in another how-to, and why you should) and connect it to the switch's center terminal.
Next, extend the truck side of the wire we cut and extend it to the switch as well, using the same procedure. Connect this wire to either the left or right terminal, it does not matter which one and is completely down to your preference.
Now, we're left with one terminal left, and you have a choice to make. The Ranger comes with a battery saver timer, which kills the accessory circuit after a period of time. Mine lasts for 40 minutes before it turns off, but others last for much less time than this.
(To see how long yours lasts, leave a door open and sit around with a timer until it turns off)
The advantage to using the battery saver wire as the source for the remaining terminal is it will kill the radio if your forget it. However, this will also mean it will periodically turn off. If you do not want this, run the wire to one of the +12 wires on either power port. These are on all the time so the radio will never turn off by itself, but this comes with the warning that you must remember to turn it off or drain your battery by forgetting. The choice is yours.
Ok, that was dirt simple, wasn't it? So, what's the other way?
The other way, the way I used, is a bit more complicated. This requires two parts. A normal on/off switch (NOT momentary) and a relay.
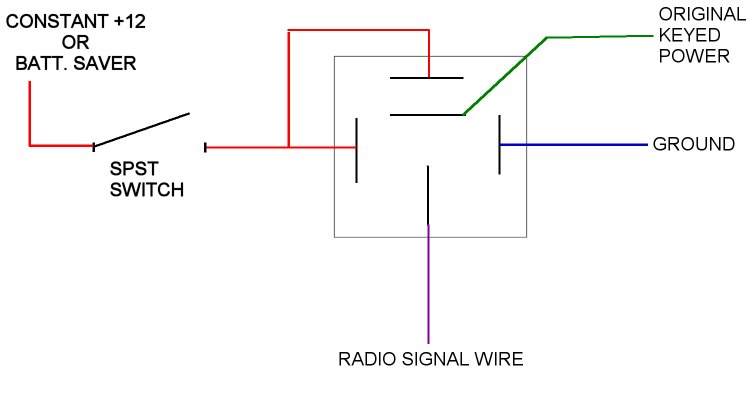
As you can see by the schematic, it's a bit more complicated, but still entirely doable. I highly recommend using a relay socket for this, as it will make connecting the relay much easier, and will expedite the process of replacing the relay if it ever gives up its electromagnetic ghost. Solder and heat shrink should be used on all connections as appropriate.
So, how does this circuit work? As you should know, a relay is a switch, but instead of using a finger to make it work, it uses an electromagnetic coil with moves a set of contacts inside it.
Usually, pin 30 is connected to a +12 source and then 87A and 87 are connected to two different things we wish to power. However, we can use them in reverse to allow two different power sources to power one thing.
Pin 30 is normally connected to pin 87A when the relay is 'OFF'. This is the normal current path, so 87A should be connected to the truck's harness to allow it to be the default choice. When we flip the switch we've chosen, we power the relay's coil allowing it to turn 'ON' and connect pin 30 to pin 87, letting us effectively swap power sources without back feeding power to the rest of the circuit.
Now, you will notice that I have connected pin 86 and 87 together in this circuit. The only reason we can do this is because the circuit we're powering uses such a minute amount of current. When implemented normally, where a low current circuit switches a high current circuit (such as sensors activating engine fans), this is not possible.
The other side of our switch you can see is described as being connected to the battery saver circuit by default. As in the previous method, either a +12 all the time wire can be used or the battery saver with the same results. Again, choice is yours.
Pin 85 connects plainly to ground. This can be done in a few ways. You can use an eyelet connected to a piece of metal OR you can tag onto an existing ground. Again, the choice is yours. There's no major advantage to either approach.
In this setup, the when our new switch is turned ON, the radio should come on and act as normal. When turned OFF, the key should reliably turn the radio on and off in both accessory and run.
This mod is very customizable. Pick any switch you want (so long as it meets the given requirements) and place it where you want.
____________________
1999 Ford Ranger XLT - 3.0 V6 4x4 - Loaded (Totaled) 143k. Rest in Peace, Gold Dust.
|


