| PM | Quote | Reply | Full Topic |
Mustang Nut

Joined: Sun Oct 22nd, 2017
Location: Horsepasture, USA
Posts: 1713
Status:
Offline
Reputation: 
Reputation Points: $user_rep

In this "how to" I am going to explain & show what I did to replace the p/s cooler which is mounted with 2 nuts to the top of the bolts that mount the steering rack to the trucks frame.
All 3 of the Rangers I have had were 4WD & had the Off Road Package & all 3 had the p/s cooler, I do not know if they were only on the 4WD's or only on models that have the towing package.
The only tools I needed were,
standard pliers, 18mm combination box/open end wrench, 1/4" nut driver, & wire cutters.
Imperial p/s cooler pt#-241009 purchased from Advance Auto Parts, & 1 medium sized zip tie I had in the garage.
1) I started by using the 18mm box end of the wrench to remove the 2 retainer nuts so you could pivot the cooler to better get at the spring clamps on the hoses,
2) using the standard pliers I removed the 2 spring clamps from both p/s hoses,
3) removed the old leaking p/s cooler & used a couple old bolts to plug the lines.
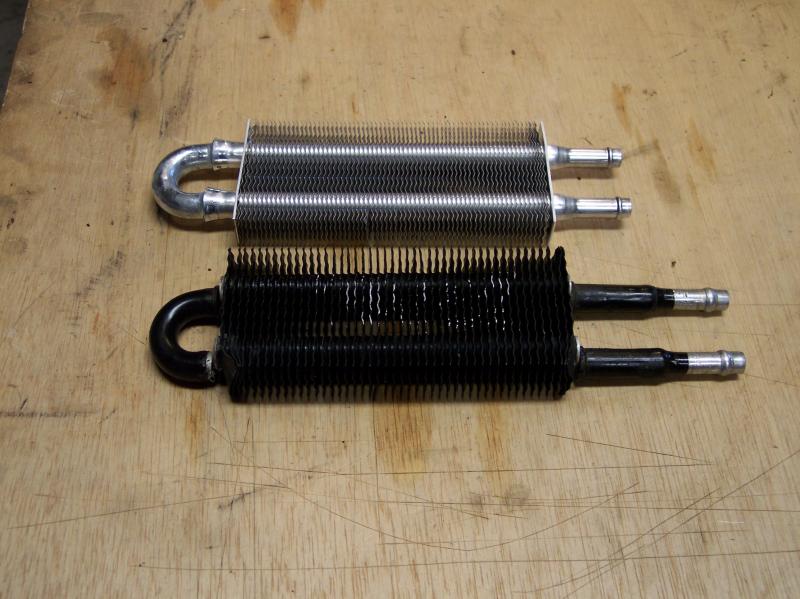
The aftermarket p/s cooler I used is almost the exact same size as the factory one I removed except the inlet & outlet tubes are a little shorter. Here is a picture of the old one on the bottom & the new one on top to show the difference is length.
4) Next I used some sheet steel stock to fab up a new mounting bracket since the old brackets are part of the factory p/s cooler.

5) Install the new p/s cooler into the p/s hoses & lightly tighten the clamps so you can still pivot the cooler.
6) Install the new p/s cooler bracket & use the 18mm wrench to tighten down the mounting nuts.
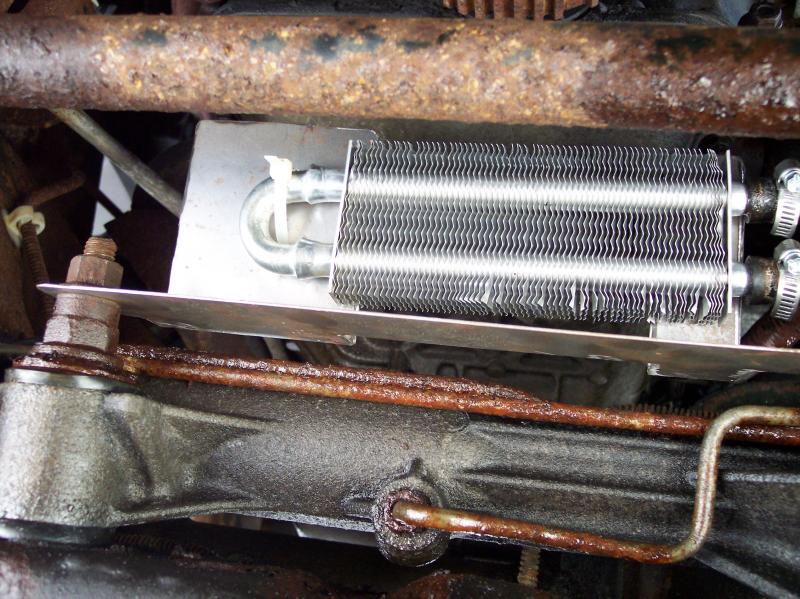
7) Pivot the new p/s cooler to match the mounting bracket & install zip tie through the 2 small drilled holes in the mounting bracket & through the curved end of the cooler opposite the inlet & outlet openings & pull the zip tie tight.
8) Tighten down both hose clamps, fill fluid, start engine, & check for leaks.
Note; depending on how long or how bad the leaks was will determine how much of a mess in under your truck. The steering rack & the frame section under the steering rack were fairly coated with p/s fluid, so I used some brake clean in a disposable spray bottle (or you can buy it in an aerosol can) & clean off the p/s fluid.
9) After cleaning off old p/s fluid run engine again & check again for leaks, or take for a test drive, then recheck for any leaks. Here is a picture of the new p/s cooler mounted, before cleaning off the old fluid.
____________________
21 Bronco Sport Big Bend (Wife's DD)
05 F150 XLT Reg Cab, 2WD, 5.4L, Auto (My DD)
69 Mustang Coupe 5.0, 5 spd 9" rear(Project)
14 Kawasaki Vulcan (Wife's Toy)